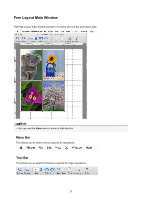
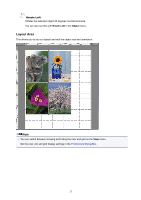
Canon imagePROGRAF TA-20 Guide for Free Layout - Page 22
Fit to Width, Fit Screen, Delete, Align Top, Object, Center Vertically, Align Bottom, Align Left,
 |
View all Canon imagePROGRAF TA-20 manuals
Add to My Manuals
Save this manual to your list of manuals |
Page 22 highlights
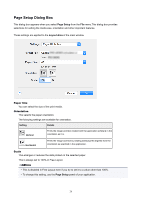
• Tool buttons that can be added Fit to Width You can change the zoom scaling of part of the preview in the selected window so as to fit the width of the printing area of one page. You can also set this with Fit to Width in the View menu. Fit Screen You can change the zoom scaling of part of the preview in the selected window so as to display the entire printing area of one page. You can also set this with Fit Screen in the View menu. Delete Deletes the selected object. You can also execute this with Delete from the Edit menu. Align Top Aligns the selected object at the top position. You can also set this with Align Top in the Object menu. Center Vertically Aligns the selected object vertically in the center. You can also set this with Center Vertically in the Object menu. Align Bottom Aligns the selected object at the bottom position. You can also set this with Align Bottom in the Object menu. Align Left Aligns the selected object at the left position. You can also set this with Align Left in the Object menu. Center Horizontally Aligns the selected object horizontally in the center. You can also set this with Center Horizontally in the Object menu. Align Right Aligns the selected object at the right position. You can also set this with Align Right in the Object menu. Rotate Right Rotates the selected object 90 degrees clockwise. You can also set this with Rotate Right in the Object menu. 22
-
 1
1 -
2
-
3
-
4
-
5
-
6
-
7
-
8
-
9
-
10
-
11
-
12
-
13
-
14
-
15
-
16
-
 17
17 -
 18
18 -
 19
19 -
 20
20 -
 21
21 -
 22
22 -
 23
23 -
 24
24 -
 25
25 -
 26
26 -
 27
27 -
28
-
29
-
30
-
31
-
32
-
33
-
34
-
35
-
36
-
37
-
38
-
39
-
40
-
41
-
42
-
43
 |
 |