Canon imagePROGRAF TA-30 MFP L36ei TA-20 / TA-30 Setup Guide - Page 10
Selecting the Method of Connecting to Your Computer, Configuring Wi-Fi Settings on the Printer
 |
View all Canon imagePROGRAF TA-30 MFP L36ei manuals
Add to My Manuals
Save this manual to your list of manuals |
Page 10 highlights
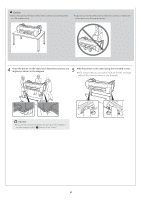
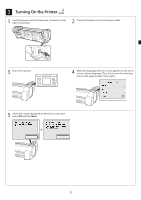
6 Selecting the Method of Connecting to Your Computer When something like the following is displayed on the touch screen, select the connection method. Connect the printer to the network using a LAN cable. Connect the printer to the network wirelessly without using a LAN cable. Connect the printer to a computer using a USB cable. Select this such as when connecting using a fixed IP address. The connection settings and software installation will need to be performed separately. Start the settings from the touch screen of the printer. Important ● Initial filling of the ink (approx. 11-12 minutes) and cleaning are performed during this operation, and the remaining ink level is reduced by this operation. ● Since the included starter ink tanks are for initial installation, it is recommended that you purchase replacement ink tanks quickly. Note that 2 MBK ink tanks are included with this product. A message asking you to install the second MBK ink tank may be displayed after the initial filling. If this happens, remove the ink tank that you first installed and then install the second ink tank. Wired LAN connection 1 Select Wired LAN connection. Check the message about the connection method and select Yes if there are no problems. ●Initial filling of the ink starts. Do not open the covers of the printer or turn the power off while the ink is charging. ● A message prompting you to connect the LAN cable appears. 2 Use the LAN cable to connect the wired LAN connector on the side of the printer to the hub port. Wi-Fi connection 1 Select Wi-Fi connection. Check the message about the connection method and select Yes if there are no problems. ●Initial filling of the ink starts. Do not open the covers of the printer or turn the power off while the ink is charging. ● A message prompting you to set up Wi-Fi connection appears. 2 Select Yes and proceed to "Installing the Software on Your Computer" (p. 10). ● To configure the settings from the printer, select No and proceed to "Configuring Wi-Fi Settings on the Printer Touch Screen" (column below). USB connection 1 Select USB connection. Check the message about the connection method and select Yes if there are no problems. ● Do not connect the USB cable yet. ●Initial filling of the ink starts. Do not open the covers of the printer or turn the power off while the ink is charging. 2 Select OK and proceed to "Installing the Software on Your Computer" (p. 10). 3 Select OK and proceed to "Installing the Software on Your Computer" (p. 10). Configuring Wi-Fi Settings on the Printer Touch Screen Only for Wi-Fi connection 1 Check that the following screen appears and select OK. 2 Select the connection method. 3 Configure the settings by following the instructions on the screen. ● When the home screen appears and (network) appears, the Wi-Fi settings are complete. Note ● If any of Checking the nozzle, Preparing the ink system, or Cleaning... is displayed, the printer initial settings are not finished. Wait until the above screen appears. 4 Proceed to "Installing the Software on Your Computer" (p. 10). 9
-
 1
1 -
2
-
3
-
4
-
 5
5 -
 6
6 -
 7
7 -
 8
8 -
 9
9 -
 10
10 -
 11
11 -
 12
12 -
 13
13 -
 14
14 -
 15
15 -
16
-
17
-
18
-
19
-
20
-
21
-
22
-
23
-
24
-
25
-
26
-
27
-
28
-
29
-
30
-
31
-
32
-
33
-
34
-
35
-
36
-
37
-
38
-
39
-
40
-
41
-
42
-
43
-
44
-
45
-
46
-
47
-
48
-
49
 |
 |
