Canon imageRUNNER ADVANCE C2230 imageRUNNER ADVANCE C2200 Srs Before Using thi - Page 33
Lower Right Cover of the Main Unit
 |
View all Canon imageRUNNER ADVANCE C2230 manuals
Add to My Manuals
Save this manual to your list of manuals |
Page 33 highlights
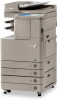
1 Output Tray Prints and copies are output to this tray. 2 Control Panel Includes the keys, touch panel display, and indicators required for operating the machine. 3 Feeder Originals placed in the feeder are fed one sheet at a time to the platen glass for scanning. 4 USB Port (1) USB port to connect USB memory, external hard disks, and other devices to the machine. 5 Upper Right Cover of the Main Unit Open this cover when clearing a paper jam inside the main unit. 6 LAN Port Use an Ethernet cable to connect the machine to a network. 7 USB Port (2) Use the USB port to connect external hard disks and other devices to the machine. You can also connect the machine to a computer using a USB cable. 8 Lower Right Cover of the Main Unit Open this cover when clearing a paper jam inside the main unit. 9 Multi-Purpose Tray Use the multi-purpose tray to feed paper manually, and for loading nonstandard paper stock, such as envelopes. 10 Paper Drawer's Upper Right Cover Open this cover when clearing a paper jam inside the main unit. 11 Paper Drawer 2 Holds up to 550 sheets of paper (21 lb bond (80 g/m2)) 12 Paper Drawer 1 Holds up to 520 sheets of paper (21 lb bond (80 g/m2)). 13 Main Power Switch Press to the "I" side to turn the power ON. 14 Waste Toner Container Waste toner accumulates here. 15 LINE 2 Use this port to connect the Super G3 2nd Line Fax Board to the machine. 16 LINE 1 Use this port to connect a fax line to the machine. 31
-
 1
1 -
2
-
3
-
4
-
5
-
6
-
7
-
8
-
9
-
10
-
11
-
12
-
13
-
14
-
15
-
16
-
17
-
18
-
19
-
20
-
21
-
22
-
23
-
24
-
25
-
26
-
27
-
 28
28 -
 29
29 -
 30
30 -
 31
31 -
 32
32 -
 33
33 -
 34
34 -
 35
35 -
 36
36 -
 37
37 -
 38
38 -
39
-
40
-
41
-
42
-
43
-
44
-
45
-
46
-
47
-
48
-
49
-
50
-
51
-
52
-
53
-
54
-
55
-
56
 |
 |
