Carvin S400D Instruction Manual - Page 3
Options &, Usage Tips
 |
View all Carvin S400D manuals
Add to My Manuals
Save this manual to your list of manuals |
Page 3 highlights
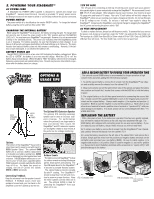
5. POWERING YOUR STAGEMATE™ AC POWER CORD A detachable AC POWER CORD supplied is designed to operate and charge your StageMate™. Securely insert the cord. Use only a grounded "3" prong" power source. No attempt should ever be made to defeat or use the amp without the ground connected. POWER SWITCH The power switch is to be utilized as the master ON/OFF switch. To charge the internal battery, plug the unit in and turn this switch "ON". CHARGING THE INTERNAL BATTERY While using the StageMate™ on AC power, the battery is being charged. To charge while not using be sure to leave the power switch in the "ON" position and turn the MASTER LEVEL to 0. You may leave your StageMate™ on overnight. However, it is not recommended to keep on for extended periods. The power LED indicates when the StageMate's power is on or charging. For battery operation, be sure that the battery is fully charged. It can take up to 8 hours to recharge a dead battery (with dual batteries up to 16 hours). The maintenance-free lead acid battery does not have memory conditioning. However, if the battery is kept discharged, it can shorten the battery's life. BATTERY STATUS LED The BATTERY STATUS LED is a two color LED indicating the battery voltage level. When the LED is "GREEN", the battery is at or very near full charge. When the LED is "off" the battery has a normal charge. When the LED is "RED" the battery will need to be recharged. Reducing volume levels will extend battery time. The unit may become intermittent in operation when the battery has a low charge. 12V DC JACK The 12V jack is for connecting an external 12 volt DC power source such as an automobile cigarette lighter to power and partially recharge the StageMate™. We recommend Carvin's C25 12V 25 ft cable adapter. Other adapters may be used, however, they must be at least 16 gauge wire and fused at 10 amps. Your car's 12 volt battery will not fully charge the StageMate™ unless you are running your engine-charging at 14 volts. Do not use this jack if the DC voltage is over 14 volts. Do not use a "wall-wart" type supply to charge the StageMate™. Instead use the StageMate's own internal charger by plugging the StageMate™ into AC power and turning the power switch "ON". AC FUSE REPLACEMENT To check or replace the fuse, always turn off the power switch. To examine the fuse, remove the power cord & place a screwdriver under the "FUSE" cap and pull the fuse holder out. The fuse type is a 250V Slow Blow SB 5 x 20mm rated at 2A for 120V. Only a SLOW BLOW (SB) type fuse will work. The fuse holder has room to store a spare fuse. OPTIONS & USAGE TIPS SS20 SPEAKER STAND MS12 MIC STAND The Optional 810 Extension Speaker The optional 810 matching extension speaker can be used to increase audience coverage. For performances where the person(s) on stage needs to hear and monitor their sound, the StageMate™ and 810 extension speaker can be slightly rotated to face inward at the performer for onstage monitoring. Options The bottom of the StageMate™ has a built in stand insert and is ready to use with Carvin's SS20 Speaker Stand. The optional B400 battery kit is used as a battery replacement or to double your battery running time. CV400 Cover is designed to protect against dust and moisture. The C25 adapter allows you to connect to your 12 volt auto's cigarette lighter. FS22 footswitch remotely switches the effects loop off & on. For hands free speech or singing, use one of Carvin's mic stands: MS15 or MS12 (pictured). Controlling Feedback Keep the mic away from the speaker to avoid feedback. If feedback occurs, move your speakers forward and your mic back so the amplified sound isn't picked up by the mic. Outdoor Events The battery powered StageMate™ is ideal for outdoor events including little league games, beach parties and camping. The Tape/CD inputs allows for the StageMate™ to become a portable Karaoke system. The cabinet features Carvin's durable Duratex™ coating. The StageMate™ should be kept free from dirt and moisture to preserve proper function. Keep the entire cabinet covered when not in use. The optional CV400 is ideal for protecting the StageMate™ from dust when not in use. ADD A SECOND BATTERY TO DOUBLE YOUR OPERATION TIME The optional second B400 battery is recommended for longer operation at high volume levels and when adding the 810 extension speaker. 1. To add the second battery, remove the 4 screws from the StageMates™ rear chassis and carefully remove the chassis from the cabinet. FIG 1 2. Observe the empty slot on the right bottom side of the cabinet and place the battery into position and install the L bracket that comes with the B400 kit to hold the battery in place. 3. The original battery on the left has spare terminals for connecting the second battery. Simply connect the supplied B400 battery wires to the negative and positive terminals on the original battery. Always match negative (-) to negative and positive (+) to positive. Black is used for negative (-) and red for positive (+). Never allow a negative wire or terminal to touch a positive wire or terminal or "sparks will fly" with possible damage to the battery. If in doubt, please call our service department Mon. - Fri. at 800-854-2235. REPLACING THE BATTERY After a few years of use, if you notice your operation time has been greatly reduced, you will need to replace the battery as the cells may have weakened with age. The B400 battery kit is shipped with connecting wires for use as a second battery. If you are replacing your old battery, discard these wires as you will not need them. A) To replace your battery, remove the 4 screws from the StageMate's™ rear chassis and carefully remove the chassis from the cabinet. FIG 1 B) Locate the battery mounted on the left side of the cabinet FIG 2 and remove the L bracket. Simply pull the wires from the positive and negative battery terminals on the old battery and reconnect your new battery (B400). Be sure to match negative (-) to negative and positive (+) to positive. Black is used for negative (-) and red for positive (+). Be sure not to short the battery terminals with a screwdriver or "sparks will fly" with possible damage to the battery. black red -+ red - black + red L bracket black red -+ red - black + red black black FIG 1 Cutaway view second battery FIG 2 Cutaway view L bracket battery connection wires (shipped with B400 kit)
-
 1
1 -
 2
2 -
 3
3 -
 4
4
 |
 |
