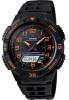
Casio AQS800W-1B2V Operating Guide - Page 3
Stopwatch, Backlight, Alarms - manuals
 |
View all Casio AQS800W-1B2V manuals
Add to My Manuals
Save this manual to your list of manuals |
Page 3 highlights
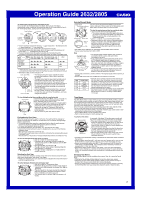
Operation Guide 2632/2805 To recall time memos Level indicator Moon phase indicator Memo number In the Recall Mode, use E (+) and B (-) to scroll through time memos on the display. • For details about the level indicator and the fishing/ hunting time graph, see "To interpret the Fishing/Hunting Time Mode screen". Memo date Memo time Fishing/hunting time graph To delete all time memos In the Recall Mode, hold down A for about two seconds, until CLR flashes on the display. • When you initially press A, CLR appears on the display. Keep A depressed until it starts flashing. • After CLR flashes for about two seconds, the memo number changes to , which indicates that all time memos have been deleted. Alarms Alarm on indicator Hourly time signal on indicator Day of week Timekeeping Alarm Mode time number Alarm time (Hour : Minutes) You can set up to five independent alarms with hour, minutes, and day of the week. When an alarm is turned on, an alert operation (beep or vibration) is performed when the alarm time is reached. You can also turn on an Hourly Time Signal that causes the watch to beep or vibrate twice every hour on the hour. • There are five alarm screens numbered1 through 5. The Hourly Time Signal screen is indicated by :00 in place of the alarm time. • You can configure alarm time settings and Hourly Time Signal settings in the Alarm Mode, which you enter by pressing D. • When you enter the Alarm Mode, the screen you were viewing when you last exited the mode appears first. Alarm Types The alarm type is determined by the settings you configure, as described below. • Daily alarm Set the hour and minutes for the alarm time. This type of setting causes an alert operation (beep or vibration) to be performed everyday at the time you set. • Weekly alarm Set the hour, minutes, and the day of the week for the alarm time. This type of setting causes an alert operation (beep or vibration) to be performed every week at the time you set, on the day of the week you set. To set an alarm time 1. In the Alarm Mode, use E to display the alarm screen. 2. After you select an alarm, hold down A until the hour setting of the alarm time starts to flash, which indicates the setting screen. • This operation automatically turns on the alarm. 3. Press D to move the flashing in the sequence shown below to select other settings. Hour Minutes Day of week 4. While a setting is flashing, use E (+) or B (-) to change it. • To set an alarm that does not include a day of the week (daily alarm), set --for the day of the week. Press E or B until the --- mark appears (between SAT and SUN) while the day of the week setting is flashing. • When setting the alarm time using the 12-hour format, take care to set the time correctly as a.m. (no indicator) or p.m. (P indicator). 5. Press A to exit the setting screen. Alert Operation The alert operation (beep or vibration) is performed at the preset time for about 10 seconds. • To stop the alert operation, press any button. • The alarm and the Hourly Time Signal alert operations (beep or vibration) are performed in all modes except for the Timekeeping Mode setting screen. • For information about changing the alert type, see "To switch between vibration alert and beeper alert". To test the alert operation In the Alarm Mode, hold down E to perform the currently selected alert operation. To turn an alarm on and off 1. In the Alarm Mode, use E to select an alarm. 2. Press B to toggle it on off (x not displayed). (x displayed) and • In all modes (except for the Timekeeping Mode setting screen), the alarm on indicator is shown for any alarm that is currently turned on. • The alarm on indicator flashes while the alarm is sounding. To turn the Hourly Time Signal on and off 1. In the Alarm Mode, use E to select the Hourly Time Signal (:00). 2. Press B to toggle it on (ydisplayed) and off (ynot displayed). • The Hourly Time Signal on indicator is shown on the display in all modes while the Hourly Time Signal is turned on. Stopwatch Hours Seconds Minutes 1/100 second The stopwatch lets you measure elapsed time, split times, and two finishes. • The display range of the stopwatch is 23 hours, 59 minutes, 59.99 seconds. • The stopwatch continues to run, restarting from zero after it reaches its limit, until you stop it. • The stopwatch measurement operation continues even if you exit the Stopwatch Mode. • Exiting the Stopwatch Mode while a split time is frozen on the display clears the split time and returns to elapsed time measurement. • All of the operations in this section are performed in the Stopwatch Mode, which you enter by pressing D. To measure times with the stopwach Elapsed Time Start Split Time Stop Re-start Stop Clear Start Two Finishes Split Split release ( displayed) Stop Clear Start Split First runner finishes. Display time of first runner. Stop Second runner finishes. Split release Display time of second runner. Clear Backlight The backlight uses an EL (electro-luminescent) panel that causes the entire display to glow for easy reading in the dark. The watch's auto light switch automatically turns on the backlight when you angle the watch towards your face. • The auto light switch must be turned on (indicated by the auto light switch on indicator) for it to operate. • See "Backlight Precautions" for other important information about using the backlight. Auto light switch on indicator To turn on the backlight manually In any mode, press L to illuminate the display for about two seconds. • The above operation turns on the backlight regardless of the current auto light switch setting. About the Auto Light Switch Turning on the auto light switch causes the backlight to turn on for about two seconds, whenever you position your wrist as described below in any mode. Moving the watch to a position that is parallel to the ground and then tilting it towards you more than 40 degrees causes the backlight to turn on. Parallel to ground More than 40° Warning! • Always make sure you are in a safe place whenever you are reading the display of the watch using the auto light switch. Be especially careful when running or engaged in any other activity that can result in accident or injury. Also take care that sudden illumination by the auto light switch does not surprise or distract others around you. • When you are wearing the watch, make sure that its auto light switch is turned off before riding on a bicycle or operating a motorcycle or any other motor vehicle. Sudden and unintended operation of the auto light switch can create a distraction, which can result in a traffic accident and serious personal injury. To turn the auto light switch on and off In the Timekeeping Mode, hold down L for about two seconds to toggle the auto light switch on (AUTO EL displayed) and off (AUTO EL not displayed). • The auto light switch on indicator (AUTO EL ) is on the display in all modes while the auto light switch is turned on. • In order to protect against running down the battery, the auto light switch automatically turns off approximately six hours after you turn it on. Repeat the above procedure to turn the auto light switch back on if you want. 3
-
 1
1 -
 2
2 -
 3
3 -
 4
4 -
 5
5
 |
 |
