Casio CTK700 User Guide - Page 29
Looking Up a Chord Using the, Chord Book
 |
View all Casio CTK700 manuals
Add to My Manuals
Save this manual to your list of manuals |
Page 29 highlights
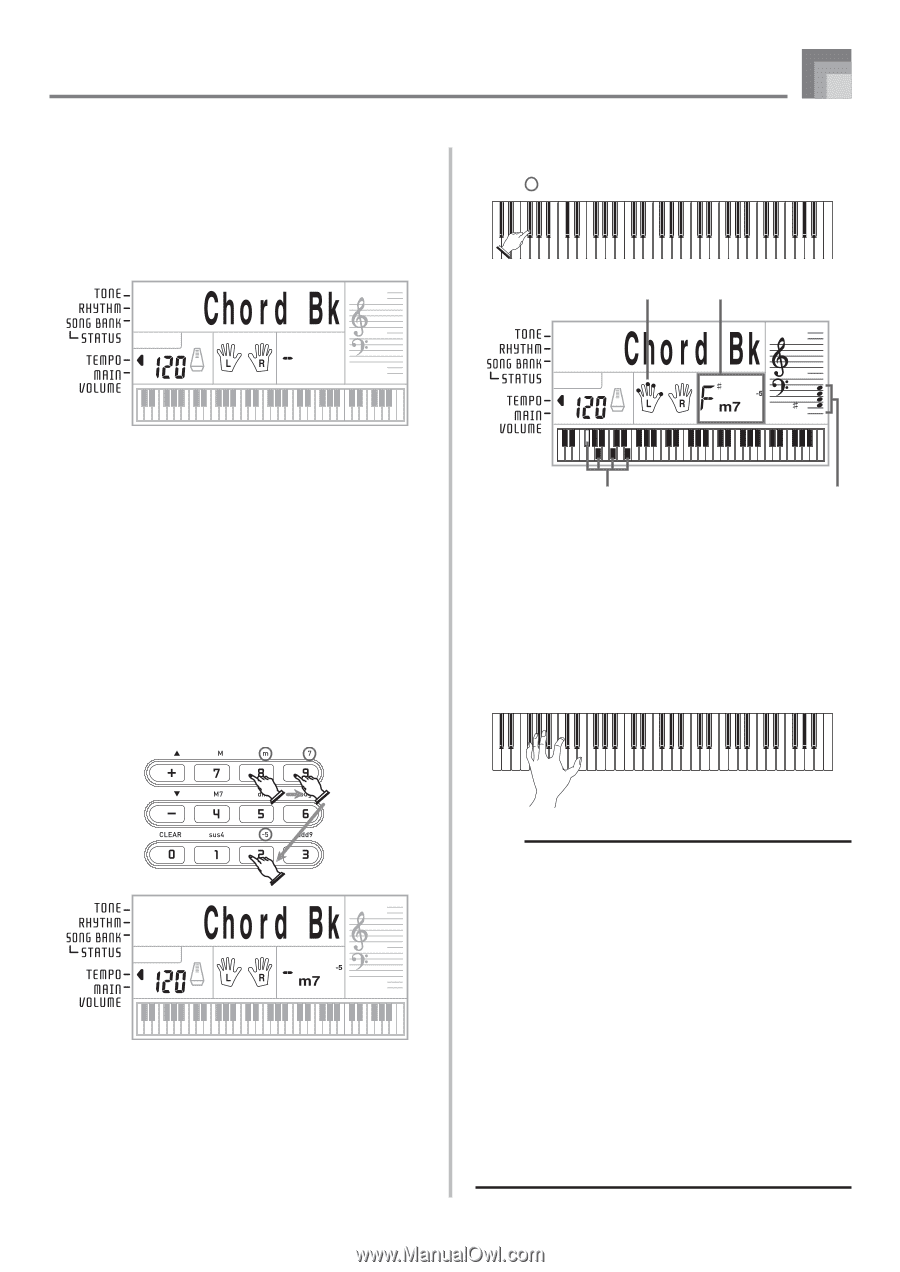
Using the Chord Book Looking Up a Chord Using the Chord Book 1 Press the CHORD BOOK button to enter the Chord Book mode. CE FAB CE C D EF G A BCD EF Fingers used Chord name 2 Press the CLEAR button. • This step is necessary to clear any previously input chord name. 3 If the chord name you plan to input is a non-major chord, use the chord specification buttons to specify the chord type. • Chord types are indicated by the small letters above the chord specifications buttons. • Non-major chords include minor, seventh, sustained, etc. chords. • See page E-28 for details on the chord specification buttons. • Skip step 3 if you want to input a major chord name. Keyboard keys used Staff display 5 Check to make sure that the chord name on the display is the one you want. If it isn't, repeat the above from step 2. 6 If the chord is correct, you can see its fingering on the graphic keyboard. Try playing the chord on the keyboard. 4 Press the accompaniment keyboard key that corresponds to the root note of the chord. • A dash appears in place of the chord name if the chord cannot be recognized by the keyboard. • To specify F , for example, press the F key. • The key you press is indicated on the graphic keyboard and the corresponding chord sounds. 627A-E-029A NOTE • The fingering that appears on the display is one standard fingering. You can also use other fingerings to match the size of your hands or to make it easier to progress from or to neighboring chords. • You can also use the [+] and [-] buttons to change the displayed chord name. • The tone used to sound chords you play on the accompaniment keyboard while using the Chord Book is the same tone used by the accompaniment part of the rhythm that was selected before you entered the Chord Book mode. Depending on the rhythm that was selected, some of the notes that make up a chord may be omitted when you play the chord on the accompaniment keyboard in the Chord Book Mode. This is due to the internal chord conversion function, arrangements, and polyphony limitations. Because of this, you should always play the chords indicated on the display on the melody keyboard (the range that does not have chord names printed above the keys). E-27
-
 1
1 -
2
-
3
-
4
-
5
-
6
-
7
-
8
-
9
-
10
-
11
-
12
-
13
-
14
-
15
-
16
-
17
-
18
-
19
-
20
-
21
-
22
-
23
-
 24
24 -
 25
25 -
 26
26 -
 27
27 -
 28
28 -
 29
29 -
 30
30 -
 31
31 -
 32
32 -
 33
33 -
 34
34 -
35
-
36
-
37
-
38
-
39
-
40
-
41
-
42
-
43
-
44
-
45
 |
 |