Casio EXILIM EX User Guide - Page 125
To view images you copied to your computer, Double-click the copied DCIM folder to open it.
 |
UPC - 079767683559
View all Casio EXILIM EX manuals
Add to My Manuals
Save this manual to your list of manuals |
Page 125 highlights
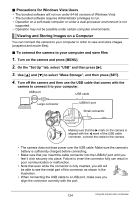
5. Turn on the camera. 6. Copy images to your computer. Windows XP 1Select "Open folder to view files" and then click "OK". 2Drag the "DCIM" folder to your Windows desktop to copy it. Windows Vista 1Select "Open folder to view files". 2Drag the "DCIM" folder to your Windows desktop to copy it. Windows 2000 1Double-click "My Computer". 2Double-click "Removable Disk". 3Drag the "DCIM" folder to your Windows desktop to copy it. 7. After you finish copying images, disconnect the camera from the computer. Windows Vista, Windows XP On the camera, press [ON/OFF] to turn off the camera. After making sure that the back lamp is unlit, disconnect the camera from the computer. Windows 2000 Click card services in the task tray on your computer screen, and disable the drive number assigned to the camera. Next, on the camera, press [ON/OFF] to turn off the camera. After making sure that the back lamp is unlit, disconnect the camera from the computer. . To view images you copied to your computer 1. Double-click the copied "DCIM" folder to open it. 2. Double-click the folder that contains the images you want to view. 3. Double-click the image file you want to view. • For information about file names, see "Memory Folder Structure" on page 135. • An image that was rotated on the camera will be displayed on your computer screen in its original (unrotated) orientation. 125 Using the Camera with a Computer
-
 1
1 -
2
-
3
-
4
-
5
-
6
-
7
-
8
-
9
-
10
-
11
-
12
-
13
-
14
-
15
-
16
-
17
-
18
-
19
-
20
-
21
-
22
-
23
-
24
-
25
-
26
-
27
-
28
-
29
-
30
-
31
-
32
-
33
-
34
-
35
-
36
-
37
-
38
-
39
-
40
-
41
-
42
-
43
-
44
-
45
-
46
-
47
-
48
-
49
-
50
-
51
-
52
-
53
-
54
-
55
-
56
-
57
-
58
-
59
-
60
-
61
-
62
-
63
-
64
-
65
-
66
-
67
-
68
-
69
-
70
-
71
-
72
-
73
-
74
-
75
-
76
-
77
-
78
-
79
-
80
-
81
-
82
-
83
-
84
-
85
-
86
-
87
-
88
-
89
-
90
-
91
-
92
-
93
-
94
-
95
-
96
-
97
-
98
-
99
-
100
-
101
-
102
-
103
-
104
-
105
-
106
-
107
-
108
-
109
-
110
-
111
-
112
-
113
-
114
-
115
-
116
-
117
-
118
-
119
-
 120
120 -
 121
121 -
 122
122 -
 123
123 -
 124
124 -
 125
125 -
 126
126 -
 127
127 -
 128
128 -
 129
129 -
 130
130 -
131
-
132
-
133
-
134
-
135
-
136
-
137
-
138
-
139
-
140
-
141
-
142
-
143
-
144
-
145
-
146
-
147
-
148
-
149
-
150
-
151
-
152
-
153
-
154
-
155
-
156
-
157
-
158
-
159
-
160
-
161
-
162
-
163
-
164
-
165
-
166
-
167
-
168
-
169
-
170
-
171
-
172
-
173
-
174
-
175
-
176
-
177
-
178
-
179
-
180
-
181
-
182
-
183
-
184
-
185
 |
 |
