Casio YC-430 Quick Guide - Page 2
YC-430 Modes, Changing the Startup Mode, Using the Business Document Startup Mode, Using the Multi - multi functional
 |
View all Casio YC-430 manuals
Add to My Manuals
Save this manual to your list of manuals |
Page 2 highlights
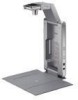
YC-430 Modes PJ Camera Software has two startup modes: a Business Document startup mode BD and a Multi PJ startup mode MP . The startup mode you are using determines the functions available to you when you start up PJ Camera Software. Document Camera Mode BD MP Document camera functions are for projecting images of documents and threedimensional objects. Select the Business Document startup mode when you want to limit PJ Camera Software operation to these functions. When you need more precise control over document camera functions or when you need to use other functions, select the Multi PJ startup mode. Scanner Mode MP The Scanner Mode provides high-speed scanning operations for everything from thick objects to documents. This mode is great when you need to digitize a large number of document pages. Camera Image Mode MP The Camera Image Mode lets you project images recorded with the PJ Camera and stored in the PJ Camera memory. PC Image Mode MP The PC Image Mode lets you project images that are stored on your computer. Board Area Capture/Projection Area Capture MP After you project an image onto a whiteboard and add handwritten notes with a marker, you can record the image along with the handwritten notes to a new image. These functions come in handy when you need to record the progress or the results of a meeting. Changing the Startup Mode You can select either Business Document or Multi PJ as the PJ Camera Software startup mode on the screen that appears when you start up the software. You also can use the following procedure to change the startup mode while PJ Camera Software already running. Changing the startup mode 1 Move the mouse pointer to the top edge of your computer screen so the operation bar appears. You can find out the currently selected startup mode by checking the operation bar. If you see this: It means this startup mode is selected: Business Document startup mode Multi PJ startup mode 2 On the operation bar, click [Tools] and then [Operating Environment]. 3 On the operating environment dialog box that appears, click the [Display Startup Dialog Box] button. This will cause the Startup Mode dialog box to appear. 4 Select "Business Document Mode" or "Multi PJ Mode" and then click [OK]. This will switch to the startup mode you selected. Using the Business Document Startup Mode Document Camera Mode: To project the image of a document or 3-dimensional object Document Camera 1 Place the document onto the document stage. ● To re-project an image Use your keyboard's left and right arrow keys to scroll through recorded images to project them. ● To enlarge small-size text Click [Zoom In] button. To reduce the size of the text, click [Zoom Out] . You also can scroll images using [Scroll] . The image that appears on your computer screen is called the monitor image. ● To rotate an image Click [Rotate Left] and [Rotate Right] . 2 Click [Shutter] . This will project an image of the document. ★ Make sure that the subject you are shooting is illuminated sufficiently. ★ Take care so illumination of the subject is not blocked by the YC-430 stand. ★ When placing the document or object onto the document stage, make sure it is positioned so it covers the cross (+) mark on the stage. 3 To project the image of another document, replace the document on the document stage and then click [Shutter] . ● To save the projected image On the operation bar, select [File] and then [Save], and then specify the file save destination and the file name. Business Document Startup Mode Operation Bar The operation bar appears whenever you move the mouse pointer to the top edge of your computer screen. The projected image, which is the image data recorded by the PJ Camera, is the document camera image. Refer to Chapter 2 of the PJ Camera Software User's Guide. DocumPernetsCenatmaZetioroaonm Zoom In OSuctroll Rotate RRiogthatte LePftroject MTornapiteozroImiSdahCguoettrerer ction Using the Multi PJ Startup Mode (1) Scanner Mode: To save images as image data on your computer Scanner 1 Click [Scanner] to enter the Scanner Mode. 2 Place the document whose image you want to save onto the document camera's document stage. 3 On the scanner window, click [Start] to start recording images. An image is recorded automatically whenever you replace the document on the document stage. Scanner window Thumbnail of the recorded image A new thumbnail is added at the top of the preview list area whenever a document is scanned. 4 To stop automatic scanning, click [Stop] . Refer to Chapter 2 of the PJ Camera Software User's Guide. Multi PJ Startup Mode Operation Bar ProjectionBoAarredaACraDepaotucCuraempteunrPteCCaImmaegCraeameraSImcaangnePerresentaStiaovne Zoom Zoom In OSuctroll Fit ImagReotate RRiogthatte LSefptecifyCCoornretocutBrBarcigkhtnFeosrsward Full ScrTereanpe/ zFouiSldlmSCacolrrlerDee3nocDtcOiuoOfmnfbejenSctthutter Quit Document Camera Mode: To project the image of a document or 3-dimensional object Document Camera Selecting the document camera function while Multi PJ is specified as the startup mode, the PJ Camera Software will switch the document camera image automatically whenever you change the document page on the document stand (under initial settings). You also can use the operation bar to change the following settings. Tool Button Subject Document (A4 size and larger) Business card and smaller document 3D objects, etc. Small 3D objects (Small Document) OFF (Default) ON OFF (Default) ON (3D Object) OFF (Default) OFF (Default) ON ON Refer to Chapter 2 of the PJ Camera Software User's Guide.
-
 1
1 -
 2
2
 |
 |
