Celestron 114LCM Computerized Telescope Quick Setup Guide for 76 and 114LCM (E - Page 1
Celestron 114LCM Computerized Telescope Manual
 |
View all Celestron 114LCM Computerized Telescope manuals
Add to My Manuals
Save this manual to your list of manuals |
Page 1 highlights
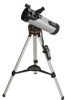
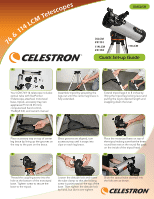
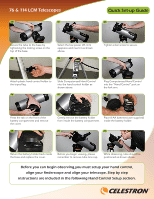
& 114 LCM Telescopes 1 2 ENGLISH 76LCM #31151 114LCM #31150 114LCM Quick Set-up Guide 3 7 6 Your LCM 76/114 telescope includes: optical tube with StarPointer finderscope attached, motorized base, tripod, accessory tray, two eyepieces (9 mm & 25 mm), computerized hand control, TheSkyX CD, and owner's manual 4 Assemble tripod by spreading the legs out until the center leg brace is fully extended. 5 Extend tripod legs 6 to 8 inches by lifting the tripod leg locking lever and pulling the leg to desired length and snapping down the lever. 6 Place accessory tray on top of center leg brace by lining up the grooves on the tray to the post on the brace. Once grooves are aligned, turn accessory tray until it snaps into clips on each leg brace. 7 8 Place the motorized base on top of the tripod making sure that the three round feet rest on the round flat pads on the inside of the tripod head. 9 Coupling screw Thread the coupling screw into the hole at the bottom of the motorized base. Tighten screw to secure the base to the tripod. Loosen the altitude lock and rotate the tube clamp so that the locking screw is positioned on the top of the base. Then tighten the altitude lock by hand, but don't over tighten. Slide the optical tube dovetail into the fork arm as shown.
-
 1
1 -
 2
2
 |
 |
