Celestron CGE PRO 1100 HD Computerized Telescope CGE Pro Series Manual - Page 9
Attaching the Motor Cables, Installing the Counterweight Bar, Installing the Counterweight
 |
View all Celestron CGE PRO 1100 HD Computerized Telescope manuals
Add to My Manuals
Save this manual to your list of manuals |
Page 9 highlights
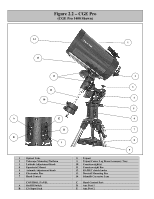
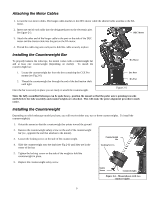
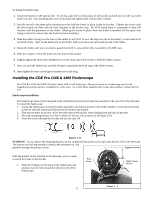
Attaching the Motor Cables 1. Locate the two motor cables. The longer cable attaches to the DEC motor while the shorted cable attaches to the RA motor. 2. Insert one end of each cable into the designated port on the electronic pier. See figure 2-5. DEC Motor 3. Attach the other end of the longer cable to the port on the side of the DEC motor and the shorter cable into the port on the RA motor. 4. Thread the cable ring onto each port to hold the cable securely in place. Installing the Counterweight Bar To properly balance the telescope, the mount comes with a counterweight bar and at least one counterweight (depending on model). To install the counterweight bar: RA Motor 1. Locate the counterweight bar from the box containing the CGE Pro mount (see Fig 2-6). 2. Thread the counterweight bar through the end of the declination shaft until tight. Once the bar is securely in place you are ready to attach the counterweight. Dec Port RA Port Figure 2-5 Since the fully assembled telescope can be quite heavy, position the mount so that the polar axis is pointing towards north before the tube assembly and counterweights are attached. This will make the polar alignment procedure much easier. Installing the Counterweight Depending on which telescope model you have, you will receive either one, two or three counterweights. To install the counterweight(s): 1. Orient the mount so that the counterweight bar points toward the ground 2. Remove the counterweight safety screw on the end of the counterweight bar (i.e., opposite the end that attaches to the mount). 3. Loosen the locking screw on the side of the counterweight. 4. Slide the counterweight onto the shaft (see Fig 2-6) until they are in the center of the bar. Counterweight Bar Locking Screws 5. Tighten the locking screw on the side of the weight to hold the counterweight in place. 6. Replace the counterweight safety screw. Safety Screw Counterweights Figure 2-6 - Mount shown with two counterweights 9
-
 1
1 -
2
-
3
-
 4
4 -
 5
5 -
 6
6 -
 7
7 -
 8
8 -
 9
9 -
 10
10 -
 11
11 -
 12
12 -
 13
13 -
 14
14 -
15
-
16
-
17
-
18
-
19
-
20
-
21
-
22
-
23
-
24
-
25
-
26
-
27
-
28
-
29
-
30
-
31
-
32
-
33
-
34
-
35
-
36
-
37
-
38
-
39
-
40
-
41
-
42
-
43
-
44
-
45
-
46
-
47
-
48
-
49
-
50
-
51
-
52
-
53
-
54
-
55
-
56
-
57
-
58
-
59
-
60
-
61
-
62
-
63
-
64
-
65
-
66
-
67
-
68
-
69
-
70
-
71
-
72
 |
 |
