Celestron CGE Pro 1400 Computerized Telescope CGE Pro Series Manual - Page 10
Attaching the Optical Tube to the Mount, Attaching the Visual Back
 |
View all Celestron CGE Pro 1400 Computerized Telescope manuals
Add to My Manuals
Save this manual to your list of manuals |
Page 10 highlights
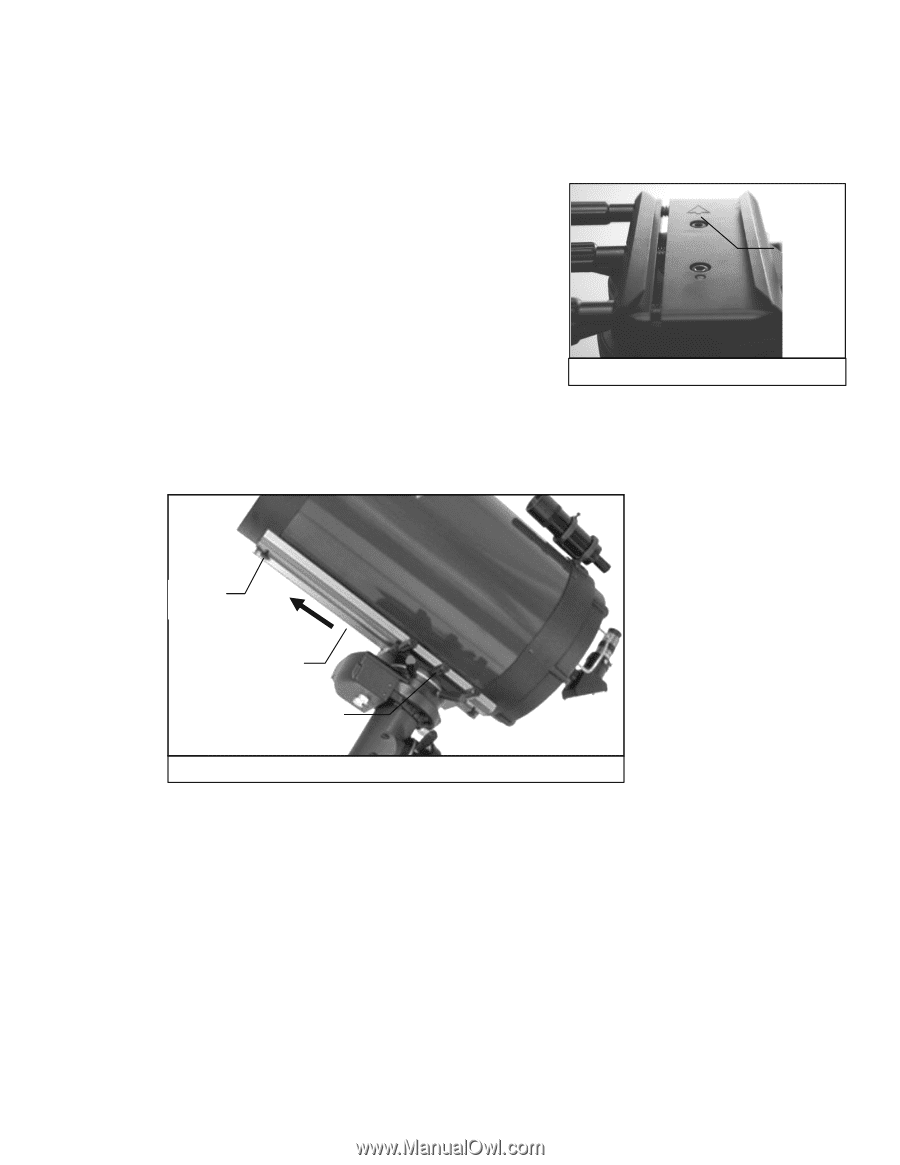
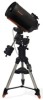
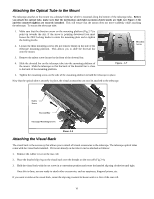
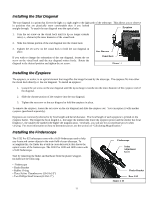
Attaching the Optical Tube to the Mount The telescope attaches to the mount via a dovetail slide bar which is mounted along the bottom of the telescope tube. Before you attach the optical tube, make sure that the declination and right ascension clutch knobs are tight (see Figure 2-14) and the counterweight(s) are securely installed. This will ensure that the mount does not move suddenly while attaching the telescope. To mount the telescope tube: 1. Make sure that the direction arrow on the mounting platform (Fig 2-7) is point up towards the sky. If the arrow is pointing downward you must loosen the DEC locking knobs to rotate the mounting plate and re-tighten the locking knobs. 2. Loosen the three mounting screws (do not remove them) on the side of the telescope mounting platform. This allows you to slide the dovetail bar onto the mount. Direction Arrow 3. Remove the safety screw located at the front of the dovetail bar. 4. Slide the dovetail bar on the telescope tube into the mounting platform of the mount. Slide the telescope so that the back of the dovetail bar is close to the back of the mounting platform. Figure - 2-7 5. Tighten the mounting screw on the side of the mounting platform to hold the telescope in place. Now that the optical tube is securely in place, the visual accessories can now be attached to the telescope. Safety Screw Dovetail Bar Telescope Mounting Screws Figure 2-8 Attaching the Visual Back The visual back is the accessory that allows you to attach all visual accessories to the telescope. The telescope optical tubes come with the visual back installed. If it is not already on the tube it can be attached as follows: 1. Remove the rubber cover on the rear cell. 2. Place the knurled slip ring on the visual back over the threads on the rear cell (Fig 2-9). 3. Hold the visual back with the set screw in a convenient position and rotate the knurled slip ring clockwise until tight. Once this is done, you are ready to attach other accessories, such as eyepieces, diagonal prisms, etc. If you want to remove the visual back, rotate the slip ring counterclockwise until it is free of the rear cell. 10
-
 1
1 -
2
-
3
-
4
-
 5
5 -
 6
6 -
 7
7 -
 8
8 -
 9
9 -
 10
10 -
 11
11 -
 12
12 -
 13
13 -
 14
14 -
 15
15 -
16
-
17
-
18
-
19
-
20
-
21
-
22
-
23
-
24
-
25
-
26
-
27
-
28
-
29
-
30
-
31
-
32
-
33
-
34
-
35
-
36
-
37
-
38
-
39
-
40
-
41
-
42
-
43
-
44
-
45
-
46
-
47
-
48
-
49
-
50
-
51
-
52
-
53
-
54
-
55
-
56
-
57
-
58
-
59
-
60
-
61
-
62
-
63
-
64
-
65
-
66
-
67
-
68
-
69
-
70
-
71
-
72
 |
 |