Celestron CGEM DX 1100 HD Computerized Telescope CGEM DX Mount Manual - Page 5
Assembly
 |
View all Celestron CGEM DX 1100 HD Computerized Telescope manuals
Add to My Manuals
Save this manual to your list of manuals |
Page 5 highlights
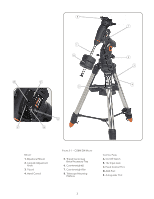
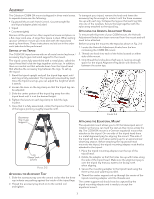
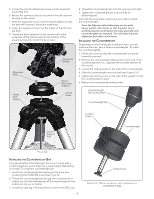
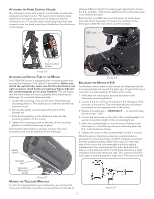
Assembly The Celestron CGEM DX mount is shipped in three main boxes. In separate boxes are the following: • Equatorial Mount with Hand Control, Counterweight Bar and tripod adapter plate included • Tripod • Counterweight(s) Remove all the pieces from their respective boxes and place on a flat, clear work area. A large floor space is ideal. When setting up your Celestron mount you must start with the tripod and work up from there. These instructions are laid out in the order each task should be performed. Setting up the Tripod The CGEM DX tripod comes with an all metal center leg brace / accessory tray to give rock solid support to the mount. The tripod comes fully assembled with a metal plate, called the tripod head that holds the legs together at the top. In addition, there is a central rod that extends down from the tripod head that attaches the accessory tray between the legs. To set up the tripod: 1. Stand the tripod upright and pull the tripod legs apart until each leg is fully extended. The tripod will now stand by itself. Once the tripod is set up, you can adjust the height at which it stands. 2. Loosen the lever on the leg clamp so that the tripod leg can be adjusted. 3. Slide the center portion of the tripod leg away from the tripod head until it is at the desired height. 4. Tighten the levers on each leg clamp to hold the legs in place. 5. Once that it is fully assembled, rotate the tripod so that one of the legs is pointing roughly towards north. To transport your tripod, remove the knob and lower the accessory tray far enough to rotate it until the three recesses line up with each leg. Collapse the legs so that each leg falls into one of the recesses. Secure the legs together with the nylon strap attached to the tripod leg. Attaching the Azimuth Adjustment Knobs To ensure safe shipment of your CGEM mount, the Azimuth Adjustment Knobs have been removed from the mount and will need to be attached. Before securing the mount to the tripod as shown in Fig. 2-4: 1. Locate the Azimuth Adjustment Knobs from the box containing the CGEM DX mount. 2. Thread one knob into each of the holes located on either side of the mount. 3. Only thread the knobs about half way in, leaving enough space for the tripod Alignment Peg which will need to fit between the screw tips. Accessory Tray / Leg Support Leg Clamp Lock Levers Figure 2-2 Attaching the Accessory Tray 1. Slide the accessory tray over the central rod so that the three cup indents are pushing against the inside of the tripod legs. 2. Thread the accessory tray knob on to the central rod and tighten. Figure 2-3 Attaching the Equatorial Mount The equatorial mount allows you to tilt the telescope's axis of rotation so that you can track the stars as they move across the sky. The CGEM DX mount is a German equatorial mount that attaches to the tripod. On one side of the tripod head there is a metal alignment peg for aligning the mount. This side of the tripod will face north when setting up for an astronomical observing session. Before attaching the equatorial head mount to the tripod, the tripod mounting adapter must first be attached to the tripod: 1. Place the tripod mounting adapter over the top of the tripod head. 2. Rotate the adapter so that the holes line up with holes along the side of the tripod head. Make sure the alignment peg is over the tripod leg that you want to be facing north when aligning. 3. Secure the mounting adapter to the tripod head using the three screws and washers provided. 4. Thread the center support rod up through the center of the tripod mounting adapter until the threads end. The center support rod should now be captured by the tripod mounting adapter and is ready to accept the equatorial mount. 3
-
 1
1 -
 2
2 -
 3
3 -
 4
4 -
 5
5 -
 6
6 -
 7
7 -
 8
8 -
 9
9 -
 10
10 -
 11
11 -
12
-
13
-
14
-
15
-
16
-
17
-
18
-
19
-
20
-
21
-
22
-
23
-
24
-
25
-
26
-
27
-
28
-
29
-
30
-
31
-
32
-
33
-
34
-
35
-
36
-
37
-
38
 |
 |
