Celestron NexStar 8SE Computerized Telescope NexStar 6 SE and 8 SE Manual
Celestron NexStar 8SE Computerized Telescope Manual
 |
View all Celestron NexStar 8SE Computerized Telescope manuals
Add to My Manuals
Save this manual to your list of manuals |
Celestron NexStar 8SE Computerized Telescope manual content summary:
- Celestron NexStar 8SE Computerized Telescope | NexStar 6 SE and 8 SE Manual - Page 1
INSTRUCTION MANUAL - Celestron NexStar 8SE Computerized Telescope | NexStar 6 SE and 8 SE Manual - Page 2
...6 The Hand Control ...6 The Star Diagonal...7 The Eyepiece...7 The Star Pointer Finderscope...7 Removing the Optical Tube...8 Attaching the NexStar to the Tripod ...9 HAND CONTROL ...10 HAND CONTROL OPERATION ...11 Alignment Procedure ...11 Sky Align ...12 Auto Two-Star Align ...13 Two Star - Celestron NexStar 8SE Computerized Telescope | NexStar 6 SE and 8 SE Manual - Page 3
...23 Scrolling Menu...23 Calibrate Goto ...23 Set Mount Position...23 Wedge Align ...23 Hand Control Command Tree ...24 TELESCOPE BASICS...24 IMAGE ORIENTATION ...25 FOCUSING ...26 CALCULATING MAGNIFICATION ...26 DETERMINING FIELD OF VIEW ...26 GENERAL OBSERVING HINTS...27 THE CELESTIAL COORDINATE - Celestron NexStar 8SE Computerized Telescope | NexStar 6 SE and 8 SE Manual - Page 4
Universe. It may take a few observing sessions to become familiar with your NexStar, so you should keep this manual handy until you have fully mastered your telescope's operation. The NexStar hand control has built-in instructions to guide you through all the alignment procedures needed to have the - Celestron NexStar 8SE Computerized Telescope | NexStar 6 SE and 8 SE Manual - Page 5
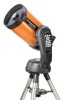
1 2 12 11 10 9 8 3 4 5 6 7 1 Optical Tube 2 Star Pointer Finderscope 3 Eyepiece 4 Star Diagonal 5 Focuser Knob 6 Battery Compartment 7 Tripod 8 Accessory Tray / Leg Brace 9 Tilt Wedge Plate 10 ON/OFF Switch 11 Hand Control 12 Liquid Crystal Display NexStar 8 SE Shown 5 - Celestron NexStar 8SE Computerized Telescope | NexStar 6 SE and 8 SE Manual - Page 6
Adjustable Steel Tripod • The Sky™ Level 1 Astronomy Software • NexRemote telescope control software • RS232 Cable • Computerized Hand Control with over 40,000 Object Database Assembling the NexStar Start by removing the telescope from its shipping carton and setting the round base on a flat table - Celestron NexStar 8SE Computerized Telescope | NexStar 6 SE and 8 SE Manual - Page 7
path of the telescope. For astronomical observing, this allows that magnifies the image focused by the telescope. The eyepiece fits NexStar uses eyepieces with a standard 11/4" barrel diameter. The Star Pointer Finderscope The Star Pointer is the quickest and easiest way to point your telescope - Celestron NexStar 8SE Computerized Telescope | NexStar 6 SE and 8 SE Manual - Page 8
dot is relative to the bright star. 5. Without moving the main telescope, turn the Star Pointer's azimuth and altitude alignment controls until the red is now ready to be used. Removing the Optical Tube The NexStar SE dovetailed quick release bracket allows you to adjust the optical tube for - Celestron NexStar 8SE Computerized Telescope | NexStar 6 SE and 8 SE Manual - Page 9
to the Tripod The Celestron NexStar tripod is a sturdy, heavy duty mount on which to place your NexStar 6/8" telescope. This tripod can down flat against the ground. 3. Place the center leg brace over the center support rod. 4. Tighten with the leg brace locking knob until the leg brace firmly - Celestron NexStar 8SE Computerized Telescope | NexStar 6 SE and 8 SE Manual - Page 10
Crystal Display (LCD) Window: Has a dual-line, 16 character display screen that is backlit for comfortable viewing of telescope information and scrolling text. 2. Align: Instructs the NexStar to use a selected star or object as an alignment position. 3. Direction Keys: Allows complete control of the - Celestron NexStar 8SE Computerized Telescope | NexStar 6 SE and 8 SE Manual - Page 11
will ask the user to choose and center the first alignment star, then the NexStar will automatically select and slew to a second star for alignment. Two-Star Alignment requires the user to identify and manually slew the telescope to the two alignment stars. One-Star Align is the same as Two-Star - Celestron NexStar 8SE Computerized Telescope | NexStar 6 SE and 8 SE Manual - Page 12
is leveled as described in the Assembly section of the manual. To begin Sky Align: 1. Power on the NexStar by flipping the switch located at the base of the arrow buttons on the hand control to slew (move) the telescope towards any bright celestial object in the sky. Align the object with the red - Celestron NexStar 8SE Computerized Telescope | NexStar 6 SE and 8 SE Manual - Page 13
information is entered, NexStar will prompt you to select and point the telescope at one known star in the sky. The NexStar now has all the the current information or press UNDO to manually edit the information (see Sky Align section for detailed instruction on entering time/site information). 4. - Celestron NexStar 8SE Computerized Telescope | NexStar 6 SE and 8 SE Manual - Page 14
Use the UP and DOWN scroll buttons to manually select any star you wish from the entire the finder, press ENTER. The display will then instruct you to center the star in the field of view NexStar requires the user to know the positions of two bright stars in order to accurately align the telescope - Celestron NexStar 8SE Computerized Telescope | NexStar 6 SE and 8 SE Manual - Page 15
the display reads "NexStar SE" 2. Press the MENU manual. EQ AutoAlign The EQ AutoAlign uses all the same time/site information as the Alt-Az alignments, however it also requires you to position the tube so that the altitude index markers are aligned (see figure 4-2), and then rotate the telescope - Celestron NexStar 8SE Computerized Telescope | NexStar 6 SE and 8 SE Manual - Page 16
UP and DOWN scroll buttons to manually select any star you wish from the entire list of available stars. 7. The telescope then asks you to center in the EQ Two-Star Align section. Improving Pointing Accuracy The NexStar SE telescope has several options that allow you to improve the pointing - Celestron NexStar 8SE Computerized Telescope | NexStar 6 SE and 8 SE Manual - Page 17
centered, press the UNDO button until you are at the main menu. 3. With NexStar SE displayed, press the ALIGN key on the hand control. 4. Use the Up/Down depending on the quality of the initial alignment, as well as where the telescope was pointing when the Sync was done. Undo Sync: Since doing a - Celestron NexStar 8SE Computerized Telescope | NexStar 6 SE and 8 SE Manual - Page 18
slew. The NexStar hand control will only display objects that are below the horizon if the Filter Limits are set below 0º in altitude. See Filter Limits in the Utility Feature section of the manual for more information on setting the filter limits. Caution: Never slew the telescope when someone is - Celestron NexStar 8SE Computerized Telescope | NexStar 6 SE and 8 SE Manual - Page 19
change the speed rate of the motors from high speed slew rate to precise guiding rate or anywhere in between. Each rate corresponds to a number on the hand that the telescope never moves. Tracking Rate - In addition to being able to move the telescope with the hand control buttons, the NexStar will - Celestron NexStar 8SE Computerized Telescope | NexStar 6 SE and 8 SE Manual - Page 20
in the sky. This way the same object can be found each time the telescope is aligned. Once a desired object is centered in the eyepiece, simply scroll can be accessed by selecting GoTo Sky Object. Save Land Object: The NexStar can also be used as a spotting scope on terrestrial objects. Fixed land - Celestron NexStar 8SE Computerized Telescope | NexStar 6 SE and 8 SE Manual - Page 21
its centered position. Using this offset, the telescope will then slew to the desired object with value may be necessary for photographic guiding. Positive backlash compensation is applied press ENTER after each one to save these values. NexStar will remember these values and use them each time - Celestron NexStar 8SE Computerized Telescope | NexStar 6 SE and 8 SE Manual - Page 22
This can create confusion when guiding on a star using an off-axis guider versus a straight through guide scope. To compensate for this, module when using the optional CN16 GPS accessory. When aligning the telescope, the NexStar still receives information, such as current time, from the optional GPS - Celestron NexStar 8SE Computerized Telescope | NexStar 6 SE and 8 SE Manual - Page 23
the beginning. Wedge Align - The NexStar has two equatorial alignment modes (one for the northern hemisphere and one for the southern) that will help you to polar align your telescope when using an optional equatorial wedge. See the Astronomy Basics section of the manual for more information on the - Celestron NexStar 8SE Computerized Telescope | NexStar 6 SE and 8 SE Manual - Page 24
NexStar SE MENU ALIGNMENT LIST TRACKING MODE ALT-AZ EQ NORTH EQ SOUTH OFF RATE SIDEREAL CCD OBJECTS CALDWELL ASTERISM ABELL VARIABLE STAR TOUR SOLAR SYSTEM SAO NGC Select Object Center Object NexStar Menu Tree: The following figure is a menu tree showing the sub-menus associated with the primary - Celestron NexStar 8SE Computerized Telescope | NexStar 6 SE and 8 SE Manual - Page 25
the Schmidt-Cassegrain optical design The optics of the NexStar have Schmidt-Cassegrain design. Actual image orientation as seen with the unaided eye Reversed from left to right, as viewed with a Star Diagonal Figure 3-2 25 Inverted image, as viewed with the eyepiece directly in telescope - Celestron NexStar 8SE Computerized Telescope | NexStar 6 SE and 8 SE Manual - Page 26
image. To avoid this problem, your first astronomical target should be a bright object (like the Moon or a planet) so that the image 160 to 280 times for the NexStar 8 telescope. Determining Field of View Determining Celestron manufactures is found in the Celestron Accessory Catalog (#93685). 26 - Celestron NexStar 8SE Computerized Telescope | NexStar 6 SE and 8 SE Manual - Page 27
to the next. This inconsistency can and will affect the ability to focus your telescope. In most cases you will not be able to achieve a truly sharp image, while in some cases, you may actually see a double image. • Never look across or over objects that are producing heat waves. This includes - Celestron NexStar 8SE Computerized Telescope | NexStar 6 SE and 8 SE Manual - Page 28
Up to this point, this manual covered the assembly and basic operation of your NexStar telescope. However, to understand your telescope more thoroughly , you need to know a little about the night sky. This section deals with observational astronomy in general and includes information on the night - Celestron NexStar 8SE Computerized Telescope | NexStar 6 SE and 8 SE Manual - Page 29
motion of the Sun across the sky is familiar to even the most casual observer. This daily trek is not the Sun moving as early astronomers thought, but the result of the Earth's rotation. The Earth's rotation also causes the stars to do the same, scribing out a large circle as the - Celestron NexStar 8SE Computerized Telescope | NexStar 6 SE and 8 SE Manual - Page 30
Polaris, refer to the Finding the North Celestial Pole section below. To polar align your NexStar: 1. Position the telescope tripod so that tilt plate hinge is facing towards north. 2. Gently rotate the telescope tube so that it is pointing straight up in the sky. 3. Loosen the Latitude Adjustment - Celestron NexStar 8SE Computerized Telescope | NexStar 6 SE and 8 SE Manual - Page 31
models are available. Attaching a Camera to the NexStar Attaching a camera to the NexStar requires the use of the optional T-adapter (# manual. To attach the photographic accessories: 1. Remove the visual back from the rear cell . 2. Thread the T-adapter securely onto the rear cell of the telescope - Celestron NexStar 8SE Computerized Telescope | NexStar 6 SE and 8 SE Manual - Page 32
named for the hemisphere in which they reside. For example, in the northern hemisphere all stars move around the north celestial pole. When the telescope's polar axis is pointed at the celestial pole, it is parallel to the Earth's rotational axis. Figure 6-6 The position of the Big Dipper changes - Celestron NexStar 8SE Computerized Telescope | NexStar 6 SE and 8 SE Manual - Page 33
heat build-up will result inside the optical tube. This can damage the telescope and/or any accessories attached to the telescope. For safe solar viewing, use a Celestron solar filter (see Optional Accessories section of manual) that reduces the intensity of the Sun's light, making it safe to view - Celestron NexStar 8SE Computerized Telescope | NexStar 6 SE and 8 SE Manual - Page 34
looking into the eyepiece, watch the shadow of the telescope tube until it forms a circular shadow. o To greatly affect transparency. While not a problem for the brighter stars and planets, slightly displaced creating an imperfect or smeared image. These atmospheric disturbances vary from time- - Celestron NexStar 8SE Computerized Telescope | NexStar 6 SE and 8 SE Manual - Page 35
be done only by the Celestron repair department. If your telescope is in need of internal cleaning, please call the factory for a return authorization number and price quote. Collimation Corrector Plate Collimation Screws The optical performance of your NexStar telescope is directly related to - Celestron NexStar 8SE Computerized Telescope | NexStar 6 SE and 8 SE Manual - Page 36
then loosen the other two screws by the same amount. Figure 7-3 7. Once the star image is in the center of the field of view, check to see if the rings are concentric. If the A collimated telescope should appear symmetrical with the central obstruction central obstruction is still skewed in the - Celestron NexStar 8SE Computerized Telescope | NexStar 6 SE and 8 SE Manual - Page 37
Celestron eyepieces. Diagonal, 45 degree, erect image (#94112-A) - This design allows you to look into the telescope at a 45° angle, at images that are oriented properly, meaning the image are designed to enhance your views of deep sky astronomical objects when viewed from urban areas. LPR Filters - Celestron NexStar 8SE Computerized Telescope | NexStar 6 SE and 8 SE Manual - Page 38
included. Sky Maps (#93722) - Celestron Sky Maps are the ideal teaching guide for learning the night sky. You telescope when shaken by the wind or an accidental bump. This accessory is a must for long exposure prime focus photography. Wedge, NexStar 6/8 (#93658) - Upgrade your NexStar 6SE or 8SE - Celestron NexStar 8SE Computerized Telescope | NexStar 6 SE and 8 SE Manual - Page 39
Standard Eyepiece Optical Tube Length Weight of Telescope Weight of Tripod NexStar 6SE (#11068) Schmidt Cassegrain Optical Design 6 inches (150mm) 60x 16 inches 21 Lbs. 9 lbs NexStar 8SE (#11069) Schmidt Cassegrain Optical Design 8 inches (200mm) 80 inches (2032mm) 10 100mm Starbright XLT® 2.5" 35 - Celestron NexStar 8SE Computerized Telescope | NexStar 6 SE and 8 SE Manual - Page 40
object eastwards along the horizon, measured from due north, between the astronomical meridian (the vertical line passing through the center of the sky and as "the apparent yearly path of the Sun against the stars". A telescope mounting in which the instrument is set upon an axis which is parallel - Celestron NexStar 8SE Computerized Telescope | NexStar 6 SE and 8 SE Manual - Page 41
require the same distance from the focal plane of the telescope to be in focus. This means when you focus It is equal to 3.26 light-years, 206,265 astronomical units, or 30,8000,000,000,000 km. (Apart of us.) An object which cannot be resolved into an image because it to too far away or too small is - Celestron NexStar 8SE Computerized Telescope | NexStar 6 SE and 8 SE Manual - Page 42
telescope at this rate. The rate is 15 arc seconds per second or 15 degrees per hour. The boundary line between the light and dark portion of the moon or a planet. The totality of astronomical control your NexStar telescope with a computer via the RS-232 port located on the computerized hand control - Celestron NexStar 8SE Computerized Telescope | NexStar 6 SE and 8 SE Manual - Page 43
Appendix D - Maps of Time Zones 43 - Celestron NexStar 8SE Computerized Telescope | NexStar 6 SE and 8 SE Manual - Page 44
- Celestron NexStar 8SE Computerized Telescope | NexStar 6 SE and 8 SE Manual - Page 45
- Celestron NexStar 8SE Computerized Telescope | NexStar 6 SE and 8 SE Manual - Page 46
- Celestron NexStar 8SE Computerized Telescope | NexStar 6 SE and 8 SE Manual - Page 47
- Celestron NexStar 8SE Computerized Telescope | NexStar 6 SE and 8 SE Manual - Page 48
- Celestron NexStar 8SE Computerized Telescope | NexStar 6 SE and 8 SE Manual - Page 49
- Celestron NexStar 8SE Computerized Telescope | NexStar 6 SE and 8 SE Manual - Page 50
- Celestron NexStar 8SE Computerized Telescope | NexStar 6 SE and 8 SE Manual - Page 51
the right to modify or discontinue, without prior notice to you, any model or style telescope. If warranty problems arise, or if you need assistance in using your telescope contact: Celestron Customer Service Department 2835 Columbia Street Torrance, CA 90503 Tel. (310) 328-9560 Fax. (310) 212 - Celestron NexStar 8SE Computerized Telescope | NexStar 6 SE and 8 SE Manual - Page 52
Columbia Street Torrance, CA 90503 Tel. (310) 328-9560 Fax. (310) 212-5835 Web site at http//www.celestron.com Copyright 2006 Celestron All rights reserved. (Products or instructions may change without notice or obligation.) This device complies with Part 15 of the FCC Rule. Operation is subject to
-
 1
1 -
 2
2 -
 3
3 -
 4
4 -
 5
5 -
 6
6 -
 7
7 -
8
-
9
-
10
-
11
-
12
-
13
-
14
-
15
-
16
-
17
-
18
-
19
-
20
-
21
-
22
-
23
-
24
-
25
-
26
-
27
-
28
-
29
-
30
-
31
-
32
-
33
-
34
-
35
-
36
-
37
-
38
-
39
-
40
-
41
-
42
-
43
-
44
-
45
-
46
-
47
-
48
-
49
-
50
-
51
-
52
 |
 |

INSTRUCTION MANUAL