Celestron Skyris 618M Skyris Astronomical CCD Camera Manual - Page 6
Capturing Images
 |
View all Celestron Skyris 618M manuals
Add to My Manuals
Save this manual to your list of manuals |
Page 6 highlights
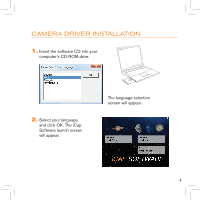
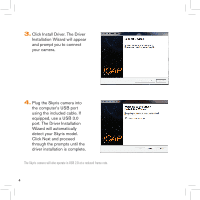
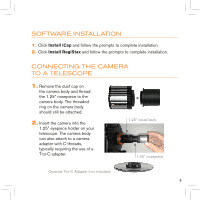
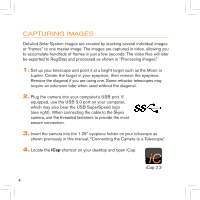
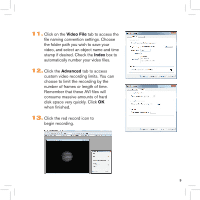
captuRing imageS Detailed Solar System images are created by stacking several individual images or "frames" to one master image. The images are captured in video, allowing you to accumulate hundreds of frames in just a few seconds. The video files will later be exported to RegiStax and processed as shown in "Processing Images." 1. Set up your telescope and point it at a bright target such as the Moon or Jupiter. Center the target in your eyepiece, then remove the eyepiece. Remove the diagonal if you are using one. Some refractor telescopes may require an extension tube when used without the diagonal. 2. Plug the camera into your computer's USB port. If equipped, use the USB 3.0 port on your computer, which may also bear the USB SuperSpeed logo (see right). When connecting the cable to the Skyris camera, use the threaded fasteners to provide the most secure connection. 3. Insert the camera into the 1.25" eyepiece holder on your telescope as shown previously in this manual, "Connecting the Camera to a Telescope." 4. Locate the iCap shortcut on your desktop and open iCap. iCap 2.3 6
-
 1
1 -
 2
2 -
 3
3 -
 4
4 -
 5
5 -
 6
6 -
 7
7 -
 8
8 -
 9
9 -
 10
10 -
 11
11 -
 12
12 -
13
-
14
-
15
-
16
 |
 |
