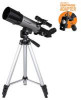
Celestron Travel Scope 60 DX Portable Telescope with Smartphone Adapter Travel - Page 3
For more information on this product or to download, the instruction manual, please visit
 |
View all Celestron Travel Scope 60 DX Portable Telescope with Smartphone Adapter manuals
Add to My Manuals
Save this manual to your list of manuals |
Page 3 highlights
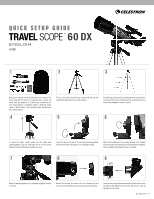
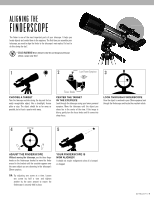
10 11 12 Insert the barrel of the 20mm eyepiece into the diagonal and tighten the set screw. Remove the knurled nuts on the threaded posts at the focuser end of the telescope tube. Locate the finderscope and remove the plastic caps on the front and back lens. Orient the finderscope so that the larger lens is facing towards the front of the tube as shown. Place the finderscope over the posts on the tube and replace the knurled nuts to secure it in place. 13 14 15 Remove the lens cap from the front of the telescope. To observe, look through the eyepiece as shown. Focus the image by turning the knobs below the focuser. For additional magnification, you can use the included 3x Barlow lens. Place the Barlow lens between the diagonal and the eyepiece. To move the scope right and left, hold a tripod leg with one hand while the other hand uses the panning handle to move the scope. The azimuth locking screw can be loosened or tightened to adjust the tension to your preference. 16 To move the scope up and down, rotate the entire pan handle counterclockwise and use the handle to point the scope in the direction you want to view. Rotate the pan handle clockwise to lock it in place. 2 | ENGLISH For more information on this product or to download the instruction manual, please visit the respective product page on celestron.com SOLAR WARNING: Never attempt to view the sun through any telescope without a proper solar filter. NEED ASSISTANCE? Contact Celestron Technical Support celestron.com/pages/technical-support 11-20
-
 1
1 -
 2
2 -
 3
3 -
 4
4 -
 5
5 -
 6
6 -
 7
7 -
 8
8 -
 9
9 -
10
-
11
-
12
-
13
-
14
-
15
-
16
-
17
-
18
-
19
-
20
-
21
-
22
-
23
-
24
-
25
-
26
-
27
-
28
-
29
-
30
-
31
-
32
 |
 |
