Cisco 16OC3/POS-SM Hardware Installation Guide - Page 95
Connecting a T1/FT1 DSU/CSU WIC to a Network, Supported Platforms
 |
View all Cisco 16OC3/POS-SM manuals
Add to My Manuals
Save this manual to your list of manuals |
Page 95 highlights
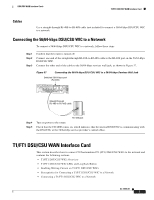
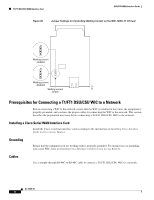
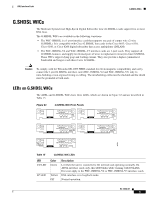
DSU/CSU WAN Interface Cards Supported Platforms Connecting a T1/FT1 DSU/CSU WIC to a Network To connect a T1/FT1 DSU/CSU WIC to a network, follow these steps: Step 1 Confirm that the router is turned off. Caution To comply with the Telcordia GR-1089 NEBS standard for electromagnetic compatibility and safety, connect the 1-port T1/FT1 DSU/CSU WIC, version 2 (WIC-1DSU-T1-V2) only to intra-building or non-exposed wiring or cabling. The intrabuilding cable must be shielded and the shield must be grounded at both ends. Step 2 Step 3 Connect one end of the straight-through RJ-48C-to-RJ-48C cable to the RJ-48C port on the T1/FT1 DSU/CSU WIC. Connect the other end of the cable to the T1 wall jack, as shown in Figure 61. Figure 61 Connecting the T1/FT1 DSU/CSU WIC to a T1 Wall Jack T1 port (RJ-48C) SEE MANUAL BEFORE INSTALLATION LP AL CD LOOP BACK T1 DSU/CSU DSU CSU T1 Straight-through RJ-48C-to-RJ-48C cable 41196 Step 4 Step 5 T1 (RJ-48C) wall jack Turn on power to the router. Check that the CD LED comes on, which means that the internal DSU/CSU is communicating with the DSU/CSU at the T1 service provider's central office. Supported Platforms For a list of the platforms supported by a Cisco interface card refer to Platform Support for Cisco Interface Cards. Finding Support Information for Platforms and Cisco IOS Software Images Use Cisco Feature Navigator to find information about platform support and Cisco IOS software image support. Access Cisco Feature Navigator at http://www.cisco.com/go/fn. You must have an account on Cisco.com. If you do not have an account or have forgotten your username or password, click Cancel at the login dialog box and follow the instructions that appear. OL-12845-01 7
-
 1
1 -
2
-
3
-
4
-
5
-
6
-
7
-
8
-
9
-
10
-
11
-
12
-
13
-
14
-
15
-
16
-
17
-
18
-
19
-
20
-
21
-
22
-
23
-
24
-
25
-
26
-
27
-
28
-
29
-
30
-
31
-
32
-
33
-
34
-
35
-
36
-
37
-
38
-
39
-
40
-
41
-
42
-
43
-
44
-
45
-
46
-
47
-
48
-
49
-
50
-
51
-
52
-
53
-
54
-
55
-
56
-
57
-
58
-
59
-
60
-
61
-
62
-
63
-
64
-
65
-
66
-
67
-
68
-
69
-
70
-
71
-
72
-
73
-
74
-
75
-
76
-
77
-
78
-
79
-
80
-
81
-
82
-
83
-
84
-
85
-
86
-
87
-
88
-
89
-
 90
90 -
 91
91 -
 92
92 -
 93
93 -
 94
94 -
 95
95 -
 96
96 -
 97
97 -
 98
98 -
 99
99 -
 100
100 -
101
-
102
-
103
-
104
-
105
-
106
-
107
-
108
-
109
-
110
-
111
-
112
-
113
-
114
-
115
-
116
-
117
-
118
-
119
-
120
-
121
-
122
-
123
-
124
-
125
-
126
-
127
-
128
-
129
-
130
-
131
-
132
-
133
-
134
-
135
-
136
-
137
-
138
-
139
-
140
-
141
-
142
-
143
-
144
-
145
-
146
-
147
-
148
-
149
-
150
-
151
-
152
-
153
-
154
-
155
-
156
-
157
-
158
-
159
-
160
-
161
-
162
-
163
-
164
-
165
-
166
-
167
-
168
-
169
-
170
-
171
-
172
-
173
-
174
-
175
-
176
-
177
-
178
-
179
-
180
-
181
-
182
-
183
-
184
-
185
-
186
-
187
-
188
-
189
-
190
-
191
-
192
-
193
-
194
-
195
-
196
-
197
-
198
-
199
-
200
-
201
-
202
-
203
-
204
-
205
-
206
-
207
-
208
-
209
-
210
-
211
-
212
-
213
-
214
-
215
-
216
 |
 |
