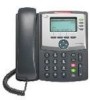
Cisco 524G User Guide - Page 13
Place a Call from Call History, Clear Call History, Use the Intercom Feature, Activate Do Not Disturb - features
 |
UPC - 882658198144
View all Cisco 524G manuals
Add to My Manuals
Save this manual to your list of manuals |
Page 13 highlights
Place a Call from Call History To place a call to a number in the call history list: 1. Use the Navigation button to scroll through the Call History list. 2. Use Select to select a phone number. The digits will appear on the phone display. To dial the number as it appears on the phone display: - Press Dial. To edit the number on the phone display before dialing: 1. Press EditDial to place the cursor at the beginning of the number on the phone display. 2. Use the keypad to edit the digits as needed. Use delChr to erase digits that you enter incorrectly. 3. Press Dial to place the call. Clear Call History To clear all numbers in the directory histories • Press Clear. Note The Clear soft key clears all call history lists. Selective clearing of call history lists is not supported. Use the Intercom Feature Cisco Unified Communications Manager Express supports intercom functionality for one-way and press-to-answer voice connections using a dedicated pair of intercoms on two phones that speed-dial each other. To use the intercom feature: 1. Press the Speaker button and get dial tone. 2. Press the speed dial key or dial the directory number to start the intercom call. Note The called Cisco Unified IP phone automatically answers the call in speakerphone mode with mute activated or deactivated depending on configuration. The phone beeps to alert the recipient to the incoming call. To respond to an intercom call: • If Mute key is lit, Press the Mute button, or lift the handset. • If Mute key is not lit, reply to caller hands free. Activate Do Not Disturb For visual call alerting and information without audible ringing, use Do Not Disturb (DnD). Calls receive normal call-forward-busy and no-answer treatment. To activate the Do-Not-Disturb feature: 1. Press DnD. 2. A text message indicates that the phone is in Do-Not-Disturb mode. Note Pressing the DnD soft key while the phone is ringing immediately forwards the call to the call-forward destination set on the phone. If the call-forward destination is not set, pressing the DnD soft key disables the ringer. To deactivate the Do-Not-Disturb feature, repeat Step 1. 13
-
 1
1 -
2
-
3
-
4
-
5
-
6
-
7
-
 8
8 -
 9
9 -
 10
10 -
 11
11 -
 12
12 -
 13
13 -
 14
14 -
 15
15 -
 16
16 -
 17
17 -
 18
18
 |
 |