Cisco AIR-LAP1131AG-E-K9 Hardware Installation Guide - Page 43
Aligning the Keyhole Clip to the Access Point Keyhole, Step 3
 |
View all Cisco AIR-LAP1131AG-E-K9 manuals
Add to My Manuals
Save this manual to your list of manuals |
Page 43 highlights
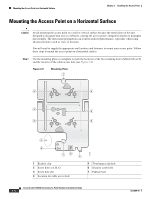
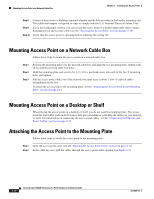
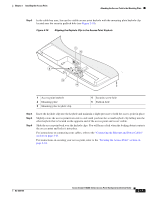
Chapter 2 Installing the Access Point Attaching the Access Point to the Mounting Plate Step 3 In the cable bay area, line up the visible access point keyhole with the mounting plate keyhole clip located near the security padlock hole (see Figure 2-10). Figure 2-10 Aligning the Keyhole Clip to the Access Point Keyhole 1 5 2 3 4 121888 1 Access point keyhole 2 Mounting plate 3 Mounting plate keyhole clip 4 Security screw hole 5 Padlock hole Step 4 Step 5 Step 6 Insert the keyhole clip into the keyhole and maintain a slight pressure to hold the access point in place. Slightly rotate the access point from side-to-side until you hear the second keyhole clip falling into the other keyhole that is located on the opposite end of the access point and is not visible. Slide the access point back over the keyhole clips. You will hear a click when the locking detent contacts the access point and locks it into place. For instructions on connecting your cables, refer to the "Connecting the Ethernet and Power Cables" section on page 2-21. For instructions on securing your access point, refer to the "Securing the Access Point" section on page 2-18. OL-8369-05 Cisco Aironet 1130AG Series Access Point Hardware Installation Guide 2-17
-
 1
1 -
2
-
3
-
4
-
5
-
6
-
7
-
8
-
9
-
10
-
11
-
12
-
13
-
14
-
15
-
16
-
17
-
18
-
19
-
20
-
21
-
22
-
23
-
24
-
25
-
26
-
27
-
28
-
29
-
30
-
31
-
32
-
33
-
34
-
35
-
36
-
37
-
 38
38 -
 39
39 -
 40
40 -
 41
41 -
 42
42 -
 43
43 -
 44
44 -
 45
45 -
 46
46 -
 47
47 -
 48
48 -
49
-
50
-
51
-
52
-
53
-
54
-
55
-
56
-
57
-
58
-
59
-
60
-
61
-
62
-
63
-
64
-
65
-
66
-
67
-
68
-
69
-
70
-
71
-
72
-
73
-
74
-
75
-
76
-
77
-
78
-
79
-
80
-
81
-
82
-
83
-
84
-
85
-
86
-
87
-
88
-
89
-
90
-
91
-
92
-
93
-
94
-
95
-
96
-
97
-
98
-
99
-
100
-
101
-
102
-
103
-
104
-
105
-
106
-
107
-
108
-
109
-
110
-
111
-
112
-
113
-
114
-
115
-
116
-
117
-
118
-
119
-
120
-
121
-
122
-
123
-
124
-
125
-
126
 |
 |
