Cisco SG102-24 Quick Start Guide - Page 4
Rack-Mount Placement, Wall Mounting, A Cisco SF 100-16, SF 100-24, SG 100-16, or SG 102-24 Unmanaged - sg 102 24 switch
 |
View all Cisco SG102-24 manuals
Add to My Manuals
Save this manual to your list of manuals |
Page 4 highlights
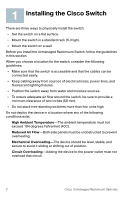
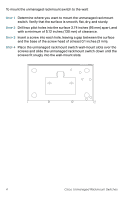
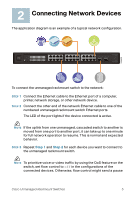
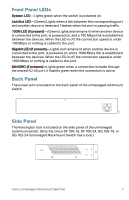
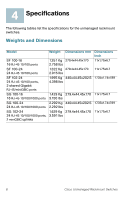
Rack-Mount Placement Follow these steps to rack-mount the switch in any standard 19-inch rack. STEP 1 Place the switch on a hard, flat surface with the front panel facing towards you. STEP 2 Attach a rack-mount bracket to one side of the switch with the supplied screws and secure the bracket tightly. Repeat this step to attach the other bracket to the opposite side of the switch. STEP 3 After the brackets are attached to the switch, use suitable screws to securely attach the brackets to any standard 19-inch rack. SYSTEM Link/Act 1 Gigabit Link/Act 2 3 4 5 6 7 8 9 10 11 12 / miniGBIC1 13 Gigabit 14 15 16 17 18 19 20 21 22 23 24 / miniGBIC2 1 2 3 4 13 14 15 16 5 6 7 8 17 18 19 20 9 10 11 12 21 22 23 24 (Shared with 12) (Shared with 24) miniGBIC1 miniGBIC2 Cisco Small Business SR2024 10/100/1000 24-Port Switch 193086 Wall Mounting A Cisco SF 100-16, SF 100-24, SG 100-16, or SG 102-24 Unmanaged Rackmount Switch can be wall-mounted. If you plan to mount this switch to a wall, you need 2 wallboard screws to deploy the unmanaged desktop switch. We recommend using screws with a minimum of 0.27 inches (6.8 mm) width at the head and at least 0.69 inches (17.6 mm) long. Depending on your mounting surface, you might require longer screws or drywall anchors with a minimum of 0.31 inches (8 mm) width at the head and at least 0.87 inches (22.2 mm) long. WARNING Insecure mounting might damage the device or cause injury. Cisco is not responsible for damages incurred by insecure wallmounting. Cisco Unmanaged Rackmount Switches 3
-
 1
1 -
 2
2 -
 3
3 -
 4
4 -
 5
5 -
 6
6 -
 7
7 -
 8
8 -
 9
9 -
 10
10 -
11
-
12
-
13
-
14
-
15
-
16
-
17
-
18
-
19
-
20
-
21
-
22
-
23
-
24
-
25
-
26
-
27
-
28
-
29
-
30
-
31
-
32
-
33
-
34
-
35
-
36
-
37
-
38
-
39
-
40
-
41
-
42
-
43
-
44
-
45
-
46
-
47
-
48
-
49
-
50
-
51
-
52
 |
 |
