Cisco SLM248G4S Administration Guide - Page 49
Priority, Authentication Port, Number of Retries, Timeout for Reply, Dead Time, Key String
 |
UPC - 745883580392
View all Cisco SLM248G4S manuals
Add to My Manuals
Save this manual to your list of manuals |
Page 49 highlights
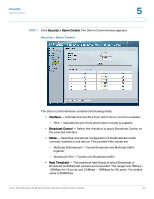
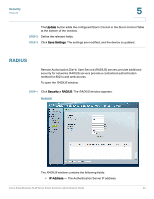
Security RADIUS 5 • Priority - The server priority. The possible values are 0-65535, where 0 is the highest value. The RADIUS Server priority is used to determine the server query order. • Authentication Port - Identifies the UDP destination port for authentication requests. The authenticated port default is 1812. • Number of Retries - Defines the number of transmitted requests sent to RADIUS server before a failure occurs. The possible field values are 1 - 10. Three is the default value. • Timeout for Reply - Defines the amount of the time in seconds the device waits for an answer from the RADIUS server before retrying the query, or switching to the next server. The possible field values are 1 - 30. Three is the default value. • Dead Time - Defines the amount of time (minutes) that a RADIUS server is bypassed for service requests. The range is 0-2000. The Dead Time default is 0 minutes. • Key String - Defines the key string used for authenticating and encrypting all RADIUS communications between the device and the RADIUS server. This key must match the encryption key defined on the RADIUS server. • Source IP Address - Defines the source IP address that is used for communication with RADIUS servers. • Usage Type - Specifies the RADIUS server authentication type. The default value is Login. The possible field values are: - Login - Indicates that the RADIUS server is used for authenticating user name and passwords. - 802.1x - Indicates that the RADIUS server is used for 802.1x authentication. - All - Indicates that the RADIUS server is used for authenticating user name and passwords, and 802.1x port authentication. The Add to List button adds the RADIUS configuration to the RADIUS Table at the bottom of the window. STEP 2 Define the relevant fields. STEP 3 Click Save Settings. The settings are modified, and the device is updated. Cisco Small Business SLM Series Smart Switches Administration Guide 45
-
 1
1 -
2
-
3
-
4
-
5
-
6
-
7
-
8
-
9
-
10
-
11
-
12
-
13
-
14
-
15
-
16
-
17
-
18
-
19
-
20
-
21
-
22
-
23
-
24
-
25
-
26
-
27
-
28
-
29
-
30
-
31
-
32
-
33
-
34
-
35
-
36
-
37
-
38
-
39
-
40
-
41
-
42
-
43
-
 44
44 -
 45
45 -
 46
46 -
 47
47 -
 48
48 -
 49
49 -
 50
50 -
 51
51 -
 52
52 -
 53
53 -
 54
54 -
55
-
56
-
57
-
58
-
59
-
60
-
61
-
62
-
63
-
64
-
65
-
66
-
67
-
68
-
69
-
70
-
71
-
72
-
73
-
74
-
75
-
76
-
77
-
78
-
79
-
80
-
81
-
82
-
83
-
84
-
85
-
86
-
87
-
88
-
89
-
90
-
91
 |
 |