Cisco SPA112 Quick Start Guide - Page 5
Configuration and Management of the ATA, Using the Web-Based Configuration Utility - admin guide
 |
View all Cisco SPA112 manuals
Add to My Manuals
Save this manual to your list of manuals |
Page 5 highlights
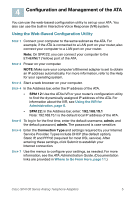
4 Configuration and Management of the ATA You can use the web-based configuration utility to set up your ATA. You also can use the built-in Interactive Voice Response (IVR) system. Using the Web-Based Configuration Utility STEP 1 Connect your computer to the same subnet as the ATA. For example, if the ATA is connected to a LAN port on your router, also connect your computer to a LAN port on your router. Note: On SPA122, you can connect your computer to the ETHERNET (Yellow) port of the ATA. STEP 2 Power on your computer. NOTE: Make sure your computer's Ethernet adapter is set to obtain an IP address automatically. For more information, refer to the Help for your operating system. STEP 3 Start a web browser on your computer. STEP 4 In the Address bar, enter the IP address of the ATA. • SPA112: Use the ATA's IVR or your router's configuration utility to find the dynamically assigned IP address of the ATA. For information about the IVR, see Using the IVR for Administration, page 6. • SPA122: In the Address bar, enter: 192.168.15.1 Note: 192.168.15.1 is the default local IP address of the ATA. STEP 5 To log in for the first time, enter the default username, admin, and the default password, admin. The password is case sensitive. STEP 6 Enter the Connection Type and settings required by your Internet Service Provider. Types include DHCP (the default option), Static IP, and PPPoE (required for most DSL service). After entering these settings, click Submit to establish your Internet connection. STEP 7 Use the menus to configure your settings, as needed. For more information, see the ATA Administration Guide. (Documentation links are provided in Where to Go From Here, page 11.) Cisco SPA100 Series Analog Telephone Adapters 5
-
 1
1 -
 2
2 -
 3
3 -
 4
4 -
 5
5 -
 6
6 -
 7
7 -
 8
8 -
 9
9 -
 10
10 -
 11
11 -
12
 |
 |