Cisco SRW2008-K9-NA User Manual - Page 5
Configuring the Cisco Small Business Managed Switch, Accessing and Managing Your Switch Using the Web - cli
 |
View all Cisco SRW2008-K9-NA manuals
Add to My Manuals
Save this manual to your list of manuals |
Page 5 highlights
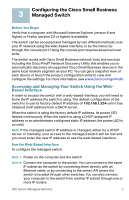
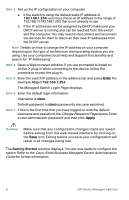
3 Configuring the Cisco Small Business Managed Switch Before You Begin Verify that a computer with Microsoft Internet Explorer (version 6 and higher) or Firefox (version 2.0 or higher) is available. The switch can be accessed and managed by two different methods; over your IP network using the web-based interface, or by the menu CLI through the console port. Using the console port requires advanced user skills. The switch works with Cisco Small Business network tools and services including the Cisco FindIT Network Discovery Utility that enables you to automatically discovers all supported Cisco Small Business devices in the same local network segment as your PC. You can get a snapshot view of each device or launch the product configuration utility to view and configure the settings. For more information, see www.cisco.com/go/findit. Accessing and Managing Your Switch Using the WebBased Interface In order to access the switch with a web-based interface, you will need to know the IP address the switch is using. The default configuration of the switch is to use its factory default IP address of 192.168.1.254 until it has obtained an IP address from a DHCP server. When the switch is using the factory default IP address, its power LED flashes continuously. When the switch is using a DHCP assigned IP address or an administrator configured static IP address, the power LED is on solid. NOTE If the managed switch IP address is changed, either by a DHCP server or manually, your access to the managed switch will be lost and you must enter the new IP address to use the web-based interface. Use the Web-Based Interface To configure the managed switch: STEP 1 Power on the computer and the switch. STEP 2 Connect the computer to the switch. You can connect to the same IP subnet as the switch by connecting them directly with an Ethernet cable, or by connecting to the same LAN where the switch is located through other switches. You can also connect your computer to the switch from another IP subnet through one or more IP routers. 300 Series Managed Switches 5
-
 1
1 -
 2
2 -
 3
3 -
 4
4 -
 5
5 -
 6
6 -
 7
7 -
 8
8 -
 9
9 -
 10
10 -
 11
11 -
12
-
13
-
14
-
15
-
16
 |
 |
