Cisco SRW2016 User Guide - Page 23
IP Address, Subnet, Default Gateway, Management VLAN, DHCP client - 16 port
 |
UPC - 745883562435
View all Cisco SRW2016 manuals
Add to My Manuals
Save this manual to your list of manuals |
Page 23 highlights
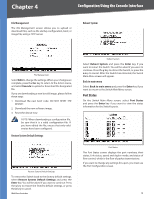
Chapter 4 Configuration Using the Console Interface IP Address Configuration The IP Address Configuration screen lets you configure the Switch's IP address information. HTTP The HTTP screen lets you configure the status and port number of the HTTP Server. IP Address Configuration IP Address The IP Address of the Switch is displayed. (The default IP address is 192.168.1.254.) Verify that the address you enter is correct and does not conflict with another device on the network. Subnet Mask The subnet mask of the Switch is displayed. Default Gateway The IP address of your network's default gateway is displayed. Management VLAN The VLAN ID number is displayed. DHCP client The status of the DHCP client is displayed. If you want the Switch to be a DHCP client, then select ENABLE. If you want to assign an static IP address to the Switch, then enter the IP settings and select DISABLE. Select Edit to make changes. When your changes are complete, press the Esc key to return to the Action menu, and select Save to save your changes. HTTP Select Edit and press the Enter key to make changes. When your changes are complete, press the Esc key to return to the Action menu. Select Save and press the Enter key to save your changes. To exit, select Quit and press the Enter key. HTTPS Configuration The HTTPS Configuration screen lets you configure the HTTPS settings.You can enable or disable the HTTPS server and configure the port on which the session is enabled. HTTPS Configuration Select Edit and press the Enter key to make changes. When your changes are complete, press the Esc key to return to the Action menu. Select Save and press the Enter key to save your changes. To exit, select Quit and press the Enter key. WebView Switches 16
-
 1
1 -
2
-
3
-
4
-
5
-
6
-
7
-
8
-
9
-
10
-
11
-
12
-
13
-
14
-
15
-
16
-
17
-
 18
18 -
 19
19 -
 20
20 -
 21
21 -
 22
22 -
 23
23 -
 24
24 -
 25
25 -
 26
26 -
 27
27 -
 28
28 -
29
-
30
-
31
-
32
-
33
-
34
-
35
-
36
-
37
-
38
-
39
-
40
-
41
-
42
-
43
-
44
-
45
-
46
-
47
-
48
-
49
-
50
-
51
-
52
-
53
-
54
-
55
-
56
-
57
-
58
-
59
-
60
-
61
-
62
-
63
-
64
-
65
-
66
-
67
-
68
-
69
-
70
-
71
-
72
-
73
-
74
-
75
-
76
-
77
-
78
-
79
-
80
-
81
-
82
-
83
-
84
-
85
-
86
-
87
-
88
-
89
-
90
-
91
-
92
-
93
-
94
-
95
-
96
 |
 |
