Cisco WS-C3560G-24TS-E Hardware Installation Guide - Page 73
Mounting the Switch in a 19-Inch Rack, Wall-Mounting (with Rack-Mount Brackets)
 |
View all Cisco WS-C3560G-24TS-E manuals
Add to My Manuals
Save this manual to your list of manuals |
Page 73 highlights
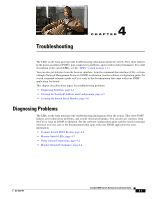
Chapter 3 Switch Installation (8- and 12-Port Switches) Installing the Switch Mounting the Switch in a 19-Inch Rack After the brackets are attached to the switch, insert the switch into the 19-inch rack, and align the bracket in the rack. Use either the 10-32 pan-head screws or the 12-24 pan-slotted screws to secure the switch in the rack, as shown in Figure 3-9. Note We strongly recommend that you allow at least 1.75 inches (4 cm) of clearance above each switch in the rack. Figure 3-9 Mounting the Switch in a 19-Inch Rack SYST STAT DPLX SPD PoE MODE CONSOLE 1x 2x 3x 4x 5x 6x 7x 8x 1 Catalyst 2960 Series 1 1 Phillips machine screws After the switch is mounted in the rack: 1. (Optional) Secure the AC power cord. See "Securing the AC Power Cord" section on page 3-19. 2. Power on the switch. See the "Verifying Switch Operation" section on page 3-7. 3. Connect to a 10/100 or 10/100/1000 port, and run Express Setup. See the Catalyst 3560 Switch Getting Started Guide for instructions. To use the CLI setup program, see Appendix D, "Configuring the Switch with the CLI-Based Setup Program." 4. Connect to the front-panel ports. Wall-Mounting (with Rack-Mount Brackets) Installing the Catalyst 3560-8PC switch or the Catalyst 3560 12-PC-S switch in a 19-inch rack requires a bracket kit that is not included with the switch (RCKMNT-19-CMPCT=). Step 1 Step 2 Attach a 19-inch bracket to one side of the switch. Follow the same steps to attach the second bracket to the opposite side, as shown in Figure 3-10. Mount the switch with the front panel facing down, as shown in Figure 3-10. For the best support of the switch and cables, make sure the switch is attached securely to wall studs or to a firmly attached plywood mounting backboard. OL-6337-07 Catalyst 3560 Switch Hardware Installation Guide 3-17
-
 1
1 -
2
-
3
-
4
-
5
-
6
-
7
-
8
-
9
-
10
-
11
-
12
-
13
-
14
-
15
-
16
-
17
-
18
-
19
-
20
-
21
-
22
-
23
-
24
-
25
-
26
-
27
-
28
-
29
-
30
-
31
-
32
-
33
-
34
-
35
-
36
-
37
-
38
-
39
-
40
-
41
-
42
-
43
-
44
-
45
-
46
-
47
-
48
-
49
-
50
-
51
-
52
-
53
-
54
-
55
-
56
-
57
-
58
-
59
-
60
-
61
-
62
-
63
-
64
-
65
-
66
-
67
-
 68
68 -
 69
69 -
 70
70 -
 71
71 -
 72
72 -
 73
73 -
 74
74 -
 75
75 -
 76
76 -
 77
77 -
 78
78 -
79
-
80
-
81
-
82
-
83
-
84
-
85
-
86
-
87
-
88
-
89
-
90
-
91
-
92
-
93
-
94
-
95
-
96
-
97
-
98
-
99
-
100
-
101
-
102
-
103
-
104
-
105
-
106
-
107
-
108
-
109
-
110
-
111
-
112
-
113
-
114
-
115
-
116
-
117
-
118
-
119
-
120
 |
 |