Cisco WS-CE500-24LC Administration Guide - Page 76
Dynamic DNS, Select the Dynamic DNS Service
 |
UPC - 882658054891
View all Cisco WS-CE500-24LC manuals
Add to My Manuals
Save this manual to your list of manuals |
Page 76 highlights
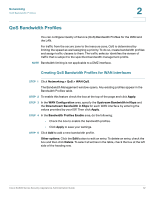
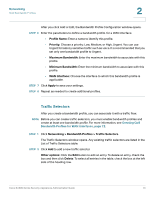
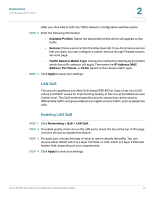
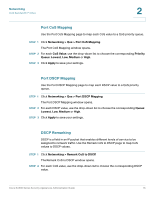
Networking Dynamic DNS STEP 3 Click Apply to save your settings. 2 Dynamic DNS Dynamic DNS (DDNS) is an Internet service that allows routers with varying public IP addresses to be located using Internet domain names. If your ISP has not provided you with a static IP, and your WAN connection is configured to use DHCP to get an IP address dynamically, then DDNS allows you to have a virtual static address for your website. To use DDNS, you must setup an account with a DDNS provider such as DynDNS.com. STEP 1 Click Networking > Dynamic DNS. The Dynamic DNS window opens. STEP 2 In the WAN Mode area, the Current WAN Mode is displayed. STEP 3 In the Dedicated WAN (DDNS Status) area or the Optional WAN (DDN Status) area, enter the following information: • Select the Dynamic DNS Service: Choose None or choose DynDNS.com. • Host and Domain Name: Specify the complete Host Name and Domain Name for the DDNS service. • User Name: Enter the DynDNS account User Name. • Password: Enter the password for the DynDNS account. • Use wildcards: Check this box to allow all subdomains of your DynDNS Host Name to share the same public IP as the Host Name. This option can be enabled here if not done on the DynDNS website. • Update every 30 days: Check this box to allow the security appliance to update the host information on DynDNS and keep the subscription active after the 30 day trial. STEP 4 Click Apply to save your settings. Cisco SA500 Series Security Appliances Administration Guide 76
-
 1
1 -
2
-
3
-
4
-
5
-
6
-
7
-
8
-
9
-
10
-
11
-
12
-
13
-
14
-
15
-
16
-
17
-
18
-
19
-
20
-
21
-
22
-
23
-
24
-
25
-
26
-
27
-
28
-
29
-
30
-
31
-
32
-
33
-
34
-
35
-
36
-
37
-
38
-
39
-
40
-
41
-
42
-
43
-
44
-
45
-
46
-
47
-
48
-
49
-
50
-
51
-
52
-
53
-
54
-
55
-
56
-
57
-
58
-
59
-
60
-
61
-
62
-
63
-
64
-
65
-
66
-
67
-
68
-
69
-
70
-
 71
71 -
 72
72 -
 73
73 -
 74
74 -
 75
75 -
 76
76 -
 77
77 -
 78
78 -
 79
79 -
 80
80 -
 81
81 -
82
-
83
-
84
-
85
-
86
-
87
-
88
-
89
-
90
-
91
-
92
-
93
-
94
-
95
-
96
-
97
-
98
-
99
-
100
-
101
-
102
-
103
-
104
-
105
-
106
-
107
-
108
-
109
-
110
-
111
-
112
-
113
-
114
-
115
-
116
-
117
-
118
-
119
-
120
-
121
-
122
-
123
-
124
-
125
-
126
-
127
-
128
-
129
-
130
-
131
-
132
-
133
-
134
-
135
-
136
-
137
-
138
-
139
-
140
-
141
-
142
-
143
-
144
-
145
-
146
-
147
-
148
-
149
-
150
-
151
-
152
-
153
-
154
-
155
-
156
-
157
-
158
-
159
-
160
-
161
-
162
-
163
-
164
-
165
-
166
-
167
-
168
-
169
-
170
-
171
-
172
-
173
-
174
-
175
-
176
-
177
-
178
-
179
-
180
-
181
-
182
-
183
-
184
-
185
-
186
-
187
-
188
-
189
-
190
-
191
-
192
-
193
-
194
-
195
-
196
-
197
-
198
-
199
-
200
-
201
-
202
-
203
-
204
-
205
-
206
-
207
-
208
-
209
-
210
-
211
-
212
-
213
-
214
-
215
-
216
-
217
-
218
-
219
-
220
-
221
-
222
-
223
-
224
-
225
-
226
-
227
-
228
-
229
-
230
-
231
-
232
-
233
-
234
-
235
-
236
-
237
-
238
-
239
-
240
 |
 |
