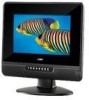
Coby TF TV1022 Instruction Manual - Page 5
Cable Connections, TV Function - power cord
 |
UPC - 716829981023
View all Coby TF TV1022 manuals
Add to My Manuals
Save this manual to your list of manuals |
Page 5 highlights
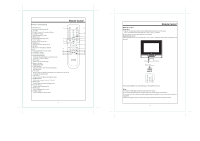
Figure. Cable connections Cable Connections Set the unit to the relative input mode to enable the signal pass. AC100-240V Outlet DVD OR VCR NOTE: 1. Be sure to have all necessary connections properly done before connect the power supply. 2. When input the AV signal, refer to the manual of the external sources as well. Antenna Connection Connect TV RF sources to the antenna port. TV RF signals include: receiving antenna/CATV net. You can use 75 coaxial cable to connect outdoor antenna. Line Out - Audio Output Connect the " Line Out" port to the external speaker or the digital decoding amplifier to output sound. Line out cable is not supplied. AV Signal Input To input the AV signal, you can chose either the S-Vdieo input or the RCA input. We suggest herewith the S-Video input since it works much better on the image definition than RCA input does. S-Video - Connect the "S-Video" port by the S-Video cable (not supplied) to input the video signal. Connect the "L" "R" port to input the audio signal by the white&red plug of the RCA cable. RCA - - Connect the "Video" port to input the video signal by the yellow plug of the RCA cable. Connect the "L" "R" port to input the audio signal by the white&red plug of the RCA cable. VGA Connection (PC Connection) When used as the computer screen, connect the VGA port by the 15-pin D-SUB signal cable and the PC Audio In port by the audio cable. Power Connection Insert one end of the adaptor to the 12V jack of the unit and the other end to the wall outlet with AC100-240V. If the unit will not be used for long period of time, please disconnect the power. 5 TV Function TV Function Preparations 1. Connect the antenna to the antenna jack on the unit side panel. 2. Connect the power supply cord. Press POWER to turn on the the player. 3. Press MODE on the remote to select TV. 4. Press CH+/- buttons to skip channels or press numeric buttons to input channel directly. Setup Menu Various features can be preset through the TV setup menu. TV setup menu consists of six menus. They are Picture Menu, Audio Menu, Time Menu, Option Menu, Lock Menu as well as Channel Menu. 1. Press MENU to show the menu window. 2. Press the left/right button to select the menu, press OK to enter the menu. Working with the menu While working with the menu, 1. Press the up/down direction button to select the item. 2. Press the left/right direction button to adjust 3. Press MENU to exit. 6
-
 1
1 -
 2
2 -
 3
3 -
 4
4 -
 5
5 -
 6
6 -
 7
7 -
 8
8 -
 9
9
 |
 |
