Compaq CQ50110US HP G50 Notebook PC and Compaq Presario CQ50 Notebook PC - Mai - Page 83
Battery, on Hard drive, Optical drive, Keyboard, Keyboard cover, Display assembly, Top cover
 |
UPC - 884420168270
View all Compaq CQ50110US manuals
Add to My Manuals
Save this manual to your list of manuals |
Page 83 highlights
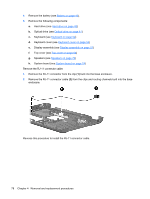
Description Spare part number Equipped with AMD processors: For use only with HP G50 and Compaq CQ50 computer models equipped with a Digital Media 489810-001 Slot and an HDMI port For use only with HP G50 and Compaq CQ50 computer models equipped only with a Digital Media 486550-001 Slot For use only with Compaq CQ50 computer models equipped with an HDMI port 490828-001 For use only with Compaq CQ50 computer models not equipped with an HDMI port 494182-001 Equipped with Intel processors: For use only with HP G50 and Compaq CQ50 computer models equipped with a GM45 chipset, 485218-001 Digital Media Slot, and HDMI port For use only with HP G50 and Compaq CQ50 computer models equipped with a GM45 chipset 494281-001 and Digital Media Slot For use only with HP G50 and Compaq CQ50 computer models equipped with a GL40 chipset, 485219-001 Digital Media Slot, and HDMI port For use only with HP G50 and Compaq CQ50 computer models equipped with a GL40 chipset 494282-001 and Digital Media Slot For use only with HP G50 and Compaq CQ50 computer models equipped with NVIDIA GeForce 488338-001 9200M graphics, a Digital Media Slot, and an HDMI port For use only with HP G50 and Compaq CQ50 computer models equipped with NVIDIA GeForce 494283-001 9200M graphics and a Digital Media Slot Before removing the system board, follow these steps: 1. Shut down the computer. If you are unsure whether the computer is off or in Hibernation, turn the computer on, and then shut it down through the operating system. 2. Disconnect all external devices connected to the computer. 3. Disconnect the power from the computer by first unplugging the power cord from the AC outlet and then unplugging the AC adapter from the computer. 4. Remove the battery (see Battery on page 40). 5. Remove the following components: a. Hard drive (see Hard drive on page 43) b. Optical drive (see Optical drive on page 41) c. Keyboard (see Keyboard on page 52) d. Keyboard cover (see Keyboard cover on page 54) e. Display assembly (see Display assembly on page 57) f. Top cover (see Top cover on page 64) g. Speakers (see Speakers on page 72) Component replacement procedures 75
-
 1
1 -
2
-
3
-
4
-
5
-
6
-
7
-
8
-
9
-
10
-
11
-
12
-
13
-
14
-
15
-
16
-
17
-
18
-
19
-
20
-
21
-
22
-
23
-
24
-
25
-
26
-
27
-
28
-
29
-
30
-
31
-
32
-
33
-
34
-
35
-
36
-
37
-
38
-
39
-
40
-
41
-
42
-
43
-
44
-
45
-
46
-
47
-
48
-
49
-
50
-
51
-
52
-
53
-
54
-
55
-
56
-
57
-
58
-
59
-
60
-
61
-
62
-
63
-
64
-
65
-
66
-
67
-
68
-
69
-
70
-
71
-
72
-
73
-
74
-
75
-
76
-
77
-
 78
78 -
 79
79 -
 80
80 -
 81
81 -
 82
82 -
 83
83 -
 84
84 -
 85
85 -
 86
86 -
 87
87 -
 88
88 -
89
-
90
-
91
-
92
-
93
-
94
-
95
-
96
-
97
-
98
-
99
-
100
-
101
-
102
-
103
-
104
-
105
-
106
-
107
-
108
-
109
-
110
-
111
-
112
-
113
-
114
-
115
-
116
-
117
-
118
-
119
-
120
-
121
-
122
-
123
-
124
-
125
-
126
-
127
-
128
-
129
-
130
-
131
-
132
-
133
-
134
-
135
-
136
-
137
-
138
-
139
-
140
-
141
-
142
-
143
-
144
-
145
-
146
-
147
-
148
-
149
 |
 |
