Compaq Presario 2500 HP Pavilion & Compaq Presario Notebook PC - Service M - Page 41
Removing the Hard Disk Drive (User-Replaceable - hard drive replacement
 |
View all Compaq Presario 2500 manuals
Add to My Manuals
Save this manual to your list of manuals |
Page 41 highlights
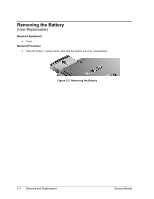
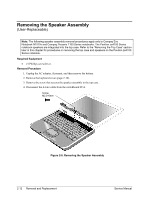
Removing the Hard Disk Drive (User-Replaceable) Required Equipment • #1 Phillips screwdriver. Removal Procedure Important If you are installing a new hard disk drive, load the factory software and operating system on the drive as described in "Recovering the Factory Software," as shown on the next page. 1. Unplug the AC adapter, if present, and then remove the battery. 2. On the bottom of the notebook, remove the hard drive rubber screw plugs and retaining screws. 3. Carefully pull the hard drive out of the notebook. Screw, M2.5×6mm (2) Figure 2-5. Removing the Hard Disk Drive Service Manual Removal and Replacement 2-7
-
 1
1 -
2
-
3
-
4
-
5
-
6
-
7
-
8
-
9
-
10
-
11
-
12
-
13
-
14
-
15
-
16
-
17
-
18
-
19
-
20
-
21
-
22
-
23
-
24
-
25
-
26
-
27
-
28
-
29
-
30
-
31
-
32
-
33
-
34
-
35
-
 36
36 -
 37
37 -
 38
38 -
 39
39 -
 40
40 -
 41
41 -
 42
42 -
 43
43 -
 44
44 -
 45
45 -
 46
46 -
47
-
48
-
49
-
50
-
51
-
52
-
53
-
54
-
55
-
56
-
57
-
58
-
59
-
60
-
61
-
62
-
63
-
64
-
65
-
66
-
67
-
68
-
69
-
70
-
71
-
72
-
73
-
74
-
75
-
76
-
77
-
78
-
79
-
80
-
81
-
82
-
83
-
84
-
85
-
86
-
87
-
88
-
89
-
90
-
91
-
92
-
93
-
94
-
95
-
96
-
97
-
98
-
99
-
100
-
101
-
102
-
103
-
104
-
105
-
106
-
107
-
108
-
109
-
110
-
111
-
112
-
113
-
114
-
115
-
116
-
117
-
118
-
119
-
120
-
121
-
122
-
123
-
124
-
125
-
126
 |
 |

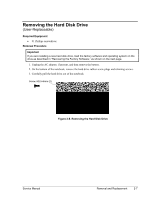
Removing the Hard Disk Drive
(User-Replaceable)
Required Equipment
•
#1 Phillips screwdriver.
Removal Procedure
Important
If you are installing a new hard disk drive, load the factory software and operating system on the
drive as described in ³Recovering the Factory Software,´ as shown on the next page.
1.
2.
3.
Unplug the AC adapter, if present, and then remove the battery.
On the bottom of the notebook, remove the hard drive rubber screw plugs and retaining screws.
Carefully pull the hard drive out of the notebook.
Screw, M2.5±6mm (2)
Figure 2-5. Removing the Hard Disk Drive
Service Manual
Removal and Replacement
2-7