Compaq Presario CQ5500 Upgrading and Servicing Guide - Page 6
Replacing the Front Bezel
 |
View all Compaq Presario CQ5500 manuals
Add to My Manuals
Save this manual to your list of manuals |
Page 6 highlights
6 Pull each of the three side tabs that secure the front bezel to the computer, to release the front bezel. Replacing the Front Bezel IMPORTANT: The new (replacement) part may not look the same as the original part, due to different manufacturers or models. Hewlett-Packard always provides quality parts that meet or exceed your original computer specifications. 1 To replace the front bezel, align the left side of the bezel and swing the front bezel toward the computer to close it. 7 Swing the front bezel out to remove from the computer. 2 The side panel has several tabs on its top, bottom, and leading edges. 4 570984-001 - Removing and Replacing the Front Bezel
-
 1
1 -
 2
2 -
 3
3 -
 4
4 -
 5
5 -
 6
6 -
 7
7 -
 8
8 -
 9
9 -
 10
10 -
 11
11 -
 12
12 -
13
-
14
-
15
-
16
-
17
-
18
-
19
-
20
-
21
-
22
-
23
-
24
-
25
-
26
-
27
-
28
-
29
-
30
-
31
-
32
-
33
-
34
-
35
-
36
-
37
-
38
-
39
-
40
-
41
-
42
-
43
-
44
-
45
-
46
 |
 |

4
570984-001 — Removing and Replacing the Front Bezel
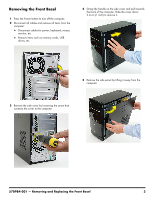
6
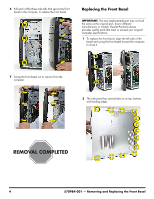
Pull each of the three side tabs that secure the front
bezel to the computer, to release the front bezel.
7
Swing the front bezel out to remove from the
computer.
Replacing the Front Bezel
1
To replace the front bezel, align the left side of the
bezel and swing the front bezel toward the computer
to close it.
2
The side panel has several tabs on its top, bottom,
and leading edges.
IMPORTANT:
The new (replacement) part may not look
the same as the original part, due to different
manufacturers or models. Hewlett-Packard always
provides quality parts that meet or exceed your original
computer specifications.