Craftsman 10721 Owners Manual - Page 7
Operation Cont., Description Cont., Operation
 |
View all Craftsman 10721 manuals
Add to My Manuals
Save this manual to your list of manuals |
Page 7 highlights
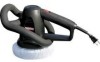
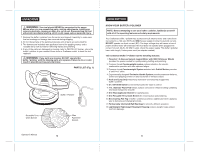
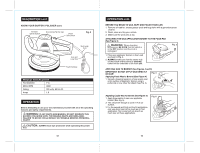
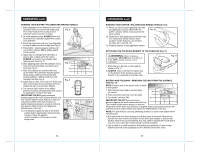
DESCRIPTION cont. KNOW YOUR BUFFER / POLISHER cont. Perimeter Handle System Non-marring Flat Top Cap On/Off Slide Switch Fig. 2 Stub Lengh Cord Hook and Loop Strip Foam Pad Base PRODUCT SPECIFICATIONS Pad Diameter 7-in. Motor OPM 3800 Rating 120 volts, 60 Hz AC Amps 1.0 OPERATION Before attempting to use your tool, familiarize yourself with all of the operating features and safety requirements. ! WARNING: IF ANY PARTS ARE MISSING, DO NOT OPERATE THIS BUFFER / POLISHER UNTIL THE MISSING PARTS ARE REPLACED. FAILURE TO DO SO COULD RESULT IN POSSIBLE SERIOUS PERSONAL INJURY. ! CAUTION: ALWAYS wear eye protection while operating this power tool. 12 OPERATION cont. BEFORE YOU BEGIN TO WAX, BUFF AND POLISH YOUR CAR: 1. Remove all road tar, excess grease spots and bug stains with a general-purpose cleaner. 2. Wash, clean and dry your vehicle. 3. Make sure the work area is dry. ATTACHING THE WAX APPLICATOR BONNET TO THE FOAM PAD (See Figure 3) ! WARNING: When changing accessories, BE SURE that the switch is in the OFF position and the cord is unplugged. Fig. 3 1. Place wax applicator bonnet on foam pad as shown in Fig. 3. 2. ALWAYS make sure that the elastic strip on the bottom of the bonnet is securely tucked on the underside of the foam pad. APPLYING WAX TO BONNET (See Figures 4 and 5) IMPORTANT: DO NOT APPLY WAX DIRECTLY ON CAR! Fig. 4 Applying Paste Wax to Bonnet (See Figure 4) 1. Spread a heaping teaspoon of wax evenly over entire surface of applicator bonnet using a putty knife or any other flat object (See Fig. 4). Applying Liquid Wax to Bonnet (See Figure 5) 1. Apply three swirls of wax over applicator bonnet (See Fig. 5). 2. This should be enough to cover 1/4 of car surface. 3. For the second and third and fourth applications, only use about one half as much as on first application. The bonnet will not absorb as much wax on these applications. Fig. 5 13
-
 1
1 -
 2
2 -
 3
3 -
 4
4 -
 5
5 -
 6
6 -
 7
7 -
 8
8 -
 9
9 -
 10
10
 |
 |
