Craftsman 21500 Operation Manual - Page 6
Maintenance - parts
 |
View all Craftsman 21500 manuals
Add to My Manuals
Save this manual to your list of manuals |
Page 6 highlights
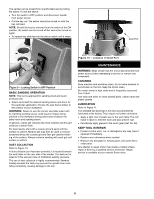
The sander can be locked from unauthorized use by locking the switch. To lock the switch: • Turn the switch to OFF position and disconnect sander from power source. • Pull the key out. The switch cannot be turned on with the key removed. NOTE: Should the key be removed from the switch at the ON position, the switch can be turned off but cannot be turned on again. • To replace key, slide key into the slot on switch until it snaps. Dust Port Figure 9 - Locking Switch in OFF Position BASIC SANDING OPERATION NOTE: This tool is approved for sanding wood and wood products only. • Select and install the desired sanding sleeve and drum for the particular application. Choose the size that is similar to the contour of your workpiece. WARNING: Failure to use the correct size table insert with its matching sanding sleeve could result in fingers being pinched or the workpiece being pulled down between the table insert and sanding sleeve. In general, coarse grit removes the most material and fine grit produces a better finish. For best results, start with a coarse grit and sand until the surface is uniform. Medium grit may then be used to remove scratches left by the coarser grit and finer grit used for finishing of the surface. Always continue sanding with each grit until surface is uniform. DUST COLLECTION Refer to Figure 10. A dust collection port has been provided; it is located beneath the work table on the rear side of the sander. The dust port is sized to fit the vacuum hose of Craftsman wet/dry vacuums. The use of dust collection is highly recommended. Sawdust buildup beneath the table may prevent the spindle from oscillating completely, causing damage to the tool. Figure 10 - Location of Dust Port MAINTENANCE WARNING: Make certain that the unit is disconnected from power source before attempting to service or remove any component. CLEANING Keep machine and workshop clean. Do not allow sawdust to accumulate on the tool. Keep the drums clean. Be certain motor is kept clean and is frequently vacuumed free of dust. Use soap and water to clean painted parts, rubber parts and plastic guards. LUBRICATION Refer to Figure 11. The shielded ball bearings in this tool are permanently lubricated at the factory. They require no further lubrication. • Apply a light coat of paste wax to the work table. This will make it easier to feed the work and also prevent rust. • Periodically apply grease to the worm gear (Ref. No. 54). KEEP TOOL IN REPAIR • If power cord is worn, cut, or damaged in any way, have it replaced immediately. • Replace worn abrasives when needed. • Replace any damaged or missing parts. Use parts list to order parts. Any attempt to repair motor may create a hazard unless repair is done by a qualified service technician. Repair service is available at your nearest Sears store. 6
-
 1
1 -
 2
2 -
 3
3 -
 4
4 -
 5
5 -
 6
6 -
 7
7 -
 8
8 -
 9
9 -
 10
10 -
 11
11 -
 12
12
 |
 |
