Craftsman 74815 Operation Manual - Page 13
Z:_ Caution, Warning - string trimmer
 |
View all Craftsman 74815 manuals
Add to My Manuals
Save this manual to your list of manuals |
Page 13 highlights
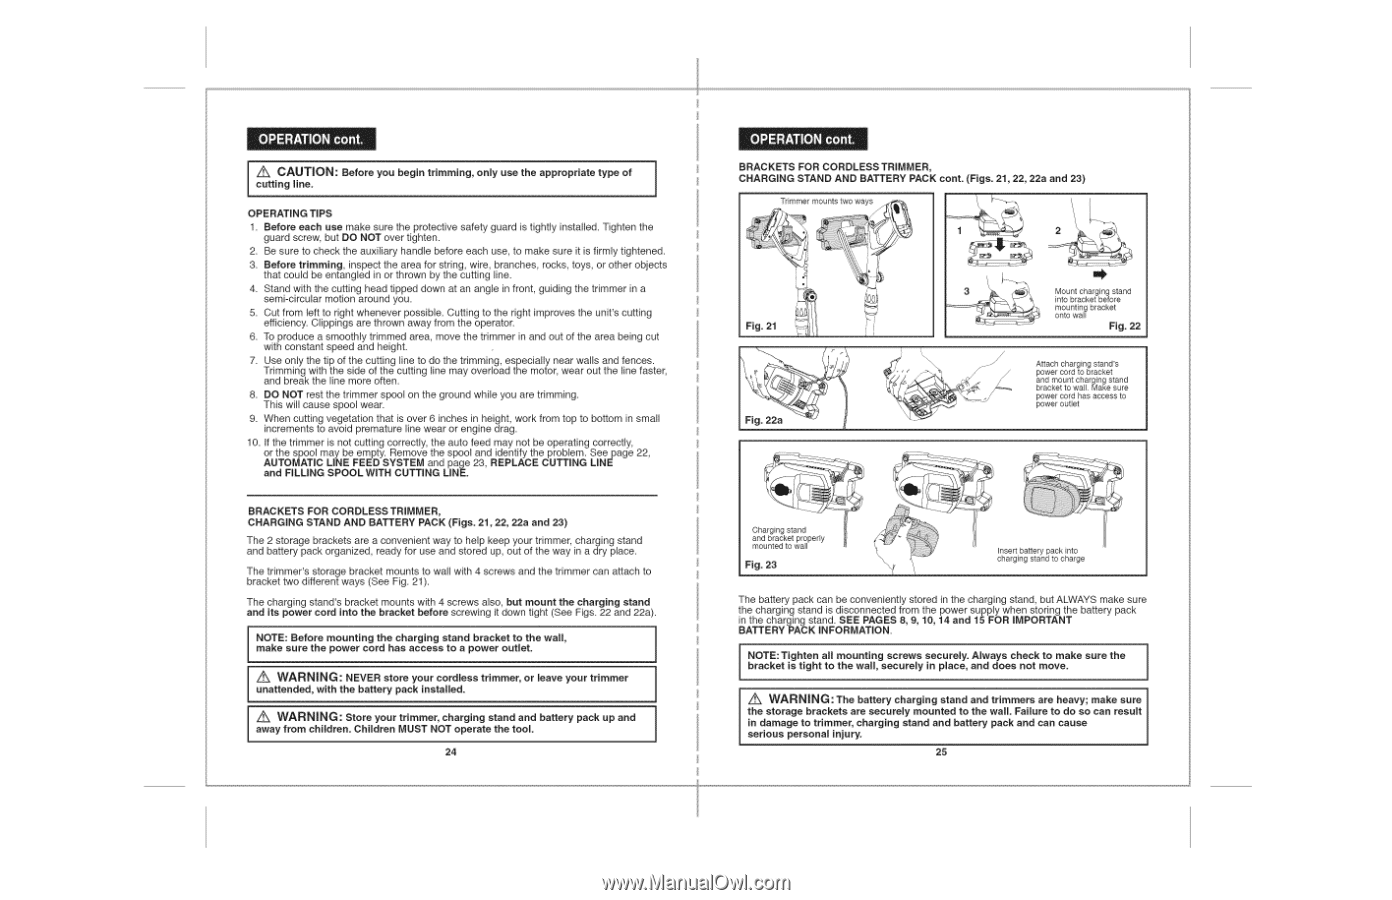
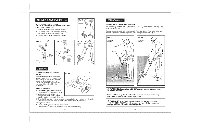
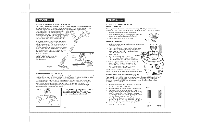
z:_ CAUTION: Before you begin trimming, only use the appropriate type of | cutting line. OPERATING TIPS 1. Before each use make sure the protective safety guard is tightly installed. Tighten tile guard screw, but DO NOT over tighten. 2. Be sure to check the auxiliary handle before each use, to make sure it is firmly tightened. 3. Before trimming, inspect the area for string, wire, branches, rocks, toys, or other objects that could be entangled in or thrown by the cutting line. 4. Stand with the cutting head tipped down at an angle in front, guiding the trimmer in a semi-circular motion around you. 5. Cut from left to right whenever possible. Cutting to the right improves the unit's cutting efficiency. Clippings are thrown away from the operator. 6. To produce a smoothly trimmed area, move the trimmer in and out of the area being cut with constant speed and height. 7. Use only the tip of the cutting line to do the trimming, especially near walls and fences. Trimming with the side of the cutting line may overload the motor, wear out the line faster, and break the line more often. 8. DO NOT rest the trimmer spool on the ground while you are trimming. This will cause spool wear. 9. When cutting vegetation that is over 6 inches in height, work from top to bottom in small increments to avoid premature line wear or engine drag. 10. If the trimmer is not cutting correctly, the auto feed may not be operating correctly, or the spool may be empty. Remove the spool and identify the problem. See page 22, AUTOMATIC LINE FEED SYSTEM and page 23, REPLACE CUTTING LINE and FiLLiNG SPOOL WITH CUTTING LINE. BRACKETS FOR CORDLESS TRIMMER, CHARGING STAND AND BATTERY PACK (Figs, 21,22, 22a and 23) The 2 storage brackets are a convenient way to help keep your trimmer, charging stand and battery pack organized, ready for use and stored up, out of the way in a dry place. The trimmer's storage bracket mounts to wall with 4 screws and the trimmer can attach to bracket two different ways (See Fig. 21 ). The charging stand's bracket mounts with 4 screws also, but mount the charging stand and its power cord into the bracket before screwing it down tight (See Figs. 22 and 22a). NOTE: Before mounting the charging stand bracket to the wail, make sure the power cord has access to a power outlet. } z_ WARNING: NEVER store your cordless trimmer, or leave your trimmer unattended, with the battery pack installed. Z_ WARNING: Store your trimmer, charging stand and battery pack up and away from children. Children MUST NOT operate the tool. } 24 BRACKETS FOR CORDLESS TRIMMER, CHARGING STAND AND BATTERY PACK cont. (Figs. 21, 22, 22a and 23) Trimmer mounts two ways , Fig. 21 . j W Mount charging stand into bracket before mounting bracket onto wall Fig. 22 Attach charging stand's power cord to bracket and mount charging stand bracket to wall. Make sure power cord has access to power outlet Charging stand and bracket properly mounted to wall Fig. 23 Insert battery pack into charging stand to charge The battery pack can be conveniently stored in the charging stand, but ALWAYS make sure the charging stand is disconnected from the power supply when storing the battery pack in the charging stand. SEE PAGES 8, 9, 10, 14 and 15 FOR IMPORTANT BATTERY PACK INFORMATION. NbrOacTkEe:tTigihstetnight atoll mthoeunwtianlgl, sescurerewlys sinecpulraeclye., aAnlwdaydsoeschneoctk mtoovme.ake sure the Z_ WARNING: The battery charging stand and trimmers are heavy; make sure the storage brackets are securely mounted to the wall. Failure to do so can result in damage to trimmer, charging stand and battery pack and can cause serious personal injury. 25
-
 1
1 -
2
-
3
-
4
-
5
-
6
-
7
-
 8
8 -
 9
9 -
 10
10 -
 11
11 -
 12
12 -
 13
13 -
 14
14 -
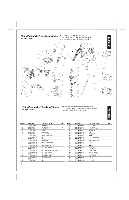 15
15 -
 16
16
 |
 |