Craftsman 88970 Operation Manual - Page 24
Jfriction Jremoval
 |
View all Craftsman 88970 manuals
Add to My Manuals
Save this manual to your list of manuals |
Page 24 highlights
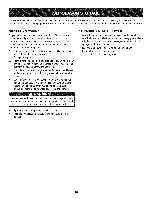
Drive Belt To removeand replaceyoursnow thrower'sdrivebelt, proceedas follows: 1. Topreventspillage,removeall fuel fromtank by runningengine until it stops. 2. Removethe plasticbelt coveron the front of the engineby removing the two self-tappingscrews.See Figure27 on previouspage. 3. Removethe beltfrom enginepulleyas follows.Referto Figure32. a. Rollthe auger beltoff theengine pulley. b. Use a wrenchto pivotthe idler pulleytowardthe right. c. Lift the drivebelt off engine pulley. 4. Carefullypivotthe snow throwerup and forwardsothat it restson the augerhousing. 5. Removethe framecoverfrom the undersideof thesnow thrower by removingfour self-tappingscrewswhich secureit. Referto Figure29. 6. Back outthe stop bolt to increasethe clearancebetweenthe frictionwheeldisc and frictionwheel.See Figure33. 7. Slip the drivebelt off the frictionwheeldisc and thenbetween frictionwheeland frictionwheeldisc.See Figure33. f 8. Reassembledrive beltby followingthese instructionsin opposite order and mannerof removal. J Figure32 FRICTION WHEEL REMOVAL If the snowthrowerfailsto drive with thedrivecontrol engaged, and performingthe drivecontrolcableadjustmentfails to correct the problem,the frictionwheelmayneed to be replaced.Followthe instructionsbelow.Examinethe frictionwheelfor signsof wearor crackingand replaceif necessary. 1. Topreventspillage,removeall fuel fromtank by runningengine until it stops. 2. Placethe shiftleverin third Forward(F3) position. 3. Carefullypivotthe snowthrowerup and forwardso that it restson theauger housing. 4. Removethe frame coverfrom the undersideof the snow thrower by removingself-tappingscrewswhich secureit. 5. Removethe right-handwheelby removingthe screwand bell washerwhichsecureit to theaxle. See Figure34. Stop Bolt f Figure33 J Figure34 24
-
 1
1 -
2
-
3
-
4
-
5
-
6
-
7
-
8
-
9
-
10
-
11
-
12
-
13
-
14
-
15
-
16
-
17
-
18
-
 19
19 -
 20
20 -
 21
21 -
 22
22 -
 23
23 -
 24
24 -
 25
25 -
 26
26 -
 27
27 -
 28
28 -
 29
29 -
30
-
31
-
32
-
33
-
34
-
35
-
36
-
37
-
38
-
39
-
40
-
41
-
42
-
43
-
44
-
45
-
46
-
47
-
48
-
49
-
50
-
51
-
52
-
53
-
54
-
55
-
56
-
57
-
58
-
59
-
60
-
61
-
62
-
63
-
64
-
65
-
66
-
67
-
68
-
69
-
70
-
71
-
72
-
73
-
74
-
75
-
76
 |
 |
