Craftsman Mower 50 Owners Manual - Page 17
TROUBLESHOOTING - See appropriate in manual unless directed, to a Sears Parts & Repair
 |
View all Craftsman Mower 50 manuals
Add to My Manuals
Save this manual to your list of manuals |
Page 17 highlights
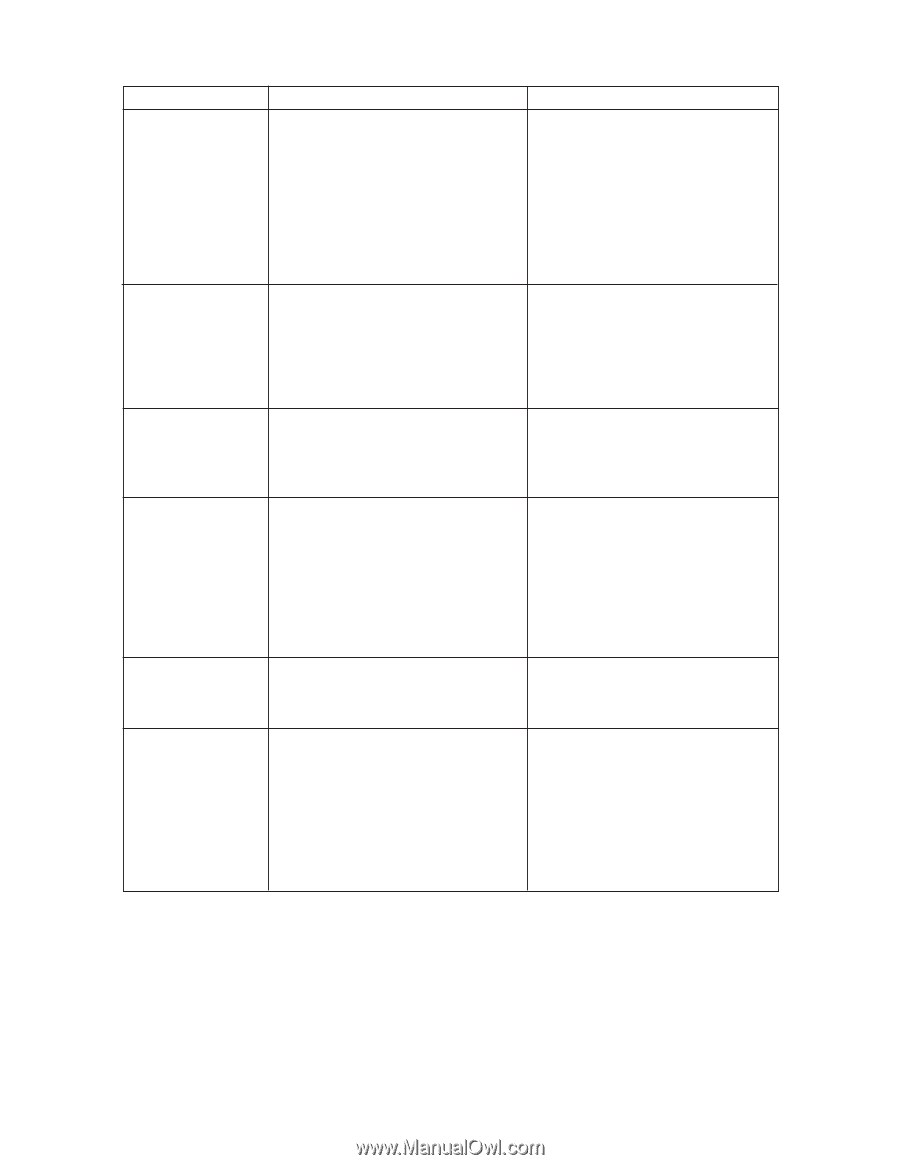
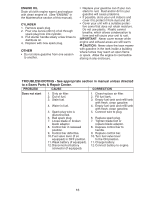
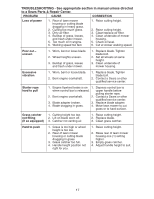
TROUBLESHOOTING - See appropriate section in manual unless directed to a Sears Parts & Repair Center. PROBLEM CAUSE CORRECTION Loss of power 1. Rear of lawn mower housing or cutting blade dragging in heavy grass. 2. Cutting too much grass. 3. Dirty air filter. 4. Buildup of grass, leaves, and trash under mower. 5. Too much oil in engine. 6. Walking speed too fast. 1. Raise cutting height. 2. Raise cutting height. 3. Clean/replace air filter. 4. Clean underside of mower housing. 5. Check oil level. 6. Cut at slower walking speed. Poor cut - uneven 1. Worn, bent or loose blade. 2. Wheel heights uneven. 3. Buildup of grass, leaves and trash under mower. 1. Replace blade. Tighten blade bolt. 2. Set all wheels at same height. 3. Clean underside of mower housing. Excessive vibration 1. Worn, bent or loose blade. 2. Bent engine crankshaft. 1. Replace blade. Tighten blade bolt. 2. Contact a Sears or other qualified service center. Starter rope hard to pull 1. Engine flywheel brake is on 1. Depress control bar to when control bar is released. upper handle before pulling starter rope. 2. Bent engine crankshaft. 2. Contact a Sears or other qualified service center. 3. Blade adapter broken. 3. Replace blade adapter. 4. Blade dragging in grass. 4. Move lawn mower to cut grass or to hard surface. Grass catcher not filling (If so equipped) 1. Cutting height too low. 2. Lift on blade worn off. 3. Catcher not venting air. 1. Raise cutting height. 2. Replace blade. 3. Clean grass catcher. Hard to push 1. Grass is too high or wheel height is too low. 2. Rear of lawn mower housing or cutting blade dragging in grass. 3. Grass catcher too full. 4. Handle height position not right for you. 1. Raise cutting height. 2. Raise rear of lawn mower housing one (1) setting higher. 3. Empty grass catcher. 4. Adjust handle height to suit. 17
-
 1
1 -
2
-
3
-
4
-
5
-
6
-
7
-
8
-
9
-
10
-
11
-
 12
12 -
 13
13 -
 14
14 -
 15
15 -
 16
16 -
 17
17 -
 18
18
 |
 |