Creative Live Cam Optia Pro Setup Guide - Page 1
Creative Live Cam Optia Pro Manual
 |
View all Creative Live Cam Optia Pro manuals
Add to My Manuals
Save this manual to your list of manuals |
Page 1 highlights
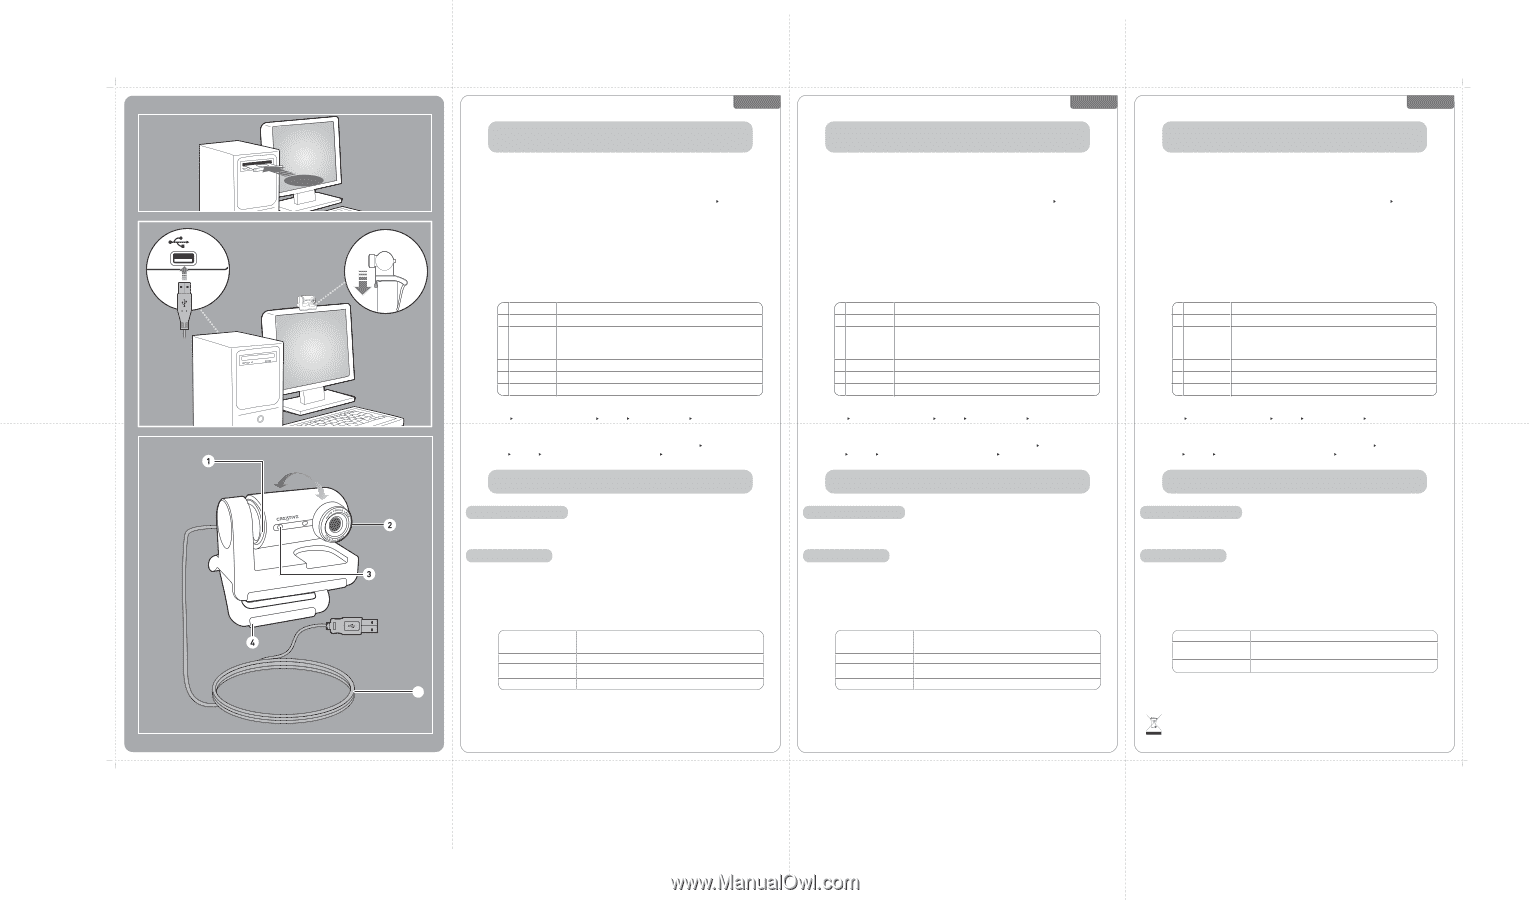
1 CD 2 USB 3 270º English You do not need to install device drivers and applications to capture still images and full color videos. Install device drivers and applications when you want to perform advanced tasks using Creative applications. 1 Installing Device Drivers and Applications Insert the Installation CD into your CD-ROM/DVD-ROM drive. Your CD should start automatically. If it does not, follow the steps below: 1) Double-click the My Computer icon. Alternatively, click Start My Computer. 2) Right-click the CD-ROM/DVD-ROM drive icon, and then click Autoplay. 2 When prompted, connect your webcam's USB cable to your computer. Windows® automatically detects the device. After all the applications have been installed, restart your computer. You do not need to install device drivers and applications to capture still images and full color videos. Install device drivers and applications when you want to perform advanced tasks using Creative applications. 1 Installing Device Drivers and Applications Insert the Installation CD into your CD-ROM/DVD-ROM drive. Your CD should start automatically. If it does not, follow the steps below: 1) Double-click the My Computer icon. Alternatively, click Start My Computer. 2) Right-click the CD-ROM/DVD-ROM drive icon, and then click Autoplay. 2 When prompted, connect your webcam's USB cable to your computer. Windows® automatically detects the device. After all the applications have been installed, restart your computer. Türkçe You do not need to install device drivers and applications to capture still images and full color videos. Install device drivers and applications when you want to perform advanced tasks using Creative applications. 1 Installing Device Drivers and Applications Insert the Installation CD into your CD-ROM/DVD-ROM drive. Your CD should start automatically. If it does not, follow the steps below: 1) Double-click the My Computer icon. Alternatively, click Start My Computer. 2) Right-click the CD-ROM/DVD-ROM drive icon, and then click Autoplay. 2 When prompted, connect your webcam's USB cable to your computer. Windows® automatically detects the device. After all the applications have been installed, restart your computer. 3 Using Your Live! Cam Component Description 1 Power LED Lights up blue when your Live! Cam is streaming video 2 Camera Head The camera head has a 270 degree range and if turned backwards, will automatically flip any image right side up. If the camera head is turned to face down, the video preview displays a black screen (or a privacy logo) and audio from the microphone is muted. 3 Microphone 4 Hinged lever 5 USB Cable Captures audio clearly during video chats. Use this to mount your Live! Cam on an LCD display panel. Connect to your computer's USB port. • To capture images and videos (including time lapse video) Click Start Programs or All Programs Creative Creative Live! Cam Creative Live! Cam Center. • To secure your webcam with a password (Parental Control), automatically zoom in on faces (Smart Face Tracking), or add video and sound effects Make sure your Live! Cam is connected to your computer, and click Start Programs or All Programs Creative Creative Live! Cam Optia Pro (VF0380) Creative Live! Cam Console. For details about using your webcam's software, click Help from the application's main window. 3 Using Your Live! Cam Component Description 1 Power LED Lights up blue when your Live! Cam is streaming video 2 Camera Head The camera head has a 270 degree range and if turned backwards, will automatically flip any image right side up. If the camera head is turned to face down, the video preview displays a black screen (or a privacy logo) and audio from the microphone is muted. 3 Microphone 4 Hinged lever 5 USB Cable Captures audio clearly during video chats. Use this to mount your Live! Cam on an LCD display panel. Connect to your computer's USB port. • To capture images and videos (including time lapse video) Click Start Programs or All Programs Creative Creative Live! Cam Creative Live! Cam Center. • To secure your webcam with a password (Parental Control), automatically zoom in on faces (Smart Face Tracking), or add video and sound effects Make sure your Live! Cam is connected to your computer, and click Start Programs or All Programs Creative Creative Live! Cam Optia Pro (VF0380) Creative Live! Cam Console. For details about using your webcam's software, click Help from the application's main window. 3 Using Your Live! Cam Component Description 1 Power LED Lights up blue when your Live! Cam is streaming video 2 Camera Head The camera head has a 270 degree range and if turned backwards, will automatically flip any image right side up. If the camera head is turned to face down, the video preview displays a black screen (or a privacy logo) and audio from the microphone is muted. 3 Microphone 4 Hinged lever 5 USB Cable Captures audio clearly during video chats. Use this to mount your Live! Cam on an LCD display panel. Connect to your computer's USB port. • To capture images and videos (including time lapse video) Click Start Programs or All Programs Creative Creative Live! Cam Creative Live! Cam Center. • To secure your webcam with a password (Parental Control), automatically zoom in on faces (Smart Face Tracking), or add video and sound effects Make sure your Live! Cam is connected to your computer, and click Start Programs or All Programs Creative Creative Live! Cam Optia Pro (VF0380) Creative Live! Cam Console. For details about using your webcam's software, click Help from the application's main window. Creative Knowledge Base Resolve and troubleshoot technical queries at Creative's 24-hour self-help Knowledge Base. Go to www.creative.com, select your region and then select Support. Product Registration Registering your product ensures you receive the most appropriate service and product support available. You can register your product during installation or at www.creative.com/register. Please note that your warranty rights are not dependent on registration. Creative Knowledge Base Resolve and troubleshoot technical queries at Creative's 24-hour self-help Knowledge Base. Go to www.creative.com, select your region and then select Support. Product Registration Registering your product ensures you receive the most appropriate service and product support available. You can register your product during installation or at www.creative.com/register. Please note that your warranty rights are not dependent on registration. Creative Knowledge Base Resolve and troubleshoot technical queries at Creative's 24-hour self-help Knowledge Base. Go to www.creative.com, select your region and then select Support. Product Registration Registering your product ensures you receive the most appropriate service and product support available. You can register your product during installation or at www.creative.com/register. Please note that your warranty rights are not dependent on registration. Installation CD Installation CD Installation CD User's Guide d:\manual\\manual.chm User's Guide d:\manual\\manual.chm Customer Support Services d:\support\\\support.chm Customer Support Services The User's Guide contains FAQs and in-depth information about software features, as well as instructions on using Creative Live! Cam Console. d:\support\\support.chm Customer Support Services The User's Guide contains FAQs and in-depth information about software features, as well as instructions on using Creative Live! Cam Console. d:\support\\support.chm Warranty d:\warranty\\\warranty.chm Please keep your Proof of Purchase for the duration of the warranty period. Warranty d:\warranty\\\warranty.chm Warranty d:\warranty\\\warranty.chm Safety d:\notices\\safety.chm Please keep your Proof of Purchase for the duration of the warranty period. Please keep your Proof of Purchase for the duration of the warranty period. Safety d:\notices\\safety.chm Safety d:\notices\\safety.chm (replace d:\ with the drive letter of your CD-ROM/DVD-ROM drive, with the region that you are in, and with the language that your document is in) 5 (replace d:\ with the drive letter of your CD-ROM/DVD-ROM drive, with the region that you (replace d:\ with the drive letter of your CD-ROM/DVD-ROM drive, with the region that you are in, and with the language that your document is in) are in, and with the language that your document is in) Copyright © 2007 Creative Technology Ltd. All rights reserved. The Creative logo and Live! are registered trademarks of Creative Technology Ltd. in the United States and/or other countries. Microsoft, Windows and the Windows logo are registered trademarks of Microsoft Corporation. Copyright © 2007 Creative Technology Ltd. All rights reserved. The Creative logo and Live! are registered trademarks of Creative Technology Ltd. in the United States and/or other countries. Microsoft, Windows and the Windows logo are registered trademarks of Microsoft Corporation. The use of the WEEE Symbol indicates that this product may not be treated as household waste. By ensuring this product is disposed of correctly, you will help protect the environment. For more detailed information about the recycling of this product, please contact your local authority, your household waste disposal service provider or the shop where you purchased the product. Copyright © 2007 Creative Technology Ltd. All rights reserved. The Creative logo and Live! are registered trademarks of Creative Technology Ltd. in the United States and/or other countries. Microsoft, Windows and the Windows logo are registered trademarks of Microsoft Corporation.
-
 1
1
 |
 |