Creative Muvo Vidz 512MB User Guide - Page 11
MuVo VIDZ, LOGO00.BMP, My Computer, Start, DO NOT, Comm Mode, Creative
 |
View all Creative Muvo Vidz 512MB manuals
Add to My Manuals
Save this manual to your list of manuals |
Page 11 highlights
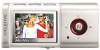
Osaka.fm Page 9 Wednesday, November 16, 2005 2:15 PM Customizing the start up screen _____ You can replace the MuVo VIDZ logo that appears when your player turns on with an image of your choice. 1. On your computer, create a 128 x 80 pixel image using your favorite image creation software and save the image file as LOGO00.BMP. 2. Make sure that the file size of the LOGO00.BMP file is less than 1 MB. 3. Connect your player to your computer's USB port with the supplied USB cable. PLAY/STOP 4. Press and hold the Play/Stop button to turn on your player. 5. Double-click the My Computer icon on your desktop. Alternatively, click Start → My Computer. You will notice that your player is recognized as a Removable Disk. 6. Locate the LOGO00.BMP file you created on your computer and copy it to your player's Root folder using the drag-and-drop method. 7. Disconnect your player from your computer properly (see "Disconnect the player" on page 5). DO NOT disconnect your player from your computer if you see the Comm Mode screen on the OLED display. PLAY/STOP 8. Press and hold the Play/Stop button to turn off your player. PLAY/STOP 9. Press and hold the Play/Stop button again to turn your player back on. 10. The LOGO00.BMP file appears after the Creative logo appears. You can also customize your player's screen saver using your favorite images. For more information, refer to your player's User's Guide found on the Installation and Applications CD (see "More Information" on page 11). 9
-
 1
1 -
2
-
3
-
4
-
5
-
 6
6 -
 7
7 -
 8
8 -
 9
9 -
 10
10 -
 11
11 -
 12
12 -
 13
13 -
 14
14 -
 15
15 -
 16
16 -
17
-
18
-
19
-
20
-
21
-
22
-
23
-
24
-
25
-
26
-
27
-
28
-
29
-
30
-
31
-
32
-
33
-
34
-
35
-
36
-
37
-
38
-
39
-
40
 |
 |
