Cub Cadet HT59L HT59L Operator's Manual - Page 3

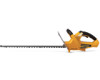
Operating Instructions, Maintenance And Repair Instructions, Specifications, Cleaning And Storage, - hedge trimmer

Page 3 highlights

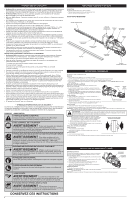
OPERATING INSTRUCTIONS CLEANING AND STORAGE WARNING: Do not allow familiarity with this unit to promote carelessness. Remember that a careless fraction of a second is enough to inflict serious injury. WARNING: If any parts are damaged or missing, do not operate the unit until the parts are replaced. Failure to heed this warning could result in serious personal injury. WARNING: Always wear appropriate eye and ear protection when operating this unit. Wear safety goggles, or safety glasses with side shields, that are marked as meeting ANSI Z87.1-1989 standards. Failure to do so could result in serious eye injury caused by thrown objects. If the operation is dusty, wear a facemask or dust mask. Use a hard hat or other type of safety helmet. WARNING: Wear non-slip gloves for maximum grip and protection. Refer to the Safety Information section for appropriate safety equipment. WARNING: Do not let brake fluids, gasoline, petroleum-based products, penetrating oils, etc., come in contact with plastic parts. These chemicals may damage, weaken and destroy plastic, which may result in serious personal injury. Cleaning Instructions • Remove the battery from the unit. • Use a firm-bristled, non-wire, brush to remove debris from the trimmer blade and air vents. Keep the air vents free from obstructions. • Wipe the unit down with a damp cloth. Do not douse the unit with water. Do not use solvents or strong detergents. • Spray the trimmer blade with corrosion inhibiting oil. Storage Instructions • Follow the Cleaning Instructions listed above. • Attach the scabbard to the trimmer blade. • Store the unit in a dry, high and/or locked location, out of the reach of children and other unauthorized persons. PROPER GRIP ON HANDLES • Hold the unit firmly with both hands. Always keep one hand on the front handle and the other hand on the rear handle. • Maintain a proper grip on the unit whenever the motor is running. The fingers should encircle the handle and the thumb should wrap under the handlebar. This grip is least likely to be broken. Any grip in which the thumb and fingers are on the same side of the handle is dangerous because a slight kick of the unit can cause loss of control. • Keep hands away from the trimmer blade. Keep both hands on the handles and behind the protective guard whenever the motor is running. PROPER CUTTING STANCE • Balance body weight securely, with both feet on solid ground. WORK AREA PRECAUTIONS DANGER: If the trimmer blade gets caught on an electrical cord or wire, DO NOT TOUCH THE BLADE! IT MAY BE ELECTRICALLY LIVE AND EXTREMELY DANGEROUS. Release the trimmer in the quickest and safest way. If possible, disconnect the damaged electrical cord or wire from its power source. If that is not possible, call an electrician, electrical contractor, or the power company for assistance. Failure to heed this danger warning will cause serious personal injury or possible death. • Keep everyone - helpers, bystanders, children and animals - at least 50 feet (15 m) away from the work area. If anyone enters the work area, stop the unit! • Only operate the unit when visibility and light are adequate to see clearly. • Keep the work area clean. Do not start the operation until the work area is clear and free from obstructions. Remove all cords, lights, wires, strings or other objects that could become entangled in the trimmer blade. BASIC OPERATING PROCEDURES WARNING: Do not attempt to remove cut material or hold material to be cut while the trimmer blade is moving. Do not grasp the trimmer blade when picking up or holding the unit. Make sure the battery is removed and the switch lock is in the locked or OFF position before clearing any jammed material from the trimmer blade. IMPORTANT: Lubricate the trimmer blade before and after each use. Ignoring this step will decrease the life of the trimmer blade and hamper operation. Refer to Maintenance and Repair Instructions. • Use the hedge trimmer for trimming and forming hedges, shrubs and bushes with a branch diameter of up to 1/2 of an inch (12.7 mm). For larger branches, use a non-powered saw or pruning saw. • Work slowly, while maintaining a proper grip and stance. Fig. 4 • Allow the unit to do the cutting. Forcing the unit through dense growth, or attempting to trim too much at one time, can cause the blade to bind and slow, reducing the cutting efficiency. Forcing the unit can also result in damage to the blade and can increase the chance of personal injury. • When trimming new growth, use a wide sweeping action, so that stems are fed directly into the trimmer blade. Older growth will have thicker stems and will be trimmed easiest by using a sawing motion. • Release the switch trigger as soon as the cut is completed. Allow the trimmer blade to come to a complete stop. Unnecessary wear may occur if the unit is run without a cutting load. • After completing the cut, wait for the trimmer blade to stop before moving the unit. Always stop the motor before moving from hedge to hedge. • If desired, use a string to help cut hedges level. Determine the desired height of the hedge, then stretch a length of string along the hedge at that height. Trim the hedge to just above the string line. Trim the side of the hedge so that it will be slightly narrower at the top. More of the hedge will be exposed when shaped this way, and it will appear more uniform. • Do not cut from a ladder; this is extremely dangerous. Leave this operation for professionals. • Do not cut above chest height, as a hedge trimmer held higher is more difficult to control. TROUBLESHOOTING THE MOTOR OPERATES SLOWLY OR WILL NOT OPERATE CAUSE The battery lacks sufficient charge The trimmer blade is jammed with debris SOLUTION Charge the battery Clean the trimmer blade NOTE: For maintenance beyond the minor adjustments listed above, please call the Customer Support Department at 1-877-282-8684 (U.S.) or 1-800-668-1238 (Canada). SPECIFICATIONS MOTOR* Type Cordless, Battery-powered Motor...20 V Reciprocating Speed 3200 SPM (Strokes Per Minute) Blade Length 22 inches (56 cm) Cutting Capacity 1/2 inch (12.7 mm) Weight (with Battery 8 lb 3 oz (3.7 kg) * All specifications are based on the latest product information available at the time of printing. We reserve the right to make changes at any time without notice. ACCESSORIES (SOLD SEPARATELY) Model # Part # Description A59 LBTY 753-06579 20V Lithium-ion Battery A59LCHGR 753-06580 20V Lithium-ion Battery Charger MAINTENANCE AND REPAIR INSTRUCTIONS WARNING: Before inspecting, cleaning, or servicing the unit, stop the motor, wait for all moving parts to stop, and remove the battery. Failure to follow these instructions can result in serious personal injury or property damage. WARNING: To avoid possible serious injury, never touch or adjust the trimmer blade while the motor is running. The trimmer blade is very sharp; always wear protective gloves when performing maintenance to the trimmer blade. MAINTENANCE BASICS Before inspecting, servicing, cleaning, storing or transporting the unit: 1. Make sure all moving parts have stopped. 2. Allow the unit to cool. 3. Remove the battery. SHARPENING THE BLADE The cutting blades are made from high-quality, hardened steel and with normal usage will not require sharpening. However, if the trimmer blade accidentally hits wire fencing, stones, glass, nails or other hard objects, the blade may become nicked. There is no need to remove this nick unless it interferes with the movement of the trimmer blade. If it does interfere, or if the performance of the unit has diminished due to blade dullness, have the trimmer blade sharpened by an authorized service center. LUBRICATING THE BLADE CAUTION: Some spray-on lubricants contain solvents and will cause some types of grease to break down. To prevent damage to the unit, only use a high-quality machine oil. Fig. 5 • For easier operation and longer blade life, lubricate the trimmer blade before and after each use. • During use, occasionally stop the motor, ensure that the switch lock is in the locked or OFF position, remove the battery and lubricate the trimmer blade as needed. 1. Apply light machine oil along the edge of the top blade (Fig. 5). 3

  • 1
  • 2
  • 3
  • 4
  • 5
  • 6
  • 7
  • 8
  • 9
  • 10
  • 11
  • 12

3
OPERATING INSTRUCTIONS
PROPER GRIP ON HANDLES
Hold the unit firmly with both hands. Always keep one hand on the front handle and the other hand on the rear handle.
Maintain a proper grip on the unit whenever the motor is running. The fingers should encircle the handle and the thumb should wrap
under the handlebar. This grip is least likely to be broken. Any grip in which the thumb and fingers are on the same side of the handle is
dangerous because a slight kick of the unit can cause loss of control.
Keep hands away from the trimmer blade. Keep both hands on the handles and behind the protective guard whenever the motor is running.
PROPER CUTTING STANCE
Balance body weight securely, with both feet on solid ground.
WORK AREA PRECAUTIONS
Keep everyone – helpers, bystanders, children and animals – at least 50 feet (15 m) away from the work area. If anyone enters the work
area, stop the unit!
Only operate the unit when visibility and light are adequate to see clearly.
Keep the work area clean. Do not start the operation until the work area is clear and free from obstructions. Remove all cords, lights,
wires, strings or other objects that could become entangled in the trimmer blade.
BASIC OPERATING PROCEDURES
IMPORTANT:
Lubricate the trimmer blade before and after each use. Ignoring
this step will decrease the life of the trimmer blade and hamper
operation. Refer to
Maintenance and Repair Instructions
.
Use the hedge trimmer for trimming and forming hedges, shrubs and bushes
with a branch diameter of up to 1/2 of an inch (12.7 mm). For larger branches,
use a non-powered saw or pruning saw.
Work slowly, while maintaining a proper grip and stance.
Allow the unit to do the cutting. Forcing the unit through dense growth, or attempting to trim too much at one time, can cause the blade
to bind and slow, reducing the cutting efficiency. Forcing the unit can also result in damage to the blade and can increase the chance of
personal injury.
When trimming new growth, use a wide sweeping action, so that stems are fed directly into the trimmer blade. Older growth will have
thicker stems and will be trimmed easiest by using a sawing motion.
Release the switch trigger as soon as the cut is completed. Allow the trimmer blade to come to a complete stop. Unnecessary wear
may occur if the unit is run without a cutting load.
After completing the cut, wait for the trimmer blade to stop before moving the unit. Always stop the motor before moving from hedge to hedge.
If desired, use a string to help cut hedges level. Determine the desired height of the hedge, then stretch a length of string along the
hedge at that height. Trim the hedge to just above the string line. Trim the side of the hedge so that it will be slightly narrower at the top.
More of the hedge will be exposed when shaped this way, and it will appear more uniform.
Do not cut from a ladder; this is extremely dangerous. Leave this operation for professionals.
Do not cut above chest height, as a hedge trimmer held higher is more difficult to control.
Fig. 4
MAINTENANCE BASICS
Before inspecting, servicing, cleaning, storing or transporting the unit:
1.
Make sure all moving parts have stopped.
2.
Allow the unit to cool.
3.
Remove the battery.
SHARPENING THE BLADE
The cutting blades are made from high-quality, hardened steel and with normal
usage will not require sharpening. However, if the trimmer blade accidentally hits
wire fencing, stones, glass, nails or other hard objects, the blade may become
nicked. There is no need to remove this nick unless it interferes with the
movement of the trimmer blade. If it does interfere, or if the performance of the
unit has diminished due to blade dullness, have the trimmer blade sharpened by
an authorized service center.
LUBRICATING THE BLADE
For easier operation and longer blade life, lubricate the trimmer blade before and after each use.
During use, occasionally stop the motor, ensure that the switch lock is in the locked or OFF position, remove the battery and lubricate
the trimmer blade as needed.
1.
Apply light machine oil along the edge of the top blade (Fig. 5).
Fig. 5
MAINTENANCE AND REPAIR INSTRUCTIONS
Cleaning Instructions
Remove the battery from the unit.
Use a firm-bristled, non-wire, brush to remove debris from the trimmer blade and air vents. Keep the air vents free from obstructions.
Wipe the unit down with a damp cloth. Do not douse the unit with water. Do not use solvents or strong detergents.
Spray the trimmer blade with corrosion inhibiting oil.
Storage Instructions
Follow the
Cleaning Instructions
listed above.
Attach the scabbard to the trimmer blade.
Store the unit in a dry, high and/or locked location, out of the reach of children and other unauthorized persons.
WARNING:
Do not let brake fluids, gasoline, petroleum-based products, penetrating oils, etc., come in contact with plastic
parts. These chemicals may damage, weaken and destroy plastic, which may result in serious personal injury.
SPECIFICATIONS
MOTOR*
*
All specifications are based on the latest product information available at the time of printing. We reserve the right to make changes at
any time without notice.
Type
. . . . . . . . . . . . . . . . . . . . . . . . . . . . . . . . . . . . . . . . . . . . . . . . . . . . . . . . . . . . . . . . . . . . . . . . . . . . . . . . . . . . . Cordless, Battery-powered
Motor. . . . . . . . . . . . . . . . . . . . . . . . . . . . . . . . . . . . . . . . . . . . . . . . . . . . . . . . . . . . . . . . . . . . . . . . . . . . . . . . . . . . . . . . . . . . . . . . . . . . . . . 20 V
Reciprocating Speed . . . . . . . . . . . . . . . . . . . . . . . . . . . . . . . . . . . . . . . . . . . . . . . . . . . . . . . . . . . . . . . . . . . . . 3200 SPM (Strokes Per Minute)
Blade Length . . . . . . . . . . . . . . . . . . . . . . . . . . . . . . . . . . . . . . . . . . . . . . . . . . . . . . . . . . . . . . . . . . . . . . . . . . . . . . . . . . . . . . 22 inches (56 cm)
Cutting Capacity
. . . . . . . . . . . . . . . . . . . . . . . . . . . . . . . . . . . . . . . . . . . . . . . . . . . . . . . . . . . . . . . . . . . . . . . . . . . . . . . . . . 1/2 inch (12.7 mm)
Weight (with Battery) . . . . . . . . . . . . . . . . . . . . . . . . . . . . . . . . . . . . . . . . . . . . . . . . . . . . . . . . . . . . . . . . . . . . . . . . . . . . . . . . . 8 lb 3 oz (3.7 kg)
CLEANING AND STORAGE
TROUBLESHOOTING
NOTE:
For maintenance beyond the minor adjustments listed above, please call the Customer Support Department at
1-877-282-8684
(U.S.)
or
1-800-668-1238
(Canada).
THE MOTOR OPERATES SLOWLY OR WILL NOT OPERATE
CAUSE
SOLUTION
The battery lacks sufficient charge
Charge the battery
The trimmer blade is jammed with debris
Clean the trimmer blade
ACCESSORIES (SOLD SEPARATELY)
Model #
A59 LBTY
. . . . . . . . . . . . .
A59LCHGR
. . . . . . . . . . . .
Description
20V Lithium-ion Battery
20V Lithium-ion Battery Charger
Part #
753-06579
. . . . . . .
753-06580
. . . . . . .
WARNING:
Before inspecting, cleaning, or servicing the unit, stop the motor, wait for all moving parts to stop, and
remove the battery. Failure to follow these instructions can result in serious personal injury or property damage.
CAUTION:
Some spray-on lubricants contain solvents and
will cause some types of grease to break down. To prevent
damage to the unit, only use a high-quality machine oil.
WARNING:
To avoid possible serious injury, never touch or adjust the trimmer blade while the motor is running. The
trimmer blade is very sharp; always wear protective gloves when performing maintenance to the trimmer blade.
DANGER:
If the trimmer blade gets caught on an electrical cord or wire, DO NOT TOUCH THE BLADE! IT MAY BE
ELECTRICALLY LIVE AND EXTREMELY DANGEROUS. Release the trimmer in the quickest and safest way. If possible,
disconnect the damaged electrical cord or wire from its power source. If that is not possible, call an electrician, electrical
contractor, or the power company for assistance. Failure to heed this danger warning will cause serious personal injury or
possible death.
WARNING:
Do not allow familiarity with this unit to promote carelessness. Remember that a careless fraction of a
second is enough to inflict serious injury.
WARNING:
Always wear appropriate eye and ear protection when operating this unit. Wear safety goggles, or safety
glasses with side shields, that are marked as meeting ANSI Z87.1-1989 standards. Failure to do so could result in serious
eye injury caused by thrown objects. If the operation is dusty, wear a facemask or dust mask. Use a hard hat or other type
of safety helmet.
WARNING:
If any parts are damaged or missing, do not operate the unit until the parts are replaced. Failure to heed this
warning could result in serious personal injury.
WARNING:
Wear non-slip gloves for maximum grip and protection. Refer to the
Safety Information
section for
appropriate safety equipment.
WARNING:
Do not attempt to remove cut material or hold
material to be cut while the trimmer blade is moving. Do not
grasp the trimmer blade when picking up or holding the unit.
Make sure the battery is removed and the switch lock is in the
locked or OFF position before clearing any jammed material
from the trimmer blade.