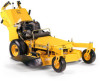
Cub Cadet PRO HW 336 Operation Manual - Page 10
Engaging the Drive, Engaging the Blades, Operating On Slopes, Setting Deck Height, Mowing
 |
View all Cub Cadet PRO HW 336 manuals
Add to My Manuals
Save this manual to your list of manuals |
Page 10 highlights
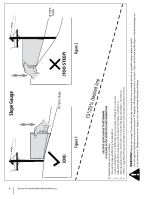
Engaging the Drive WARNING Avoid sudden starts, excessive speed and sudden stops. 1. Start the engine as instructed earlier in this section and move the throttle control into the FAST position. 2. Refer to Figure 3-1 for the following instructions. R N STOP F Figure 3-1 3. To travel FORWARD: a. Move the speed control lever forward to about one third of full speed (position 2) until you are fully familiar with the operation of the mower. b. Hold both steering levers and release the neutral latch levers from the neutral lock position. c. Slowly release the steering levers and the mower will move ahead in a straight line. To turn the mower, squeeze the steering lever on the side to which you want to turn. d. To stop the mower's forward motion, squeeze both steering levers until the mower stops and place the neutral latch levers into the neutral lock position. Important: Squeezing the left steering control only will create a counterclockwise pivot or U-turn and applying the right steering control only will create a clockwise pivot or U-turn. Applying both levers will stop the machine without turning. 3. To travel in REVERSE: DANGER Look behind the mower before and during reverse operation. Stop the mower blades before operating in reverse. a. Disengage the blades. b. Stop the mower's forward motion by squeezing both steering levers to the neutral position. WARNING To avoid possible bodily injury and to prevent damage to the transmission, the mower must be completely stopped before attempting to shift from forward to reverse or reverse to forward. c. Check that the area behind is clear. d. Slowly squeeze the steering levers and the mower will begin to move backward. WARNING Do not leave the operator's position without first disengaging the PTO. If leaving the mower unattended, also turn the engine off and remove the ignition key. Engaging the Blades WARNING To help avoid blade contact or a thrown object injury, keep bystanders, helpers, children and pets at least 75 feet from the machine while it is in operation. Stop machine if anyone enters the area. 1. Move the throttle control lever to the FAST position. 2. Engage the operator presence levers. 3. Pull up on the PTO knob until it engages and the blades start rotating. Operating On Slopes Refer to the SLOPE GAUGE in the Safe Operation Practices section to help determine slopes where you may safely operate the mower. WARNING Do not mow on inclines with a slope in excess of 15°/26% (a rise of approximately 2-1⁄2 feet every 10 feet). The mower could overturn and cause serious injury. • Mow across the face of slopes; never up and down. • Exercise extreme caution when changing direction on slopes. • Watch for holes, ruts, rocks, hidden objects, or bumps which can cause you to slip or trip. Tall grass can hide obstacles. • Always be sure of your footing. A slip and fall can cause serious personal injury. • Do not mow near drop-offs, ditches or embankments, you could lose your footing or balance. • Do not mow slopes greater than 15 degrees as shown on the slope gauge. • Do not mow on wet grass. Unstable footing could cause slipping. Setting Deck Height To adjust the deck height, adjust the clevis pin location in the deck adjustment pins and the deck lift adjustment collars. 1. Securely grasp one of the three handles on the deck (see Figure 3-2 for location) and lift slightly to remove the cotter pin (a). See Figure 3-3. Figure 3-2 (b) (c) (a) Figure 3-3 2. Raise or lower the deck on the deck adjustment pin (b) and in combination with the deck lift adjustment collar (c), find the desired height. 3. Insert the cotter pin (a) back into the deck adjustment pin (b) at the desired position. 4. Repeat these steps for the other three deck adjustment pins (b) making sure the height is the same for all four deck adjustment pins (b). Mowing The following information will be helpful when operating your mower. WARNING Plan your mowing pattern to avoid discharge of materials toward roads, sidewalks, bystanders and the like. Also, avoid discharging material against a wall or obstruction which may cause discharged material to ricochet back toward the operator. • Be sure area is clear of rocks, sticks, toys, wire, or other objects that could be thrown by the mower. Survey the entire area to be mowed. Make sure that the accessories and attachments would be suitable for use on the terrain. • Use care when approaching blind corners, shrubs, trees or other objects that could obstruct vision. • To mow grass and produce a striped pattern: • Pick a point on the opposite side of the area to be mowed (post, tree, shrub, etc). • If on a hillside, start at the bottom so that the turns are uphill rather than downhill. • Align the mower so as to head directly toward the object on the far side. • Slowly increase the speed of the machine to match cutting conditions, terrain, and operator familiarity with the controls and keep the machine headed directly toward the alignment object. Do not go fast as to reduce cut quality or to be uncomfortable in controlling the speed and direction of the machine. • When approaching the other end of a strip, slow down or stop before turning. A U-turn is recommended. 10 Section 3 - Controls & Operation
-
 1
1 -
2
-
3
-
4
-
 5
5 -
 6
6 -
 7
7 -
 8
8 -
 9
9 -
 10
10 -
 11
11 -
 12
12 -
 13
13 -
 14
14 -
 15
15 -
16
-
17
-
18
-
19
-
20
-
21
-
22
-
23
-
24
 |
 |
