Cub Cadet PRO Z 554S KW Owners Manual - Page 18
Executing a Zero Turn, Stopping the Tractor, Driving On Slopes, Operating The PTO knob, Using
 |
View all Cub Cadet PRO Z 554S KW manuals
Add to My Manuals
Save this manual to your list of manuals |
Page 18 highlights
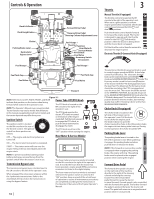
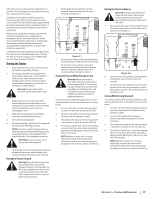
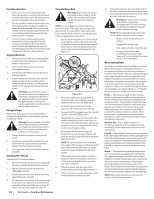
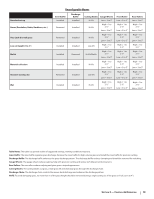
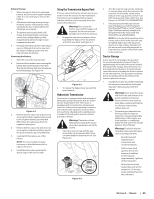
Executing a Zero Turn 1. A zero turn maneuver can be executed while the machine is moving in the forward or reverse directions if the steering wheel is turned completely in the one direction. 2. To turn clockwise when going forward, turn the steering wheel clockwise and depress the forward drive pedal. Release the pedal and the machine should stop turning. If the reverse drive pedal is depressed, the turn will be counter-clockwise. 3. To turn counter-clockwise when going forward turn the steering wheel counterclockwise and depress the forward drive pedal. Release the pedal and the machine should stop turning. If the reverse drive pedal is depressed, the turn will be clockwise. Stopping the Tractor 1. Allow the forward and reverse drive pedals to return the neutral position to stop the motion of the tractor. 2. Push the PTO knob downward to the disengaged position. 3. Use the deck lift pedal to raise the deck to its highest position. 4. If dismounting the machine, allow the drive pedals to return to the neutral position, engage the parking brake, turn the ignition switch to OFF and remove the key from the switch. Warning! Do not leave the seat of the tractor without disengaging the PTO knob, moving drive pedals to the neutral position, and engaging the parking brake. If leaving the tractor unattended, turn the ignition key off and remove key. Driving On Slopes Refer to the slope gauge in the Safe Operation Section to help determine slopes where you may not operate safely. Warning! Do not operate on inclines with a slope in excess of 20°/36% (a rise of approximately 4 feet every 10 feet). The machine could overturn and cause serious injury. 1. Always drive across slopes, never up and down. 2. Avoid turning downhill if possible. Start at the bottom of a slope and work upward. Always slow down before turning. 3. Use extra care and go slowly when turning downhill. Operating The PTO knob Operate the PTO knob as follows: 1. Move the throttle control lever (if equipped) to approximately the mid throttle position. 2. Pull the PTO knob switch upward to the "ENGAGED" position. 3. Advance the throttle lever to the operating speed (full engine speed). 4. The operator must remain in the tractor seat at all times. If the operator should leave the seat without turning off the power take-off switch, the tractor's engine will shut off. Using the Mower Deck Warning! Make certain the area to be mowed is free of debris, sticks, stones, wire or other objects that can be thrown by the rotating blades. NOTE: Do not engage the mower deck when lowered in grass. Premature wear and possible failure of the 'V" belt and PTO clutch will result. Fully raise the deck or move to a non grassy area before engaging the mower deck. 1. Use the deck lift pedal (a) to raise the deck to its highest position, place the clevis pin (b) attached to the tractor into the desired index hole on the deck height index, then slowly release the deck lift pedal (a). See Figure 3-3. (b) (a) Figure 3-3 2. Mow across slopes, not up and down. If mowing a slope, start at bottom and work upward to ensure turns are made uphill. 3. On the first pass pick a point on the opposite side of the area to be mowed. 4. Engage the PTO knob and move the throttle control to the FAST position. 5. Remove the clevis pin, raise the deck to the highest (transport) position and place the clevis pin in the desired position and secure with the clevis pin. Lower the mower deck to the desired height setting. 6. Slowly push the forward drive pedal forward to move the tractor forward, and keep the tractor headed directly toward the alignment point. NOTE: The speed of the tractor will affect the quality of the mower cut. Mowing at full speed will adversely affect the cut quality. Control the ground speed with the drive pedals. 7. When approaching the other end of the strip, slow down or stop before turning. A U-turn is recommended unless a pivot or zero turn is required. 8. Align the mower with an edge of the mowed strip and overlap approximately 3". 9. Direct the tractor on each subsequent strip to align with a previously cut strip. 18 Section 3 - Controls & Operation 10. To prevent rutting or grooving of the turf, if possible, change the direction that the strips are mowed by approximately 45° for the next and each subsequent mowing. Warning! Be careful when crossing gravel paths or driveways. Disengage the PTO knob and raise the deck to the highest/transport position before crossing. NOTE: When stopping the tractor for any reason while on a grass surface, always: • Make sure the drive pedals are in neutral. • Engage the parking brake. • Shut engine off and remove the key. • Doing so will minimize the possibility of having your lawn ''browned'' by hot exhaust from your tractor's running engine. Mower Cutting Blades The blades normally factory installed on a mower afford the best grass cutting performance on the majority of grasses and mowing conditions; however, there will be occasions whereby the grass type, stage of grass growth, soil conditions, and weather conditions will require different cutting blade types. Since the mower decks are designed so that over-lap of the cutting blades generally exceed 1.5", there is no need for orientation of one cutting blade to an adjacent blade (i.e., the blades do not need to be "timed" nor synchronized). Hi-lift - These are generally the best cutting blades for most grasses and mowing conditions. The Hi-Lift blades are the factory installed blades on these tractors. These blades will provide extra "lift" for the thinner leaf grasses, will handle lush grasses, and will provide maximum grass and debris discharge. These blades are generally required for material collection systems. More horsepower is required for these blades when compared to others, and they generally produce the highest noise levels. Medium-lift - These blades require less horsepower than the hi-lift, and they generally work well in wider leaf grasses and some mulch applications. Low-lift - These blades require less horsepower than hi-lift and medium-lift blades, and they generally work best with wide leaf grasses, sparse grass growth, and sandy soil conditions. They produce the lowest noise levels. Low-lift blades are configured without offset, and with a maximum amount of sharpened cutting edge. Mulch - These blades are generally designed for use in cutting decks equipped with mulch baffles. The shape of the blade generally produces higher turbulence in order that the grass can be repeatedly cut and re-cut into smaller pieces. These blades generally require more horsepower than other blades. Mulch blades work best when the grasses are cut at the highest levels, minimal lengths of grasses are removed, and grass conditions are generally dry. NOTE: Refer to the Attachment & Accessories section for a list of part numbers.
-
 1
1 -
2
-
3
-
4
-
5
-
6
-
7
-
8
-
9
-
10
-
11
-
12
-
 13
13 -
 14
14 -
 15
15 -
 16
16 -
 17
17 -
 18
18 -
 19
19 -
 20
20 -
 21
21 -
 22
22 -
 23
23 -
24
-
25
-
26
-
27
-
28
-
29
-
30
-
31
-
32
 |
 |
