Cub Cadet PRO Z 760L KW Owners Manual - Page 16
Driving the Tractor
 |
View all Cub Cadet PRO Z 760L KW manuals
Add to My Manuals
Save this manual to your list of manuals |
Page 16 highlights
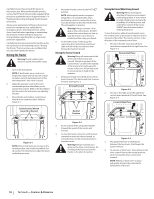
Carefully move (or have moved) the tractor to the practice area. When performing the practice session, the PTO knob should not be engaged. While practicing, operate the tractor at approximately 1⁄2-3⁄4 throttle and at less than full speed in both forward and reverse. Always wear appropriate clothing and personal protection equipment (e.g. safety glasses, long pants, gloves, hearing protection, safety shoes, hard hat) when operating or maintaining this machine. Follow all federal, state and local guidelines regarding the use of personal protective equipment. Carefully practice maneuvering the machine using the instructions in the following section "Driving the Tractor." Practice until you are confident that you can safely operate the tractor. Driving the Tractor Warning! Avoid sudden starts, excessive speed and sudden stops. 1. Turn on the fuel valve(s). NOTE: IF both tanks are on, and one is empty the engine will not start. Be certain to make sure both tanks have fuel or that the empty tank's fuel valve is closed. 2. Adjust the operator's seat to the most comfortable position that allows you to operate the controls. Refer to the Assembly & Set-Up section for instructions on adjusting the seat. 3. Move the RH and LH drive control levers inward in the neutral position. Refer to Figure 3-1. Control Levers Moved Inward & in Neutral 4. Move the throttle control to the FAST position. NOTE: Although the tractor's engine is designed to run at full throttle, when performing a practice session the tractor must be operated at less than full throttle. This only applies to practice. Warning! Always maintain a firm grip on the control levers. DO NOT release the control levers to slow or stop the tractor; move levers to neutral position using your hands. 5. To drive the tractor, firmly grasp the respective drive control levers with your right and left hands and continue with Driving the Tractor Forward. Driving the Tractor Forward Warning! Keep all movement of the drive control levers slow and smooth. Abrupt movement of the control levers can affect the stability of the tractor and could cause the tractor to flip over, which may result in serious injury or death to the operator. 1. Slowly and evenly move both drive control levers forward. The tractor will start to move forward. See Figure 3-2. Driving Forward Faster Slower Neutral Position Turning the Tractor While Driving Forward Warning! When reversing the direction of travel, we recommend performing gradual 'U' turns where possible. Sharper turns increase the possibility of turf defacement, and could affect control of the tractor. ALWAYS slow the tractor before making sharp turns. To turn the tractor while driving forward, move the control levers as necessary so that one lever is rearward of the other. The tractor will turn in the direction of the rearward control lever. 1. To turn to the left, move the left drive control lever rearward of the right lever. See Figure 3-3. Forward Left Turn Figure 3-3 2. To turn to the right, move the right drive control lever rearward of the left lever. See Figure 3-4. Forward Right Turn Figure 3-1 NOTE: If the control levers are not even in the neutral position, refer to the Assembly & SetUp section for instructions to adjust the levers so that they are even. Figure 3-2 2. As the control levers are pushed farther forward the speed of the tractor will increase. 3. To slow the tractor move the controls lever rearward to attain the desired speed, or move the levers to the neutral position to stop the tractor. Warning! Always maintain your grasp on the drive control levers. Do not release the levers to slow the tractor or to return to neutral. Figure 3-4 3. The greater the fore-to-aft distance between the two levers, the sharper the tractor will turn. 4. To execute a "pivot turn," move the turn side drive control lever to the neutral position, while moving the other control lever forward. NOTE: Making a "pivot turn" on grass will greatly increase the potential for defacement of the turf. 16 SECTION 3 - CONTROLS & OPERATION
-
 1
1 -
2
-
3
-
4
-
5
-
6
-
7
-
8
-
9
-
10
-
 11
11 -
 12
12 -
 13
13 -
 14
14 -
 15
15 -
 16
16 -
 17
17 -
 18
18 -
 19
19 -
 20
20 -
 21
21 -
22
-
23
-
24
-
25
-
26
-
27
-
28
-
29
-
30
-
31
-
32
 |
 |