Cub Cadet SC 500 hw SC 500 hw Operator's Manual - Page 19
Replacing Battery If Equipped, Charging Battery If Equipped
 |
View all Cub Cadet SC 500 hw manuals
Add to My Manuals
Save this manual to your list of manuals |
Page 19 highlights
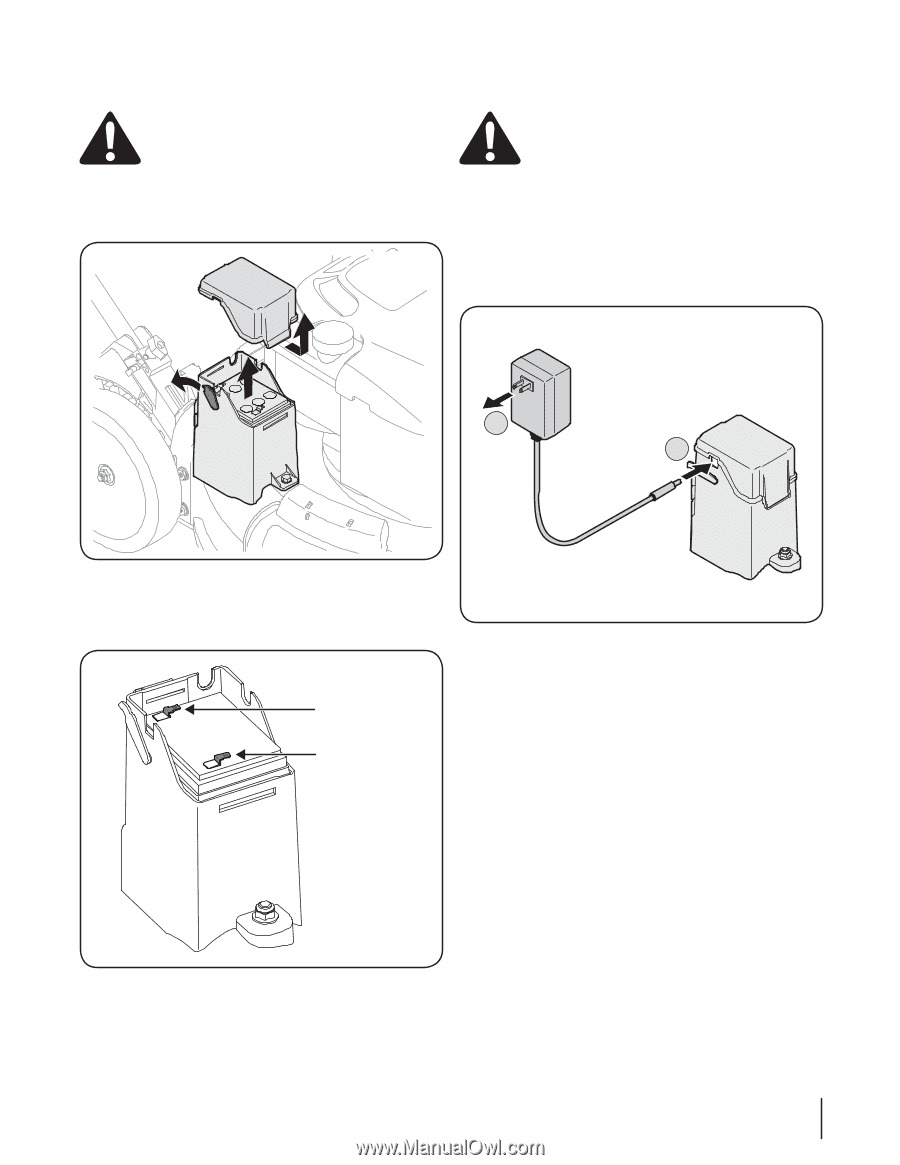
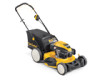
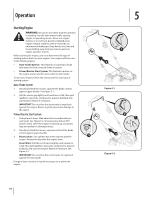
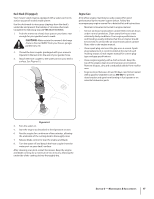
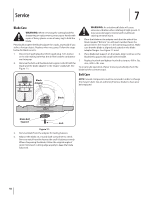
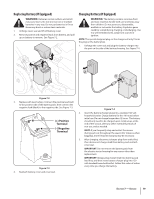
Replacing Battery (If Equipped) WARNING: Batteries contain sulfuric acid which may cause burns. Do not short circuit or mutilate batteries in any way. Do not put batteries in fire as these may burst or release toxic materials. 1. Unhinge cover seal and lift off battery cover. 2. Remove positive and negative leads from battery, and pull up on battery to remove. See Figure 7-2. Charging Battery (If Equipped) WARNING: The battery contains corrosive fluid and toxic material; handle with care and keep away from children. Do not puncture, disassemble, mutilate or incinerate the battery. Explosive gases could be vented during charging or discharging. Use in a well ventilated area, away from sources of ignition. NOTE: The special designed plug on the charger will only fit into the plug on the battery box. 1. Unhinge the cover seal and plug the battery charger into the port on the side of the battery housing. See Figure 7-4. 2 1 Figure 7-2 3. Replace with new battery. Connect the positive lead (red) to the positive side of the battery pack, then connect the negative lead (black) to the negative side. See Figure 7-3. (+) Positive Terminal (-) Negative Terminal Figure 7-3 4. Reattach battery cover and cover seal. Figure 7-4 2. Insert the battery charger plug into a standard 120 volt household outlet. Charge battery for 8 to 10 hours before initial use. Do not charge longer than 12 hours. The battery should only need to be charged upon initial setup, at the end of the season, after any other extended periods of non-use, and as needed. NOTE: If you frequently stop and restart the mower during each cut throughout the season (for instance when bagging), more frequent charging may be necessary. 3. After charging, disconnect charger plug from outlet first, then disconnect charger lead from battery and reattach cover seal. IMPORTANT: Do not remove the battery pack from the electric starter housing for any reason other than replacement. IMPORTANT: Always plug charger lead into battery pack lead first, and then insert battery charger plug into 120 volt standard household outlet. Follow this order of action every time you charge the battery. Section 7 - Service 19
-
 1
1 -
2
-
3
-
4
-
5
-
6
-
7
-
8
-
9
-
10
-
11
-
12
-
13
-
 14
14 -
 15
15 -
 16
16 -
 17
17 -
 18
18 -
 19
19 -
 20
20 -
 21
21 -
 22
22 -
 23
23 -
 24
24 -
25
-
26
-
27
-
28
 |
 |