Cub Cadet TANK LZ 54 TANK LZ 48 Operator's Manual - Page 28
Battery Storage, Tires, Lubrication, Spindle Pulleys, Pump Control & Pedal Control Area, Deck
 |
View all Cub Cadet TANK LZ 54 manuals
Add to My Manuals
Save this manual to your list of manuals |
Page 28 highlights
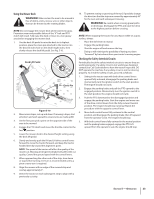
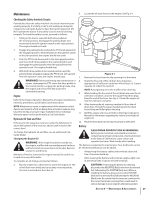
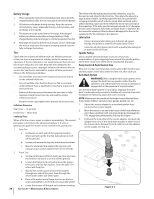
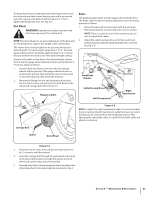
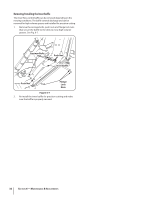
Battery Storage 1. When storing the tractor for extended periods, disconnect the negative battery cable. It is not necessary to remove the battery. 2. All batteries discharge during storage. Keep the exterior of the battery clean, especially the top. A dirty battery will discharge more rapidly. 3. The battery must be stored with a full charge. A discharged battery can freeze sooner than a charged battery. A fully charged battery will store longer in cold temperatures than hot. 4. Recharge the battery before returning to service. Although the tractor may start, the engine charging system may not fully recharge the battery. Tires Check the tire air pressure before each use. Inflation pressure of the rear tires is important for stability while the mower is in operation. If the tire diameter is not equal between the two tires, the mower will pull to one side. Keep the tires inflated to the recommended pressures. Improper inflation will shorten the tire service life. See the tire side wall for proper inflation pressures. Observe the following guidelines: • Do not inflate a tire above the maximum pressure shown on the sidewall of the tire. • Do not reinflate a tire that has been run flat or seriously under inflated. Have a qualified tire mechanic inspect and service the tire. • Balance inflation pressure between the rear tires to help maintain straight travel (see tire side wall for proper inflation pressure). • Keep the valve caps tightened to prevent air pressure loss. Inflation Pressure Rear Tires - 12 psi max Front Tires - 14 psi max Leaking Tires When a flat tire occurs, repair or replace immediately. The normal procedure is to remove the wheel and replace it. If a tire is getting soft, park the mower on the nearest level, paved area. 1. Rear Tire a. Put blocks on each side of the opposite traction wheel and jack up the tire that leaks about an inch off the ground. b. Loosen and remove the lug nuts and remove the wheel. c. Mount a wheel and tire, replace the lug nuts, and using a torque wrench, tighten them to 44-50 ft-lbs. 2. 28 Front Tire a. Set the park brake and block both rear tires and raise the front tire so that it is an inch off the ground. b. Loosen the flange lock nut and remove the spacer, hex screw and two flat washers from the yoke. The wheel will drop free. c. Slip the hex screw, spacer and one flat washer through one side of the yoke, then through the wheel to the other side of the yoke. d. Place a flat washer and a flange lock nut on the hex screw and tighten to 44-50 ft-lbs to secure the wheel. e. Lower the mower off the jack and continue mowing. Section 6- Maintenance & Adjustments The wheel with the leaking tire should be inflated to 12 psi for the rear tire and 14 psi for the front tire . Then place the wheel in a large bucket of water. Carefully inspect the tire, rim and valve for escaping air bubbles which indicate a leak. Mark each leak with a yellow marking crayon and then deflate the tire to 8 psi and repeat the inspection. If the leaks you find are pin hole size to 1⁄16" diameter, the tire can be repaired. If the leaks are larger than 1⁄16" diameter, the tire cannot be repaired. If the tire bead is damaged, the tire can be repaired or the tire will have to be replaced. Lubrication • Using a pressure lubricating gun, lubricate all grease fittings and points as noted in the Lubrication Chart. • Lubricate all other pivot points with a quality lubricating oil as noted in the Oil Chart. Spindle Pulleys Once a month remove the belt covers to remove any accumulation of grass clippings from around the spindle pulleys and V-belt. Clean more often when mowing tall, dry grass. Pump Control & Pedal Control Area Blow out or clean out the pump control area under the floor pan and the pedal control area under the foot rest after each use. Deck Wash System WARNING! When using the deck wash system, never engage the deck from any position other than the operator's seat of the tractor. Do not use an assistant or engage deck in the presence of any bystanders. Use the Deck Wash System to rinse grass clippings from the deck's underside and prevent the buildup of corrosive chemicals. Complete the following steps after each mowing: NOTE: Make certain the machine's discharge chute is directed away from people, children, animals, house, garage, parked cars, etc. 1. Attach the nozzle adapter to a standard garden hose connected to a water supply. 2. Move the tractor to an area within reach of the hose where you won't have a problem with wet grass clippings. Disengage the PTO, engage the parking brake, and stop the engine. 3. Pull back the lock collar of the nozzle adapter and push the adapter onto one of the deck wash nozzles at either end of the mower deck. Release the lock collar to lock the adapter on the nozzle. See Fig. 6-2. Figure 6-2
-
 1
1 -
2
-
3
-
4
-
5
-
6
-
7
-
8
-
9
-
10
-
11
-
12
-
13
-
14
-
15
-
16
-
17
-
18
-
19
-
20
-
21
-
22
-
 23
23 -
 24
24 -
 25
25 -
 26
26 -
 27
27 -
 28
28 -
 29
29 -
 30
30 -
 31
31 -
 32
32 -
 33
33 -
34
-
35
-
36
-
37
-
38
-
39
-
40
-
41
-
42
-
43
-
44
 |
 |