Cuisinart CB-18BK CB-18BKSS Manual - Page 4
Features And Benefits, Use And Care - blade
 |
View all Cuisinart CB-18BK manuals
Add to My Manuals
Save this manual to your list of manuals |
Page 4 highlights
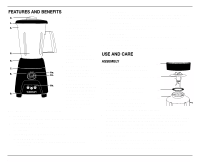
FEATURES AND BENEFITS 2. 1. Cover Just press on. Tightfitting 1. seal resists leakage. 3. 2. 2-oz. Measured Pour Lid Allows you to measure and add ingredients without removing the cover. 3. 50-oz. Stainless Steel Jar This unbreakable 5. stainless steel jar has easy-to-read graduation 6. marks. 4. Leak-proof Rubber 7. Gasket (not shown) 8. 8a. Holds the glass jar 8c. snugly in position for safe operation. 5. High-quality Cutting 8b. Assembly with Patented Stainless Steel Blades 9. Is strong enough for all blender tasks, including tough jobs, from ice crushing to chopping delicate herbs. Note: Blades are sharp ... handle carefully. 6. Locking Ring Is self-aligning so that the glass blender jar slides easily into position. 7. Heavy-duty Motor Base Is so sturdy and stable, it will not "walk" on your counter - even during ice crushing! 8. 18-Speed Dial with Push-button Controls a. 18-Speed Dial Control Choose from 18 speeds to blend ingredients to the desired consistency. b. Pulse Button Set the dial to the desired speed and press the Pulse button. Pulse at any speed to blend ingredients only as much as needed. c. Ice Crush Button Press the ice crush button to begin crushing. This button is preset to the best speed for crushing ice. 9. Slip-proof Feet Prevent movement during use and prevent damaging marks on countertops or tables. 10. Cord Storage (not shown) Keeps countertop safe and neat by conveniently storing excess cord. USE AND CARE ASSEMBLY (d) To use your Cuisinart® SmartPower Bar Basics™ Blender, begin by assembling the blender jar. 1. Turn the blender jar (a) upside down, and (c) place it flat on a sturdy surface. 2. Position the rubber gasket (b) on the round opening on the bottom (b) of the blender jar. 3. Turn the cutting assembly (c) (a) upside down, and place the blade end in the blender jar opening. Note: Blades are sharp ... handle carefully. 4. Secure the rubber gasket and cutting assembly into position by placing the smaller opening of the locking ring (d) on top of the cutting assembly. Engage threads by twisting the locking ring clockwise until tightened. Make sure locking ring is tightly fastened to blender jar. Once assembled, turn the blender jar right side up. 5. Push the cover onto the top of the blender jar. Push the measured pour lid into the cover. 6. Place blender jar on the motor base so that the jar markings are facing you and the handle is positioned to one side. 7. Plug in power cord. Your blender is now ready to be used. 4
-
 1
1 -
 2
2 -
 3
3 -
 4
4 -
 5
5 -
 6
6 -
 7
7 -
 8
8 -
 9
9 -
 10
10 -
11
-
12
-
13
-
14
-
15
-
16
-
17
-
18
-
19
-
20
-
21
-
22
-
23
-
24
 |
 |
