Cuisinart CPT-20 CPT-20 Manual - Page 4
USE AND CARE, Helpful Browning Notes, Notes on Specialty Uses
 |
UPC - 086279003102
View all Cuisinart CPT-20 manuals
Add to My Manuals
Save this manual to your list of manuals |
Page 4 highlights
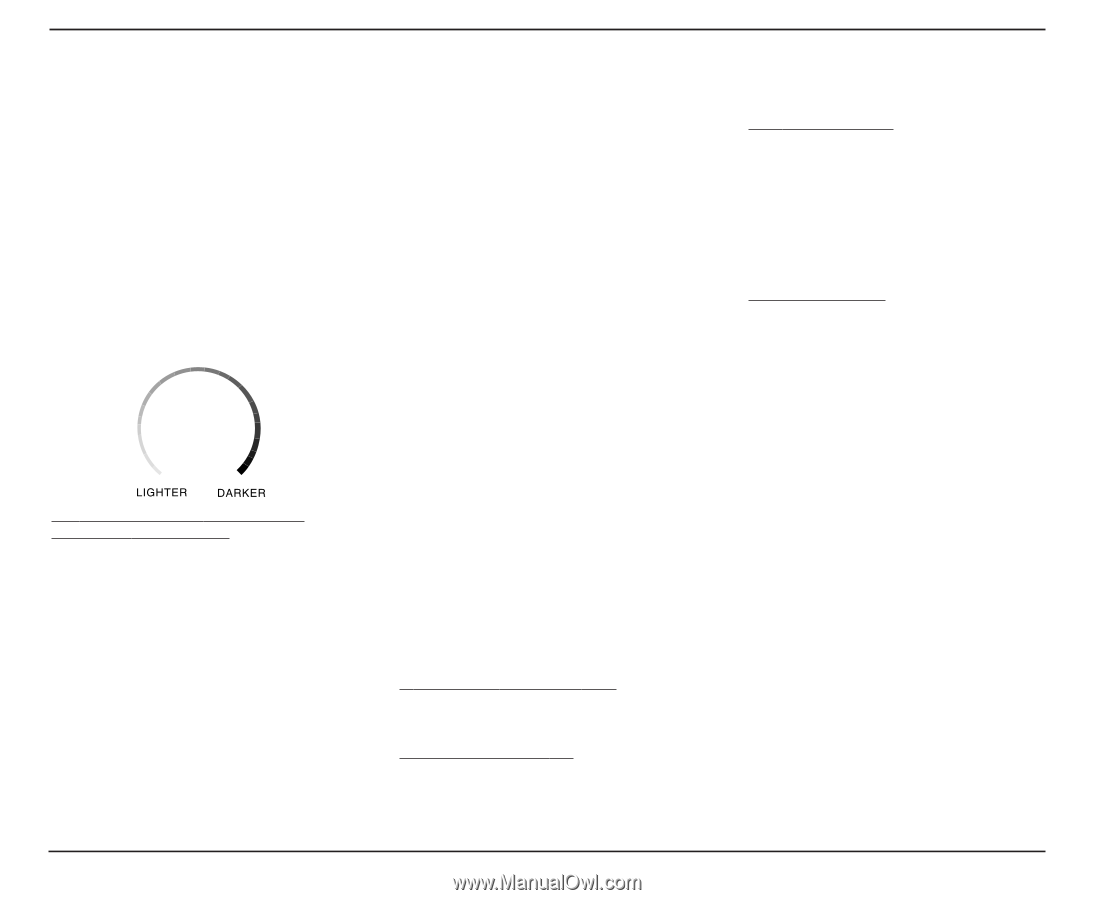
USE AND CARE Unwind the power cord. Check that the crumb tray is in place and that there is nothing in the toaster slot. Plug power cord into the wall outlet. 1. Insert slice(s) of bread. Be sure that the bread carriage is in the up position. 2. Set the Browning Control. Turn the rotary browning dial to the desired position. Toast gets darker as the dial is turned clockwise from left to right. The browning dial can be adjusted either before or after pressing down the Start / Carriage Lever. There is a color band around the dial to select the browning setting. The browning guide is as follows: Desired Color Light Dial Position 1st third of color band Medium 2nd third of color band Dark Final third of color band 3. Begin Toasting. Press the Start / Carriage Lever down until it locks into position. The toaster will start. 4. If desired, Select a Special Setting on the button control after the Start / Carriage Lever is pushed down. If no Special Settings are selected, the toaster will brown your toast based on the selection you have made on the browning dial. 4 If you desire a Special Setting, press one of the following buttons: Defrost - for defrosting, then toasting. Adds time to the standard toast cycle for defrosting. Reheat - for reheating pretoasted bread. When you press one of these Special Settings, a red LED light will come on above the selected feature button. 5. To Stop Toasting. When the toasting cycle is finished, the toast will be raised. If you wish to stop the cycle before it is finished, simply press the Cancel Button. You can also lift up the Start / Carriage Lever to stop the cycle. Pressing the Cancel Button will also cancel the Special Settings. Helpful Browning Notes: Toasting is a combination of cooking and drying the bread. Therefore, differences in moisture level from one bread to another can result in varying toasting times. For slightly dry bread, use a lighter setting than you normally would. For very fresh bread or whole wheat bread, use a darker setting than normal. Dense, moist breads may also require a darker setting. Breads with very uneven surfaces (such as English muffins) will require a higher (darker) browning setting. Thickly cut pieces of bread (including bagels) will take longer to toast, sometimes significantly longer, since more moisture must be evaporated from the bread before toasting can occur. For moister breads or very thick pieces you may need to make the toast setting darker than you normally would. Very thick pieces may require two cycles. Before toasting bagels, slice into two equal halves. When toasting raisin breads, fruit breads, or fruit muffins, remove any loose fruit, etc. from the surface of the bread before placing into the toaster. This will help prevent pieces from falling into the toaster or sticking on the guard wires in the slot. A single slice of toast requires less toasting time than two slices of bread. To prevent overtoasting of a single slice, set the browning control to a lighter setting than you normally would. Each chamber is designed for 2 slices of bread. By lowering the toasting time for a single slice, your bread won't get too brown. Notes on Specialty Uses: Toaster Pastries: Exercise caution with toaster pastries; the filling can become quite hot long before the surface of the pastry becomes browned. A lighter setting should be adequate. Never leave toaster pastries unattended while toasting or warming. Avoid iced pastries. The icing can melt onto inside of toaster or burn easily. Muffins: Require longer toasting time than regular breads. Slice muffins vertically and remove paper wrapper before toasting. English Muffins & Thick Sliced Breads: Require longer toasting time than regular breads. We suggest that you increase the darkness setting on the browning dial to increase the toasting time.
-
 1
1 -
 2
2 -
 3
3 -
 4
4 -
 5
5 -
 6
6 -
 7
7 -
 8
8
 |
 |