Cuisinart DCB-10 Owner Manual - Page 6
Getting To Know Your Control Panel
 |
View all Cuisinart DCB-10 manuals
Add to My Manuals
Save this manual to your list of manuals |
Page 6 highlights
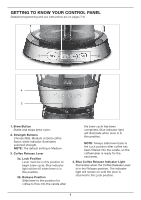
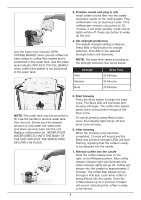
GETTING TO KNOW YOUR CONTROL PANEL Detailed programming and use instructions are on pages 7-8. 1 2 4 3 3a. 3b. 1. Brew Button Starts and stops brew cycle. 2. Strength Buttons Choose Mild, Medium or Bold coffee flavor; white indicator illuminates selected strength. NOTE: The default setting is Medium. 3. Coffee Release Lever 3a. Lock Position Lever must be in this position to begin brew cycle. Blue indicator light will be off when lever is in this position. 3b. Release Position Slide lever to this position for coffee to flow into the carafe after the brew cycle has been completed. Blue indicator light will illuminate when lever is in this position. NOTE: Always slide lever back to the Lock position after coffee has been filtered into the carafe, so the coffeemaker is ready for the next brew. 4. Blue Coffee Release Indicator Light Illuminates when the Coffee Release Lever is in the Release position. The indicator light will remain on until the lever is returned to the Lock position. 6
-
 1
1 -
 2
2 -
 3
3 -
 4
4 -
 5
5 -
 6
6 -
 7
7 -
 8
8 -
 9
9 -
 10
10 -
 11
11 -
 12
12
 |
 |
