Cuisinart DCC-1000R DCC-1000BK Manual - Page 8
Making Coffee - filter brew carafe red
 |
View all Cuisinart DCC-1000R manuals
Add to My Manuals
Save this manual to your list of manuals |
Page 8 highlights
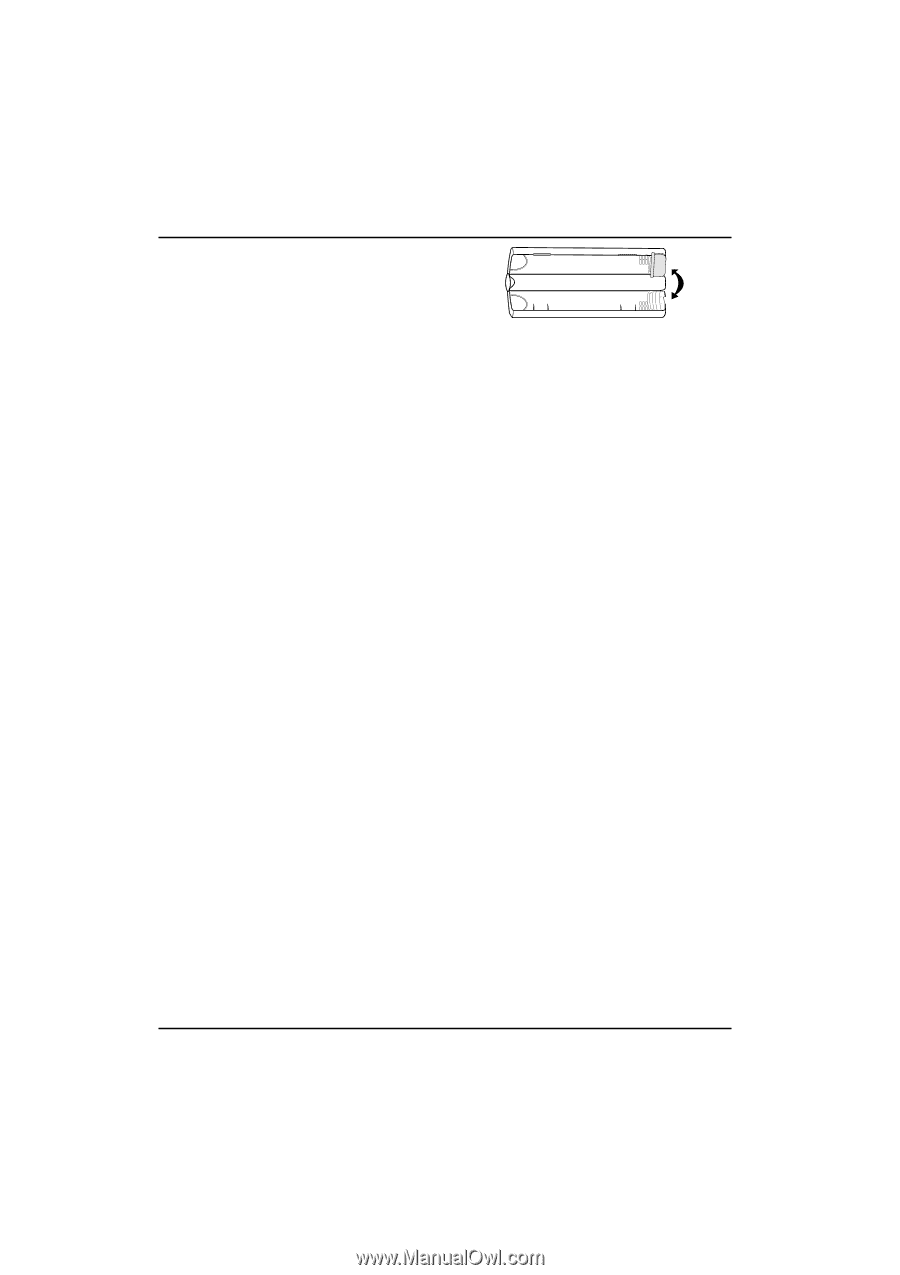
the programming function is in use, and the brewing cycle will begin at the programmed time. At the programmed time, the red light will come on with green light, indicating that the brewing cycle is starting. Both lights will go off after keep warm cycle. NOTE: if you leave the control knob in the auto-on position and let the auto-off function turn off the unit, it will not function again in auto-on mode. To activate auto-on again, you must turn the knob to any other position, then back to auto-on. 4. To program the Variable Auto Off: Turn the function knob to the "Auto Off" position. Press and hold the "Hour" button for five seconds, until the clock display starts blinking. To change the hour and minutes, use the pushbuttons as you would to set the time of day. The Auto Off time can be set from zero to four hours in minute increments. At the end of the keep warm cycle, two beeps will sound. If no auto off time is set, the coffeemaker will turn off after two hours. MAKING COFFEE Before making the first pot of coffee in your new Cuisinart® Filter Brew™ Deluxe Coffeemaker, we recommend operating the coffeemaker once using only water and a filter paper. This will remove any dust or residues in the system that remain from the manufacturing process. 1. Insert the Water Filter a. Remove the filter from polybag and soak in cold tap water for 15 minutes. b. Remove the water filter holder from the coffeemaker by lifting it out of the reservoir area with your thumb and forefinger. c. Hold the water filter holder lengthwise and place thumbs in slots directly under arrows. d. Pull open in opposite directions with thumbs. e. Place the filter in the holder recess area at the bottom of the water filter holder. NOTE: It will only fit correctly in one end of this unit. f. Close the water filter holder; you will hear a snap indicating it is in place. g. Hold the filter under cold running tap water for 10 seconds to flush. You should place the hole openings in the side of the unit directly under the water stream. h. Allow the filter to drain completely. i. Replace the water filter holder in the reservoir area of the coffeemaker, pushing it all the way down to the base of the unit. 2. Fill the water reservoir: Remove the carafe from the heating plate. Open the carafe cover and fill with cold water to just over the amount of coffee you are making. This is to account for the amount of water lost in wetting the grounds and lost as steam during the brewing process. Close the carafe cover. Lift the lid of the water reservoir and pour the water from the carafe into it. Replace the carafe on the heating plate. 3. Add the ground coffee: Remove the filter basket by grasping the handle and lifting straight up, and place it on the countertop. Insert a #4 paper filter or permanent filter. Be sure that the paper filter is completely open and fully inserted into the basket. It may help to fold and flatten the seams of a paper filter beforehand. Add the desired amount of ground coffee, corresponding to the number of cups being brewed. Many coffee bars and the Specialty Coffee Association of America recommend adding 2 rounded tablespoons of coffee per 6 ounces of water. Some coffee manufacturers recommend using one tablespoon per cup. We recommend using 1 tablespoon of ground coffee per cup, but use more or less to suit your taste. NOTE: The maximum capacity for ground coffee is 15 tablespoons for this 12 cup coffeemaker. Exceeding these amounts may cause overflow if the coffee is too finely ground. Replace the filter basket in the filter basket holder and flip the water reservoir lid closed. Be sure that it closes securely in place. 7
-
 1
1 -
2
-
 3
3 -
 4
4 -
 5
5 -
 6
6 -
 7
7 -
 8
8 -
 9
9 -
 10
10 -
 11
11
 |
 |