Cuisinart DCC-1100C User Guide - Page 3
Features And Benefits, Contents, Introduction, The Quest For, The Perfect Cup, Of Coffee
 |
UPC - 068459244895
View all Cuisinart DCC-1100C manuals
Add to My Manuals
Save this manual to your list of manuals |
Page 3 highlights
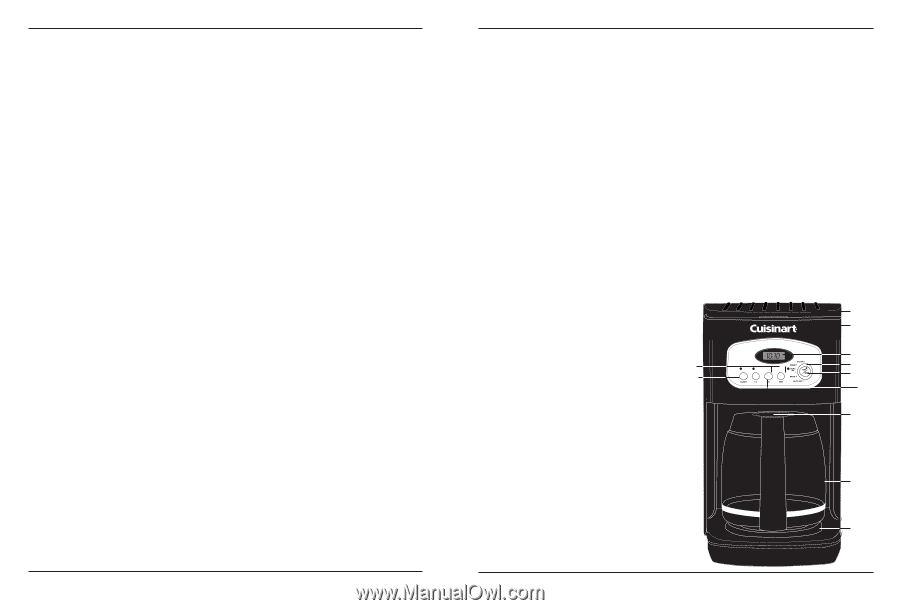
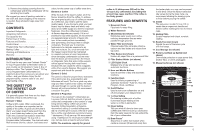
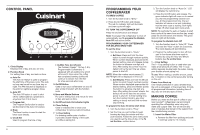
6. Remove the polybag covering from the coffeemaker and lift the coffeemaker off the remaining two inserts. We suggest you save all packing materials in the event that future shipping of the machine is needed. Keep all plastic bags away from children. CONTENTS Important Safeguards 2 Unpacking Instructions 3 The Quest for the Perfect Cup of Coffee 4 Features and Benefits 5 Control Panel 6 Programming Your Coffeemaker 7 Making Coffee 7 Cleaning and Maintenance 9 Warranty 10 INTRODUCTION You'll love the way your new Cuisinart Classic™ 12-Cup Programmable Coffeemaker looks on your counter, as it's brewing 12 cups (1.8 L) of fabulous coffee. The Cuisinart Classic™ 12-Cup (1.8 L) Programmable Coffeemaker is a statement about how serious you are about your coffee - and your kitchen. Enjoy the full programmability, extreme ease of use, and great tasting coffee. THE QUEST FOR THE PERFECT CUP OF COFFEE It is generally agreed that there are four basic elements critical to the perfect cup: Element 1: Water Coffee is 98% water. Often overlooked, the quality of the water is as important as the quality of the coffee. A good rule of thumb is that if your water doesn't taste good from the tap, it won't taste any better in your coffee. That's why Cuisinart has added a water filter to the Cuisinart Classic™ 12-Cup (1.8 L) Programmable Coffeemaker. The charcoal water filter removes chlorine, calcium, bad tastes and odors, for the purest cup of coffee every time. Element 2: Coffee While the bulk of the liquid is water, all of the flavour should be from the coffee. To achieve the same great quality cup of coffee you receive at a coffee bar, you need to use the same quality beans. If you choose to grind your own beans, buy the beans fresh and whole, only about a two-week supply at a time for maximum freshness. Once the coffee bean is broken, its flavour degrades very quickly. If it is not practical to buy small supplies, we recommend you separate larger amounts of beans into one- to two-week portions immediately after purchasing, and freeze them in airtight containers. The best way to maximize freshness is to minimize exposure to air, light and moisture. So, once removed from the freezer, beans should be maintained in a sealed container at room temperature, since damaging condensation occurs every time the beans are removed from the freezer or refrigerator. Note that some coffee experts advise against freezing dark-roast beans because this can cause the oils to coagulate, while other experts disagree. We suggest you experiment and decide for yourself. Element 3: Grind The grind is critical for proper flavour extraction. If the grind is too fine, overextraction and bitterness will result. Too fine a grind may also clog your filter. If grind is too coarse, the water will pass through too quickly and the desired flavours will not be extracted. We recommend a medium-fine grind. Element 4: Proportion The cups on the Cuisinart® coffeemaker are 5 ounces (148 ml). Add the amount of ground coffee that corresponds to the number of cups being brewed. Many coffee bars and the Specialty Coffee Association of America recommend adding 2 rounded tablespoons (30 ml) of coffee per 6 ounces (170 ml) of water. Some coffee manufacturers recommend using 1 tablespoon (15 ml) per cup. We recommend using 1 tablespoon (15 ml) of ground coffee per cup, but use more or less to suit your taste. NOTE: The maximum capacity for ground 4 coffee is 15 tablespoons (225 ml) for this 12-cup (1.8 L) coffeemaker. Exceeding this amount may cause overflow if the coffee is too finely ground. FEATURES AND BENEFITS 1. Reservoir Cover Flips back for easy filling. 2. Water Reservoir 3. Showerhead (not shown) Distributes water evenly over coffee, reducing temperature loss as water passes through grounds. 4. Water Filter (not shown) Charcoal water filter eliminates chlorine, calcium and bad tastes and odours from tap water. 5. Filter Basket (not shown) Holds a #4 paper filter or a permanent filter. 6. Filter Basket Holder (not shown) 7. LCD Digital Clock Displays time of day and set time for automatic functions. 8. Hour and Minute Buttons Used to set time of day and automatic functions. 9. Function Knob Used to initiate programming of automatic functions - Auto On, Auto Off, Program, Clock, and Brew. 10. On/Off Button Used to turn your coffeemaker on and off and program your delayed brew. 11. 1-4 Cup Setting For brewing smaller pots of coffee. It provides double heating of the water, so coffee is piping hot. 12. Clean Setting Tells you when it's time to clean your coffeemaker. Remove built-up calcification from the water reservoir, to help extend the life of your coffeemaker. 13. Brew Pause™ Stops flow of coffee from basket when carafe is removed (30 seconds max) from the heater plate, so a cup can be poured in mid-brew. Since the flavour extraction rate varies during the brew cycle, we recommend allowing the brewing cycle to finish before pouring the coffee. 14. Carafe The easy-pour, no-drip 12-cup (1.8 L) carafe has an ergonomic handle and brewed coffee markings for two to twelve cups. 15. Heating Plate Scratch resistant with black, nonstick coating. 16. Ready Tone (not shown) Signals the end of the brew cycle with five beeps. 17. Cord Storage (not shown) 18. Power Loss Back-up System (not shown) One-minute protection in case power fails, breaker trips, or unit is unplugged. 19. Measuring Scoop (not shown) 1 2 7 8 9 12 10 11 13 14 15 5
-
 1
1 -
 2
2 -
 3
3 -
 4
4 -
 5
5 -
 6
6
 |
 |