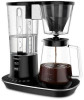
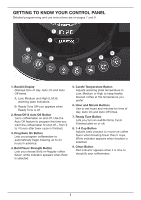
Cuisinart DCC-4000 User Manual - Page 7
Before Brewing Your, First Pot Of Coffee, Programming Your, Coffeemaker
 |
View all Cuisinart DCC-4000 manuals
Add to My Manuals
Save this manual to your list of manuals |
Page 7 highlights
BEFORE BREWING YOUR FIRST POT OF COFFEE Rinsing your coffeemaker: During the manufacturing process, dust can get trapped in the unit. We recommend flushing out the system before brewing your first pot of coffee. Simply fill the reservoir, power on the unit, and follow steps 1, 3 and 5 on page 8 under MAKING COFFEE. Do not add coffee! Charcoal Water Filter Your coffeemaker comes with a charcoal water filter that eliminates chlorine, bad tastes and odors from tap water. Inserting the Water Filter • Remove the filter from polybag and soak it, fully immersed, in cold tap water for 15 minutes. • Lift the water filter holder out of the water reservoir. • Press down on the filter compartment and pull toward you to open. • Place filter into the holder and snap it closed. Be careful - improper placement can tear the filter skin. • Flush filter by running cold tap water through holes in bottom of compartment for 10 seconds. • Allow the filter to drain completely. • Slide the water filter holder back into the channel in the water reservoir, pushing it down to the base of the unit. NOTE: We recommend changing the water filter every 60 days or after 60 uses, and more often if you have hard water. Replacement filters can be purchased in stores, by calling Cuisinart Customer Service, or at www.cuisinart.com PROGRAMMING YOUR COFFEEMAKER SETTING THE CLOCK When the coffeemaker is plugged in, 12:00 will flash in the display for 10 seconds, indicating the unit is in Clock Set mode. If 12:00 stops flashing, simply press and hold Hour or Minute button to return to flashing Clock Set mode. Setting Hours and Minutes Press either button to select the desired time. Hold buttons down to scroll through the digits quickly, or press and release to advance one digit at a time. Be sure the PM indicator is on if setting a PM time. SETTING THE AUTO ON TIME 1. Press and hold the Prog/Auto On button for 2 seconds. The digital display will flash the default (12:00) or previously selected time. Follow directions under SETTING THE CLOCK (above) to program your startbrew time. Five seconds after finishing, the unit will automatically exit Auto On Setup mode and the indicator light will illuminate, letting you know Auto On is activated. NOTE: To exit Auto On Setup mode, you can also just press Auto On button again. 2. To activate Auto On using previously selected time: Press the Prog/Auto On button. Previously set time will appear and indicator will light up. Display will return to clock setting. 3. To deactivate Auto On: Press illuminated Auto On button; light will go off, indicating mode is turned off. 7
-
 1
1 -
 2
2 -
 3
3 -
 4
4 -
 5
5 -
 6
6 -
 7
7 -
 8
8 -
 9
9 -
 10
10 -
 11
11 -
 12
12 -
13
-
14
-
15
-
16
-
17
-
18
-
19
-
20
-
21
-
22
-
23
-
24
-
25
 |
 |
