Cuisinart DGB-300BK DGB-300BK Manual - Page 12
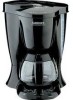
Making Coffee - new automatic grind and brew 10 cup coffeemaker
 |
View all Cuisinart DGB-300BK manuals
Add to My Manuals
Save this manual to your list of manuals |
Page 12 highlights
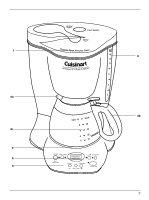
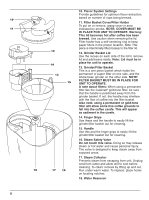
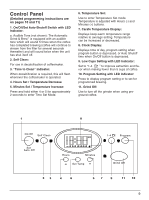
TURNING OFF GRIND FUNCTION To turn off the grinding function, press the "Grind Off" button. A yellow LED will be illuminated. Then press the "On" button. MAKING COFFEE Before you make the first pot of coffee in your new Cuisinart® Coffee Bar™ Automatic Grind & Brew™ coffeemaker, we recommend operating the coffeemaker once, using only water and a paper filter. This will remove any dust or residues which remain in the system from the manufacturing process. 1. Fill the Water Reservoir Remove the carafe from the hot plate. Open the carafe cover and fill with cold water to just over the amount of coffee you are making. Close the carafe cover. Press the reservoir lid to open. Pour the water from the carafe into reservoir. The numbers on the water reservoir indicate a slightly higher amount of water per cup than the carafe markings. This is to compensate for the amount of water lost in wetting the grounds, and lost as steam during the brewing process. The float on the water window indicates the amount of water necessary to brew the corresponding amount of coffee. Replace the carafe on the hot plate. 2. Set the Flavor System The Flavor System has been designed to extract the proper coffee flavor compounds when the dial is positioned according to the number of cups being brewed. NOTE: If you use less than the recommended coffee measure, or you use a grind that is finer than the recommended grind, set the Flavor System to a higher cup setting. This takes more water away from the grounds, preventing overextraction. Conversely, if you use more coffee or a coarser grind, set Flavor System to a lower setting. To deactivate the Flavor System, turn the selector knob counterclockwise to the "OFF" setting. 3. Add Beans/Filter Lift the grinder basket lid, using the recess on either side. Fill the basket with the desired quantity of beans. Lift the filter basket cover/filter holder. (See parts list for best location to grasp). Place a #4 cone filter or a permanent filter in the basket. Note: When using a permanent filter, be sure that the filter handle is facing away from the grinder basket. If you do not do so, the handle may interfere with the flow of ground coffee into the filter basket. Also note: a permanent filter may allow some ground coffee to flow into carafe. The filter holder will help to keep the filter open, but when using a paper filter, be sure that the filter is completely open and fully inserted into the basket. To make a full pot of coffee (10 cups), fill the grinder basket to the top. To make fewer than 10 cups of coffee, we suggest that you use about 1 tablespoon of whole beans per cup. Note: One measuring scoop is approximately equal to one tablespoon. For 1 or 2 cups, use 1-1/2 tablespoons per cup. Adjust the recipe according to your individual taste. 4. Close the Reservoir Lid Press down to lock. To prevent coffee grounds from escaping the grinding chamber, make sure reservoir lid is locked. The Automatic Grind & Brew™ is equipped with a Safety Interlock System. The Grind & Brew™ will not operate if the cover of the unit is open more than 1/2 inch or the grinder cover and/or the filter cover are left out. Because grinder blades spin during operation, the Grind & Brew™ will not operate if the cover of the unit is open. If you try to turn the unit on with the cover open, the unit will beep continuously until the missing parts are installed and you close the lid. The unit will also beep if you open the lid during the brewing process. The grinder will stop grinding or, if brewing, the brewing will stop. Once the missing parts are installed and the cover is closed, the beeping will stop. The brewing process can be restarted by pressing the "On" button. Restarting the process will not affect coffee 12
-
 1
1 -
2
-
3
-
4
-
5
-
6
-
 7
7 -
 8
8 -
 9
9 -
 10
10 -
 11
11 -
 12
12 -
 13
13 -
 14
14 -
 15
15 -
 16
16
 |
 |