Cuisinart SPB-7CHP1 User Manual - Page 3
Unpacking Instructions, Contents, Features And Benefits
 |
View all Cuisinart SPB-7CHP1 manuals
Add to My Manuals
Save this manual to your list of manuals |
Page 3 highlights
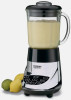
UNPACKING INSTRUCTIONS 1. Place the gift box containing your Cuisinart® SmartPower® 7-Speed Electronic Blender on a flat, sturdy surface before unpacking. 2. Remove instruction booklet and other printed materials from top of corrugated insert. Next remove the top corrugated insert. 3. Carefully lift blender base from box and set aside. 4. Remove the lower corrugated insert containing the blender jar assembly. Be careful not to tip the jar when removing. 5. Remove any additional literature from the box. To assemble the blender, follow the Assembly instructions on page 4 of this instruction booklet. Replace all corrugated inserts in the box and save the box for repackaging. Before using for the first time: Wash all parts according to the Cleaning and Maintenance section on page 6 of this booklet to remove any dust or residue. CONTENTS Important Safeguards 2 Unpacking Instructions 3 Features and Benefits 3 Use and Care/Assembly 4 Helpful Reminders 4 Operation 4 Easy Reference Guides 5 Cleaning and Maintenance 6 Do's and Don'ts 6 Recipe Tips 7 Recipes 8 Warranty Information 19 FEATURES AND BENEFITS 1. Cover Just press on. Tight fitting seal resists leakage. 2. 2-oz. Measured Pour Lid Allows you to measure and add ingredients without removing the cover. 3. 40-oz. Glass Jar with Dripless Pour Spout Has a unique, sturdy, widemouth design and a dripless pour spout for no mess pouring. 4. Leak-proof Rubber Gasket (not shown) Holds the glass jar snugly in position for safe operation. 5. High-quality Cutting Assembly Is strong enough for all blender tasks, including tough jobs, from ice 2. crushing to chopping delicate herbs. 1. 6. Locking Ring 3. Is self-aligning so that the glass blender jar slides easily into position. 7. Heavy-duty Motor Base Is so sturdy and stable, it will not "walk" on your counter - even dur- ing ice crushing! 5. 8. 7-Speed Touchpad Control with Indicator Lights Is easy to use, read and clean. The 6. red LED lights clearly indicate what blender speed you are using. 7. 8a. Pulse at Any Speed Button Allows you to pulse at any speed 8b. from high to low, so you can blend 8. 8a. ingredients only as much as needed. 8b. Ice Crush Button This button is preset to the best speed for crushed ice. 9. 9. Slip-proof Feet Prevent movement during use and prevent damaging marks on countertops or tables. 10. Cord Storage (not shown) Keeps countertop safe and neat by conveniently storing excess cord. 3
-
 1
1 -
 2
2 -
 3
3 -
 4
4 -
 5
5 -
 6
6 -
 7
7 -
 8
8 -
 9
9 -
10
-
11
-
12
-
13
-
14
-
15
-
16
-
17
-
18
-
19
-
20
-
21
-
22
-
23
-
24
-
25
-
26
-
27
-
28
-
29
-
30
-
31
-
32
-
33
-
34
-
35
-
36
-
37
-
38
-
39
-
40
-
41
 |
 |
